Setting Current Date and Time
Overview:
The location is synchronized after the settings are configured in the Hydrawise app. The time zone and forecast are automatically set when the location is entered during the app set up wizard process. In the event this setup needs to be changed or updated, we recommend editing the setting in the application under the Weather Station tab.
Steps:
- Login to the Hydrawise account or app.
- Select on the MENU
 icon on the upper left-hand side of the app. If accessing from a web browser, select the
  icon on the upper right-hand side.
 - Select CONTROLLER SETTINGS.
- Select WEATHER STATIONS.
- Enter the COMPLETE STREET ADDRESS. The regional setting will automatically be updated to the correct timezone.
| Instructional Media Clip: |
 |
Next Article - Set Up Basic Program
Setting a Basic Program - Time Based
Overview:
Standard Mode allows you to create traditional irrigation programs using Programs A, B, and C — just like Hunter X-Core® or Pro-C® controllers. This mode offers less flexibility than Hydrawise Advanced Mode. Key features include:
- Six programs available with six start times each
- Zones already labeled in the program for easier selection
- Once a zone is selected, the zone run time is visible
- Predictive WateringTM options that only apply to that program
Time-based watering will water on specific days (unless delayed by rainfall or forecast rainfall) and will vary the watering length based on your watering triggers. The controller will use the Watering Triggers you’ve set to automatically adjust its watering schedule.
Steps:
Click on ZONES AND SCHEDULES from the home dashboard, then select PROGRAMS. Scroll over to ADD PROGRAM and click on the  icon.
icon.
- Enter in a PROGRAM NAME, then select the watering type TIME BASED. Click NEXT.
- Choose the WATER DAYS (Blue means water). Options are listed below.
- Specific days to water (most common)
- Even or Odd day watering
- Interval days - See article here for details
- Enter in START TIMES (Up to six max), then select NEXT.
- Select ZONES. The edit box will only appear if you check the zone box. Add RUN TIMES using the up arrows in the box. When finished here, select NEXT.
- Predictive watering adjustments - Adjusted based on your water triggers
- Monthly adjustments can be made using a chart as well. This will allow the run times set in a program to change by month as a global percentage (e.g; June 80%, July 90%, August 100%).
- Click OK when adjustments are complete.
| Instructional Media Clip: |
 |
Setting Start Times - Standard Mode
Overview:
One start time will activate all stations sequentially in that program. Multiple start times in a program can be used for the separate morning, afternoon, or evening watering cycles. Start times may be entered in any order as the software will wort them based on the time of day.
Steps:
- Login to the Hydrawise account or app.
- Select on the MENU
 icon on the upper left-hand side of the app. If accessing from a web browser, select the
  icon on the upper right-hand side.
 - Select ZONES & PROGRAMS.
- Select PROGRAMS.
- Select the
 icon for the program that requires the change.
 - Select NEXT in the zone details.
- Click inside the START TIME text box. Select a start time.
- Select OK to save.
| Instructional Media Clip: | |
 |
Next Article - Setting Run Times
Setting Station Run Times - Standard Mode
Overview:
The Set Station Run Times mode allows you to enter a length of run time for each station assigned to a particular program. Each station that has a run time associated with a program will be activated and operate one after another sequentially with each start time for that program. If you choose to edit the RUN TIME for each station (zone) in STANDARD MODE, please review the steps and screenshots below to access this feature.
Steps:
- Login to the Hydrawise account or app.
- Select on the MENU
 icon on the upper left-hand side of the app. If accessing from a web browser, select the
  icon on the upper right-hand side.
 - Select ZONES & PROGRAMS.
- Select PROGRAMS.
- Select the
 icon for the program that requires the change.
 - Select NEXT 2X in the zone details.
- Click on SELECT ALL ZONES so they appear in the selection bar to the right.
- Enter the watering RUN TIME in minutes for each zone. Select DONE, then OK to save.
| Instructional Media Clip: | |

|
Next Article - Setting Water Days
Setting Days to Water - Standard Mode
Overview:
When using the WATER DAYS function, you can select the days you would like to water for each program independently. There are three options for choosing the days you want to water: selected days of the week, odd/even day watering, and interval watering.
Selected Days of the Week Watering
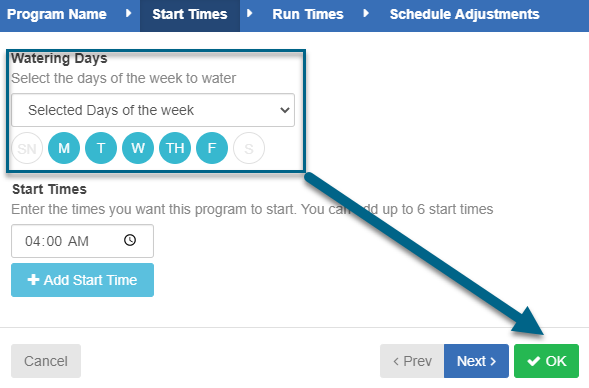
This is the most commonly used method for selecting water days. Use this feature to water on specific days of the week (e.g., Monday, Wednesday, and Friday).
Odd/Even Day Watering
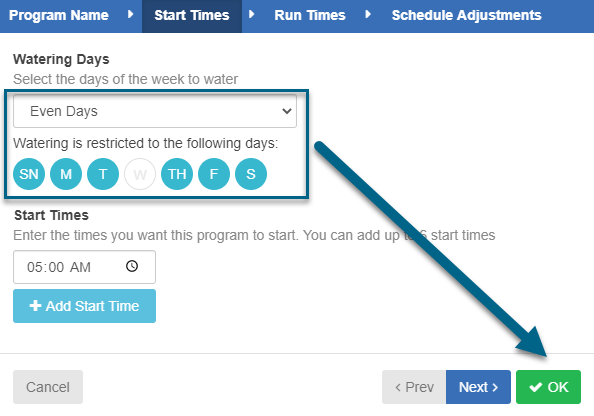
Select this feature if you want to use numbered day(s) of the month for watering instead of specific days of the week (e.g., odd days: 1st, 3rd, 5th, etc.; even days: 2nd, 4th, 6th, etc.).
Interval Watering
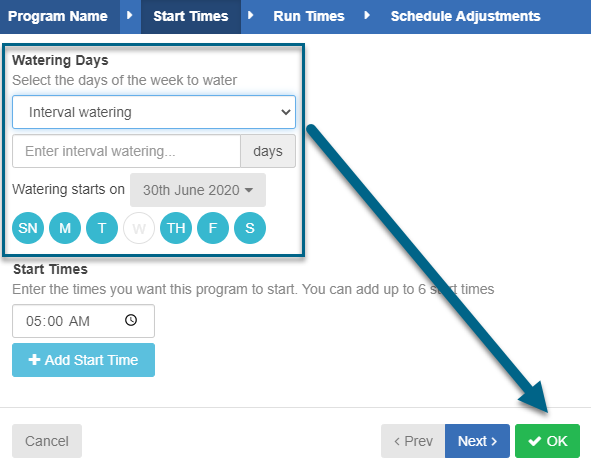
This feature is convenient if you want a consistent watering schedule without having to worry about days of the week or dates. The interval you select is the number of days between watering, including the water day (e.g., a 2-day interval will water every other day).
Steps:
To edit water days or change the water day mode within a program, follow these steps:
- From the Home dashboard, click on ZONES & SCHEDULES.
- Click on PROGRAMS. Then select the
 icon on the program you want to change.
 - Click on NEXT.
- Select the desired water day option from the drop-down list.
-
Selected Days of the Week option
- Blue indicates a water day, and clear icon indicates a no-water day. Click on the day that requires watering and the icon will turn blue.
-
Odd/Even Day option
- Select odd to water on odd-numbered days. Select even to water on even-numbered days.
- Restrict watering on a specific day to water (e.g., mow day).
-
Interval Watering option
- Select an interval number, which is the number of days between watering, including the water day (e.g., a 2-day interval will water every other day).
- Use the calendar drop-down to choose when you want the interval to start (e.g., a start date of June 10 with a 2-day interval will water on June 10, June 12, etc.).
- Restrict watering on a specific day to water (e.g., mow day).
-
Selected Days of the Week option
- Select OK.
| Selected Days of the Week |
 |
| Odd/Even Day Watering |
 |
| Interval Watering |
 |
Setting Up Odd/Even Days for Watering
Hydrawise supports watering restrictions such as on odd or even days of the week. This feature uses a numbered day(s) of the month for watering instead of specific days of the week (e.g., odd days: 1st, 3rd, 5th, etc; even days: 2nd, 4th, 6th, etc.).
IMPORTANT: The 31st of any month won't be irrigated if Odd watering is selected. If the controller is not connected to the Hydrawise Software and runs Offline, the stations will run on the 31st if Odd days are selected. February 29th will water if the Odd day option is selected.
| Steps |
Review the steps below to set up your schedule to water on Odd or Even days.
- Sign in to your Hydrawise account.
-
Select the Menu icon (
) on the upper left-hand side of the app. If accessing from a web browser, click on the (
) on the upper right-hand side.
- Select Programs. If you are using the advanced mode, select Program Start Times.
- Select the Edit icon
 under the desired program.
 - Select Next.
- Using the Watering Days dropdown, select Odd or Even.
- Select Ok to complete.
IMPORTANT: Every day must be selected and highlighted in Blue unless there is a day restriction (e.g., gardner scheduled, maintenance day, etc.). If an Odd/Even day lands on a day not in Blue, you will not see watering for two more days.
Setting a Program - Virtual Solar Sync
This operates the same way as the Hunter SOLAR SYNC by adjusting the run time per zone. It uses daily ET from your selected weather stations instead of on-site ET so it does not require on-site Solar Sync sensor installation. If no weather station ET is available, then it will fall back to using forecast ET and historical ET. The virtual Solar Sync makes its adjustments based on the rolling average of the last three days of data.
Please view the steps and screenshots to access this feature:
Click on ZONES AND SCHEDULES from the home dashboard, then select PROGRAMS. Scroll over to ADD PROGRAM and click on the  icon.
icon.
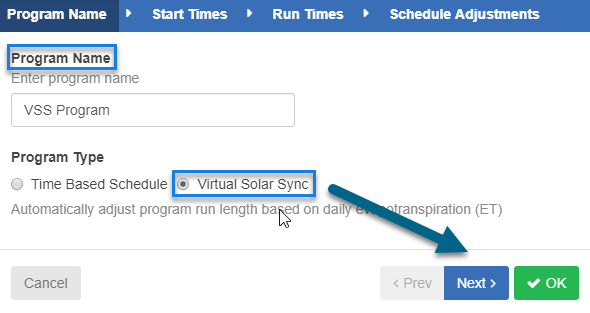
- Enter in a PROGRAM NAME, then select the watering type VIRTUAL SOLAR SYNC. Click NEXT.
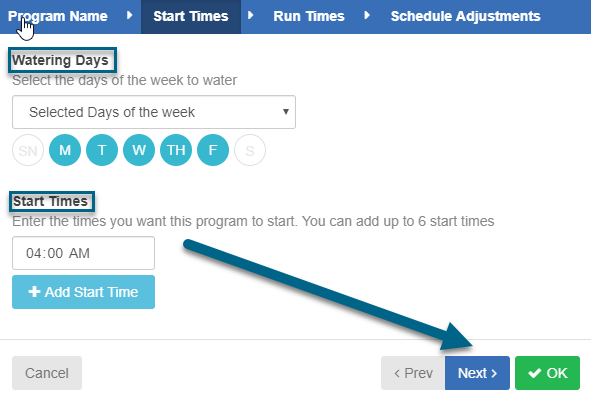
- Choose the WATER DAYS (Blue means water). Options are listed below.
- Specific days to water (most common)
- Even or Odd day watering
- Interval days - See article here for details
- Enter in START TIMES (Up to six-max), then select NEXT.
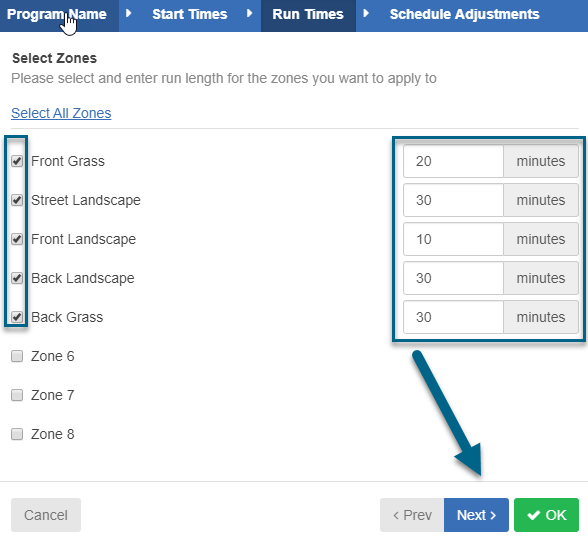
- Select ZONES. The edit box will only appear if you check the zone box. Add RUN TIMES using the up arrows in the box. Set station run times for PEAK summer watering. For assistance on establishing correct run times for your system, see run time calculator. When finished here, select NEXT.
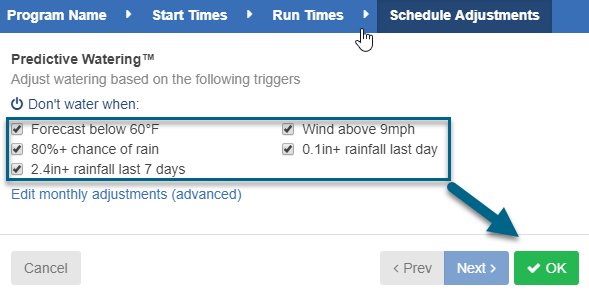
- Set Predictive watering adjustments - Adjusted based on your water triggers
- Monthly adjustments can be made using a chart as well.
- Click OK when adjustments are complete.
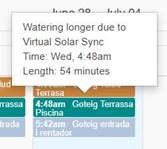
IMPORTANT: When the Virtual Solar Sync is making adjustments, you will see this in your REPORTS tab. Click on the zone and one of two Virtual Solar Sync messages will appear.
| STEP 1 |
 |
| STEP 2-3 |
 |
| STEP 4 |
 |
| STEP 5 |
 |
How to Add, Edit, and Customize Zones
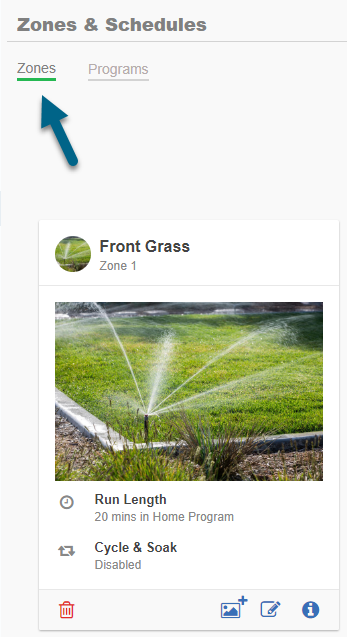
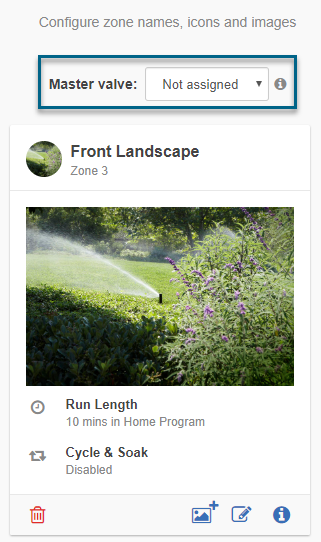
The ZONES section allows you to configure zone names, set zone icons and images, view zone details, set up Cycle & Soak, fine-tune your watering, and configure a master valve if one is installed.
| ZONE ICON | DESCRIPTION |
 |
Use this function to see an overview of when your system will water and for how long. |
 |
Use this function to make changes to an existing zone like icons, zone names etc. |
 |
Use this function to add a photo for referencing the zone. See links for details on mobile and desktop. |
 |
Use this function to delete the configured zone and all included information. |
The steps and screenshots below show how to add, edit, and customize zones.
- Click on ZONES & SCHEDULES from the home Dashboard. Then select ZONES.
- If you have a master valve or pump start relay, select YES to enable it. Visit this section for more configuration details.
- Select the
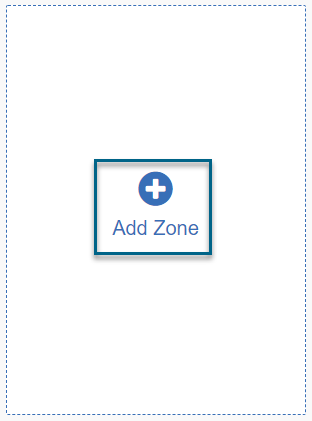
 button to add a NEW zone. Click the
  icon to edit an existing zone.
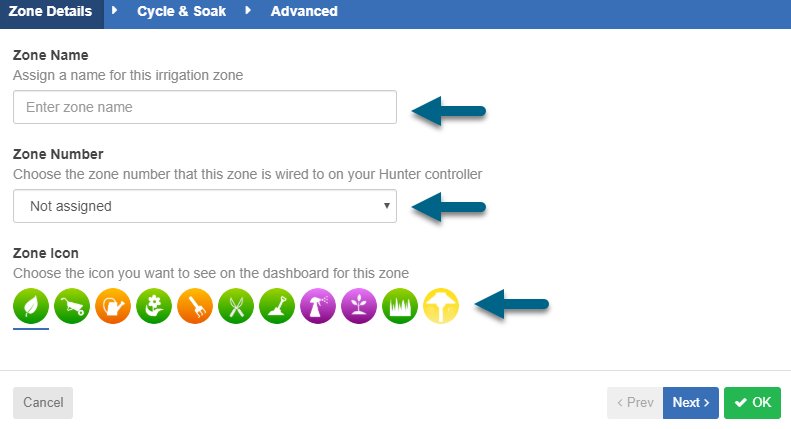
 - Choose a ZONE NAME (e.g., Front Yard).
- Choose a ZONE NUMBER (e.g., If the front yard is wired to zone one in the controller, select ZONE 1).
- Choose the ICON for your zone. If an image is assigned to zone, that icon will also appear here.
- Choose whether you want to enable the CYCLE & SOAK feature.
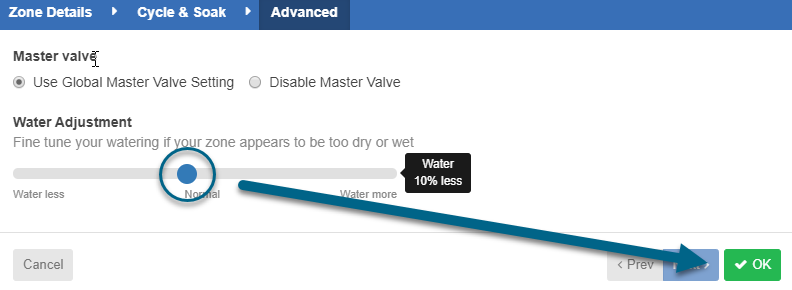
- Finally, the ADVANCED setting lets you select a WATERING ADJUSTMENT as a percentage (e.g., you can set the zone to water 10% less of that run time).
| Step 1 |
 |
| Step 2 |
|
|
| Step 3 |
|
|
| Step 4-6 |
 |
| Step 7 |
 |
| Step 8 |
|
|
Changing Run Times in Standard Mode
If you need to edit the Run Time for each station (zone) in Standard Mode, review the steps below to access this feature. The following fields are also available:
| Time and Frequency | |
| Program Name | Choose the program name and program type. |
| Start Times | Choose the water days and up to six start times. |
| Run Times | Choose the number of minutes each zone will run for each start time. Run times must be from 1 min to 23 hrs and 59 mins. |
| Schedule Adjustment | Choose how to adjust the watering time based on your weather triggers. |
| Monthly Adjustment | Monthly adjustments can be made using a chart as well. This will allow the run times set in a program to change by month as a global percentage (e.g.; June 80%, July 90%, August 100%). |
| Edit Run Times |
- Sign in to your Hydrawise account.
- Click on Zones at the bottom of the app or Zones and Programs on a web browser from the home dashboard.
- Select Programs.
- Select the (
) icon for the program that requires the change.
- Select Next 2X in the zone details.
- Click on Select All Zones to appear in the right selection bar.
- Enter the watering Run Time in minutes for each zone.
- Select Done, then Ok to save.
How to Change to Advanced Mode
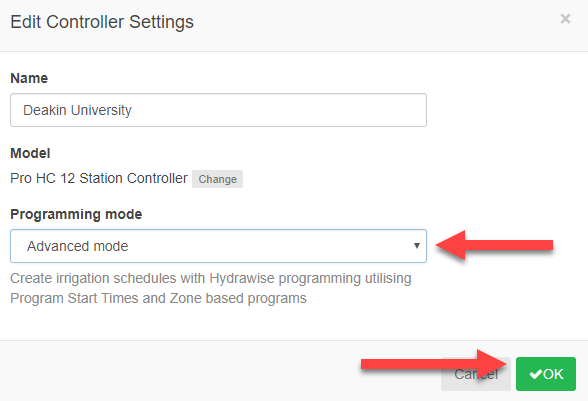
The steps and screenshots below describe how to change the programming mode on your controller:
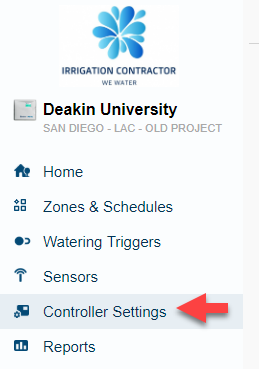
- Select CONTROLLER SETTINGS from the home Dashboard on the left-hand side.
- Once the configuration screen has loaded, click the
 icon to edit the mode.
 - After you enter the desired mode for your controller, click "OK."
For more information on comparing the two different programming modes, click here.
| Step 1 |
 |
| Step 2 |
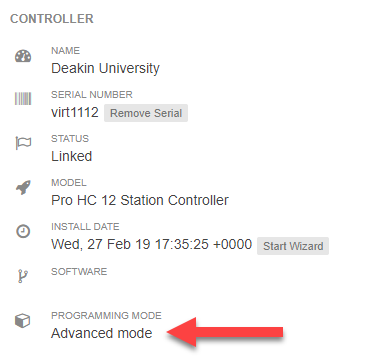 |
| Step 3 |
 |
How to Use a Grow In Program
Establishing new turf or plants can sometimes require a special watering program. It is typical to use a GROW IN PROGRAM for several waterings per day for the first few weeks. This will ensure that the new turf sod does not dry out and is established into the soil.
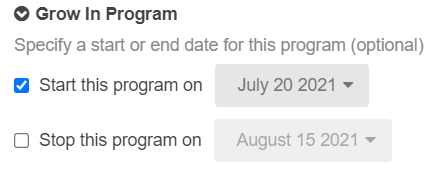
The Hydrawise Grow In Program provides a Standard Mode Program that allows for custom runtimes, watering triggers, rain sensor activations, multiple start times all with a defined start and end date. This makes it easy to set up a new turf or sod program, then will automatically switch to a normal program on the calendar day selected.
For information on changing to Standard Mode, click here.
Important: A Grow In Program does not stop additional programs from running as they will run in conjunction with one another. If you want to use a Grow In Program (e.g; new turf), with multiple start times, and want it to finish on Monday the 19th, then you set the End Date for the 19th. If you want a more permanent program to take over on the 20th, then you set up an additional program to start on the 20th with No End Date.
| Instructional Steps | |
|
Sign in to your Hydrawise account. Select the ( |
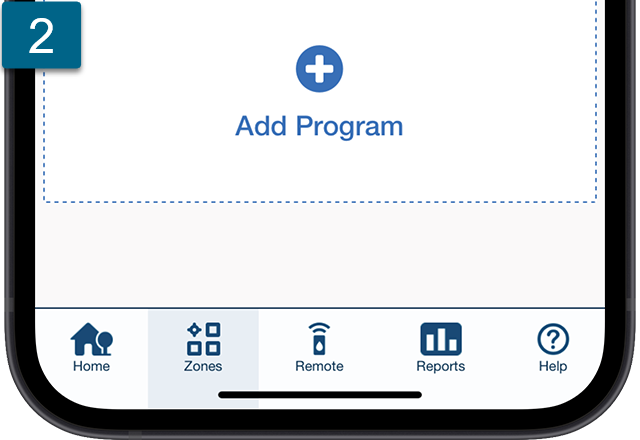
Select Programs. Add a new program by selecting the ( |
|
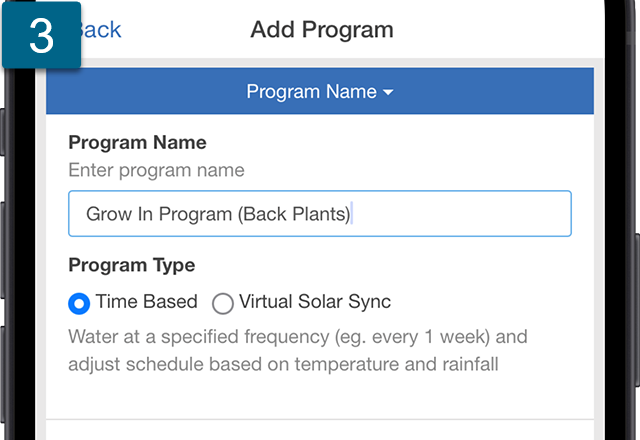
Enter in a Program Name, then select the watering type Time-Based. Click Next. |
|
|
|
|
|
|
|
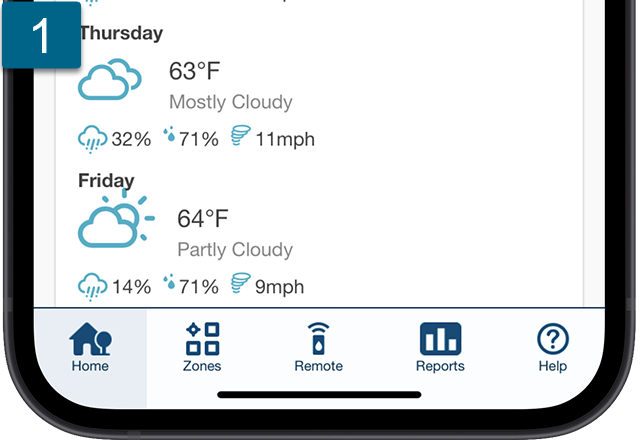
 ) zones icon at the bottom of the app. Select Zones and Programs if using a PC.
 ) icon.
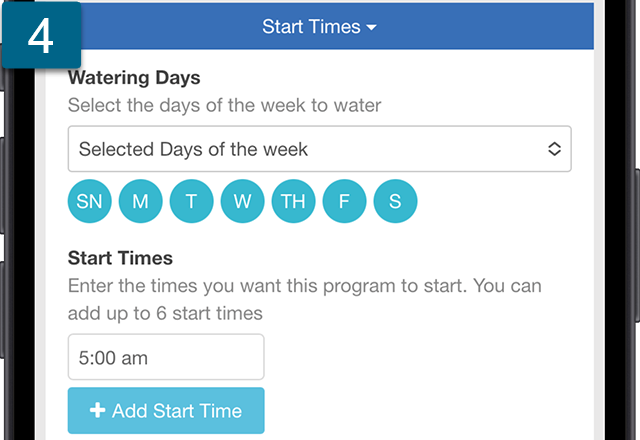 Choose the
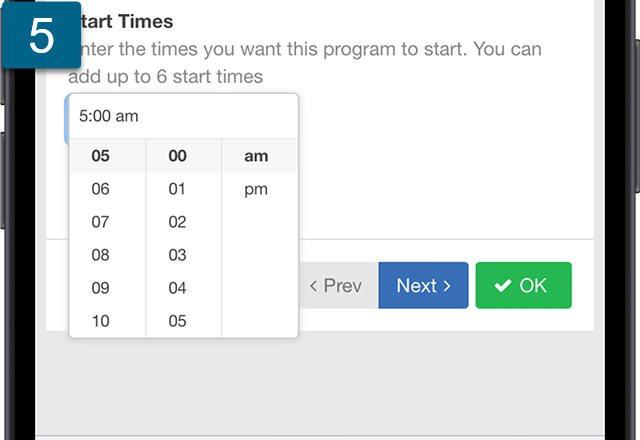 Enter in
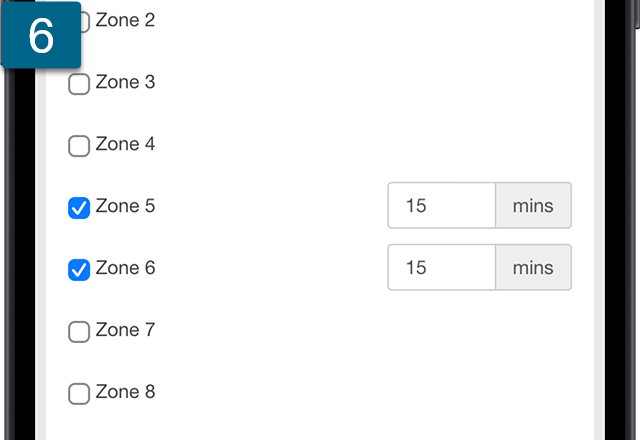 Select
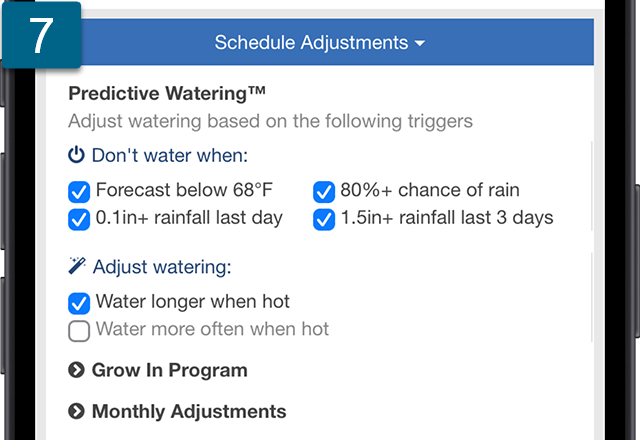 Predictive watering adjustments - Adjusted based on your
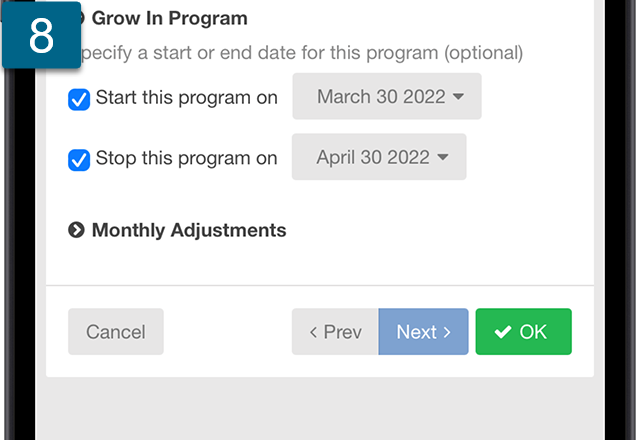 Select Grow In Program. Choose a start and stop period that the program will run. You also have the option to bypass the sensor as well.