HC - Install Guide
HC - Controller Mounting
The HC is designed for indoor installations only. The chosen location must have Wi-Fi coverage. Wi-Fi coverage can be easily tested using a smart phone with Wi-Fi connectivity or on the HC itself (signal strength is shown when you select a wireless network).
Note: The HC Controller is an indoor model and is not water-proof or weather resistant, and must be installed indoors or in a protected area. Do not plug transformer into power source until controller is mounted and all wiring has been connected.
CABLE ENTRY
The controller has 2 cable entry options -- from the rear of the case or via a conduit from the bottom of the controller.
ENTRY FROM THE REAR OF THE CONTROLLER
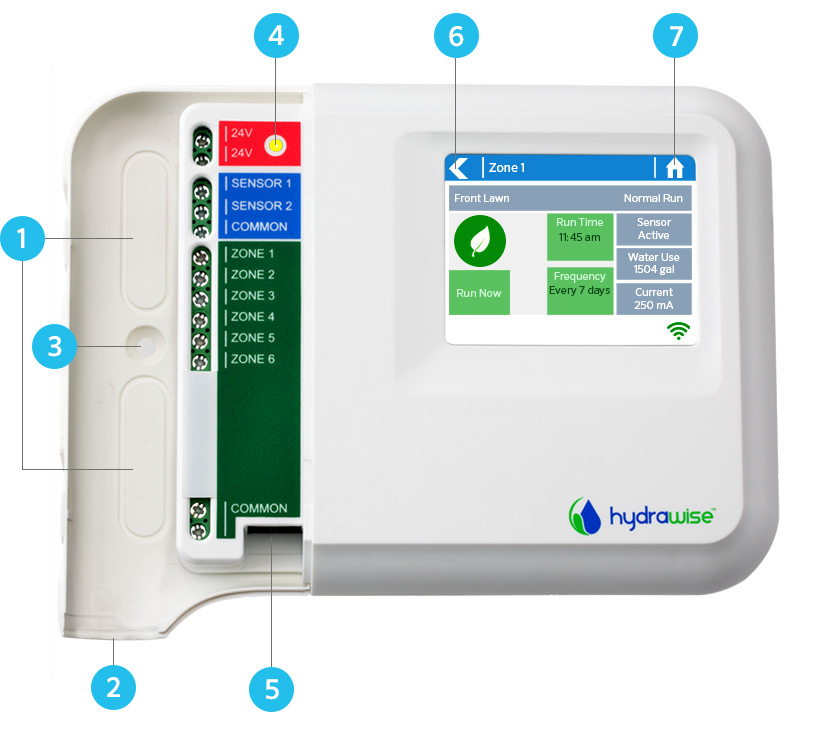
Using a sharp knife, remove the 2 cutouts on the rear of the controller as indicated on the diagram as ![]() .
.
ENTRY VIA ¾ INCH CONDUIT
Using a sharp knife, cut around the semi-circular line on the controller as indicated on the diagrams as ![]() . Cut around the matching line on the blue controller wiring cover.
. Cut around the matching line on the blue controller wiring cover.
MOUNTING THE CONTROLLER
- Using a drill bit of 3/16 inch diameter, drill a hole to a depth of 1 inch (25 mm).
- Insert plastic anchor so it is flush with the surface of the wall.
- Screw 1 inch screw into plastic anchor leaving the head protruding about 1/8 inch (4 mm).
- Slide the controller case over the screw head.
- Mark second mounting point (see
 in diagram), remove controller, drill hole, insert plastic anchor, slide controller case over first screw head and screw into place.
![]() Rear cable entry point (remove with knife)
Rear cable entry point (remove with knife)
![]() Conduit cable entry point (remove with knife)
Conduit cable entry point (remove with knife)
![]() Wall mounting screw hole
Wall mounting screw hole
![]() Power indicator
Power indicator
![]() Expansion module cable entry
Expansion module cable entry
![]() Go to previous screen
Go to previous screen
![]() Go to home screen
Go to home screen
| STEPS 1-5 |
 |
HC - Connecting Solenoid Valves and AC Power
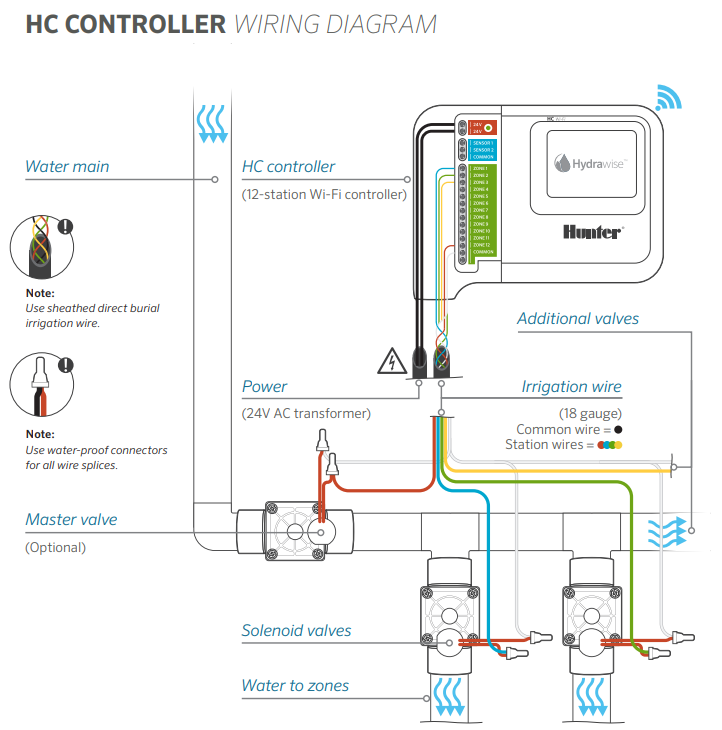
Your controller has either 6 or 12 zones depending on the model you have purchased. There are 3 COMMON wiring points for convenience – any or all of them can be used. Refer to the diagram below when connecting your solenoid valves to the controller. Please click on the link below for the downloadable version of the controller to valve wiring diagram. Hydrawise Controller Connection Diagram
 |
Solenoid Valve Wiring
- Take one wire from each solenoid, twist together and connect to the common (usually white) wire of your multi-conductor irrigation cable.
- Connect each of the other individual wires to a different colored wire. Record zones against wire color for later reference.
- Connect the common wire from the multi-conductor cable (usually white) to any of the three terminals on the controller marked COMMON.
- Connect each of the other solenoid wires to one of the ZONE inputs.
- If a master valve (sometimes labelled as MV on other controllers) is installed this can be connected to any spare zone as any of the zones can be assigned as a master valve output. Configuration of the master valve in the Hydrawise app is required.
- Click the blue wiring cover into place to seal the controller and protect the wiring.
Connecting the Transformer
- Use the plug pack supplied and connect the wires to the red AC terminal blocks on the unit marked as 24V. Polarity of the wiring is not important.
- Turn the power on. The power indicator will light up.
HC - Wiring a Master Valve and Setting Up Online
A master valve is an automatic valve that is installed at the point where the irrigation system connects to the water supply. (Sometimes this circuit is called a “pump start circuit”. Both types of circuits work identical, and can be used for a pump and/or a master valve.) The controller turns the master valve on and off.
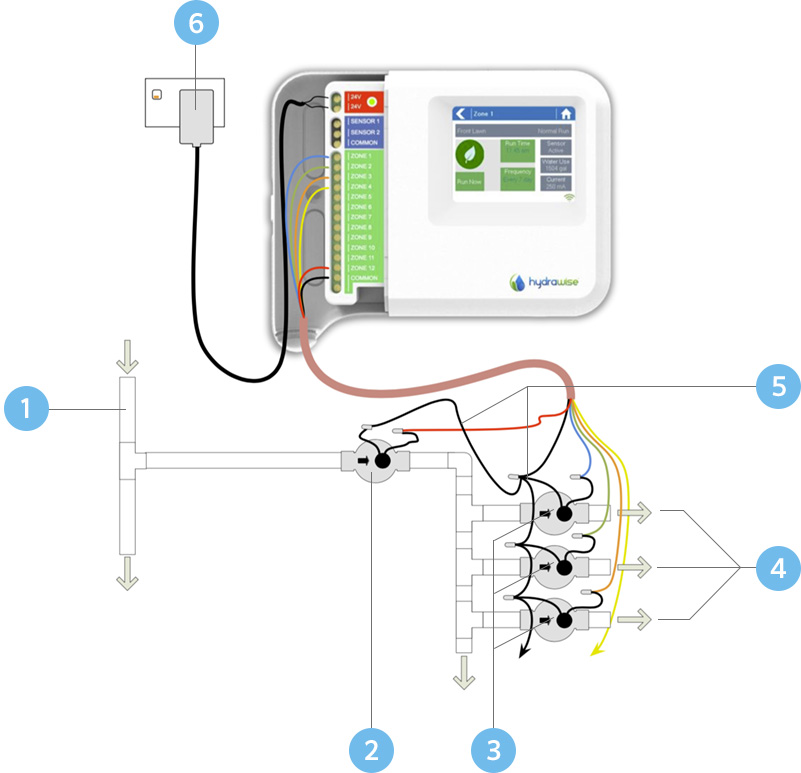
Zone valves are the individual valves that operate a group of sprinklers or drip emitters. Hydrawise controllers support 6 - 54 zone valves, depending on the model. Typically one zone valve is turned on at a time and controls the irrigation in a specific area of your garden. Whenever one of the irrigation zone valves is told to open by the controller, the controller also signals the master valve to open. So the master valve is a little like a backup valve or a fail-safe valve. The purpose of the master valve is to shut off the water to the irrigation system when none of the zone valves are operating. The image below shows a master valve operating connected to Zone 12 on a Hydrawise controller.
![]() Water main
Water main
![]() Master valve
Master valve
![]() Solenoid valves
Solenoid valves
![]() Water to zones
Water to zones
![]() Common wires
Common wires
![]() 24V AC plug pack
24V AC plug pack
 |
HOW IS IT CONFIGURED?
With a Hydrawise controller, any one of your 6 / 12 zones can be configured to act as a master valve. The master zone is configured on the Zones & Schedules page above your list of irrigation zones. For more information on this setup, please visit support article here.
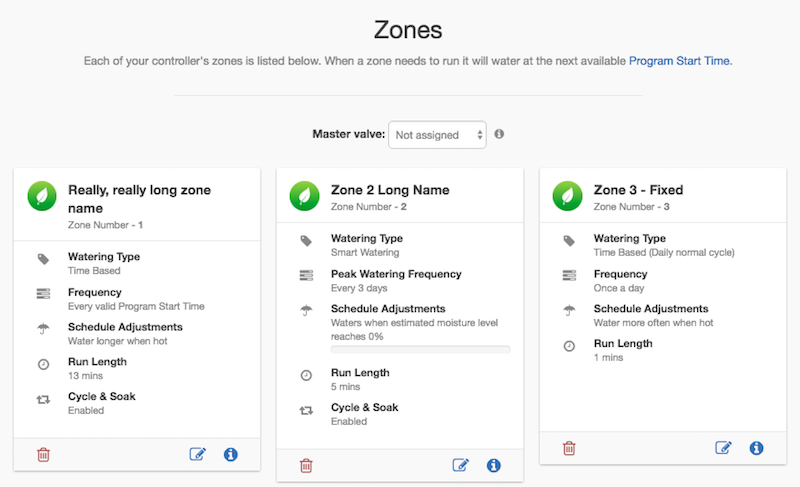 |
Initially, there is no master valve configured and all zones on the controller can be used as normal zone valves. To select a master valve, select the relevant zone from the list next to the text which says Master valve.
HC - Connecting Master Valve
A master valve is an automatic valve that is installed at the point where the irrigation system connects to the water supply. (Sometimes this circuit is called a “pump start circuit”. Both types of circuits work identical, and can be used for a pump and/or a master valve.) The controller turns the master valve on and off.
Zone valves are the individual valves that operate a group of sprinklers or drip emitters. Hydrawise controllers support 6 - 54 zone valves, depending on the model. Typically one zone valve is turned on at a time and controls the irrigation in a specific area of your garden. Whenever one of the irrigation zone valves is told to open by the controller, the controller also signals the master valve to open. So the master valve is a little like a backup valve or a fail-safe valve. The purpose of the master valve is to shut off the water to the irrigation system when none of the zone valves are operating. The image below shows a master valve operating connected to Zone 12 on a Hydrawise controller.
![]() Water main
Water main
![]() Master valve
Master valve
![]() Solenoid valves
Solenoid valves
![]() Water to zones
Water to zones
![]() Common wires
Common wires
![]() 24V AC plug pack
24V AC plug pack
 |
HOW IS IT CONFIGURED?
With a Hydrawise controller, any one of your 6 / 12 zones can be configured to act as a master valve. The master zone is configured on the Zones & Schedules page above your list of irrigation zones.
 |
Initially, there is no master valve configured and all zones on the controller can be used as normal zone valves. To select a master valve, select the relevant zone from the list next to the text which says Master valve.