No Communication with Expansion Modules Message
| Overview: |
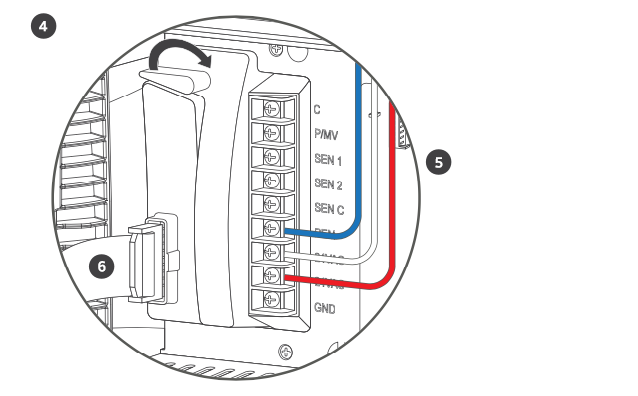
If your HCC Controller does not recognize your stations, you will see the facepack message No Communication with Expansion Modules on the controller screen. You may need to reset some of the hardware components. You can follow the steps below to make the connection between the facepack and your station modules.
| Steps: |
- Open the Front Panel.
- Turn Off the power by unplugging the controller.
- Remove the Ribbon from the back of the front panel.
- Remove all the Modules (power module and station module(s)).
- Reinstall the Modules.
- Reinstall the Ribbon cable (wait 2-3 minutes).
- Turn On the power to the controller.
- Sign in to your Hydrawise account.
- Select the Menu icon (
 ) on the upper left-hand side of the app.
 - Select Controller Settings.
- Verify the correct controller station count under Model (i.e., HCC 16 Zones).
HCC - Can I use my existing Hunter remote?
Yes, the HCC is compatible with Hunter’s ROAM and ROAM XL remotes, allowing for fast and reliable manual operation in the field from long-range distances without the need for a smartphone. There is no need to remove the smart port adapter from the controllers when doing a facepack upgrade.
Compatible models include all Hunter remotes: SRR, ICR, ROAM, and the ROAM-XL.
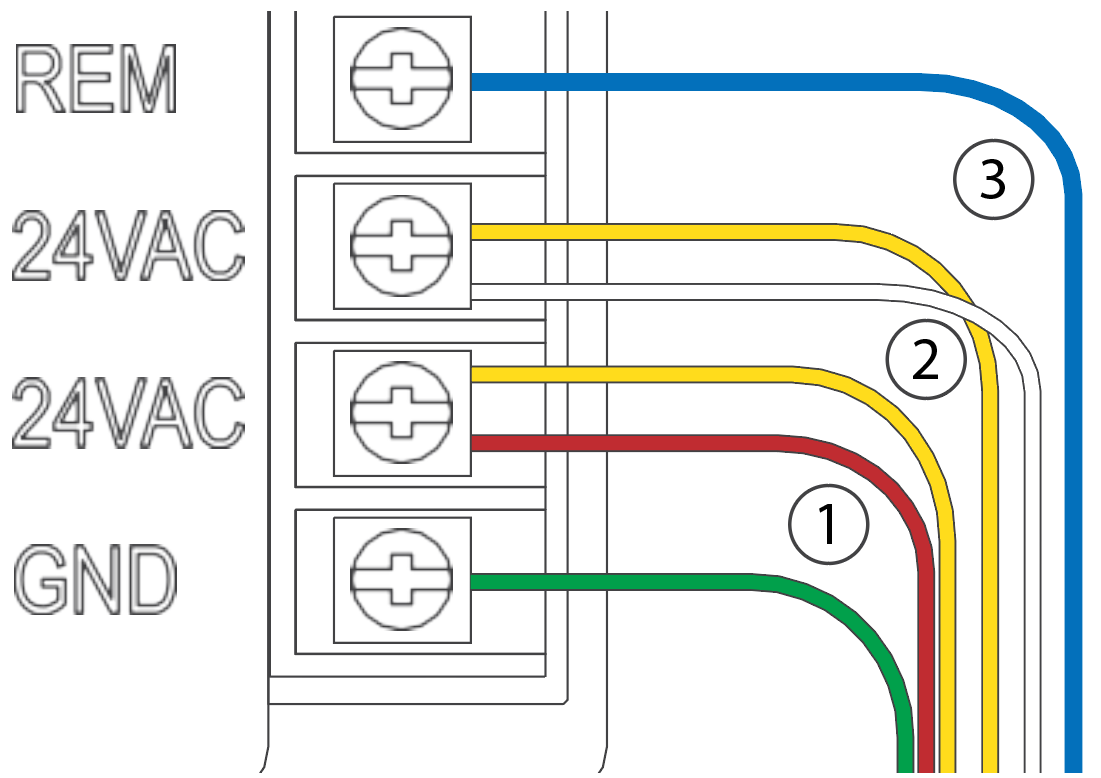
If the Smartport is not installed on the controller, see illustrations below for wiring instructions.
Note: Any extension of the wiring on the SmartPort may result in an error message in
the controller display and possible malfunction of the remote unit due to radio interference. In
some situations, lengthening of the harness may work fine, in others it may not work at all (it is
site specific). In either case, extending the wiring harness should be done using shielded cable to
minimize the possible effects of electrical noise. For easiest installation, order the Hunter SmartPort shielded cable wiring harness. (P/N ROAM-SCWH) with a full 25' (7.6 meters) of
shielded cable.
Wiring
- Bottom 24 VAC terminal - Red wire
- Second 24 VAC terminal - White wire
- Remote terminal - Blue wire
| Smart Port Wiring |
 |
Operation
The ROAM System will allow you to remotely turn on and off any station on your Hunter controller with the press of a button. Once on, the station will run for the run time you have designated in the remote. To remotely activate a station, follow the steps below:
- Plug the receiver into a SmartPort® that is connected to a powered controller. The receiver will beep 4 times followed by a 10-second pause and a single beep.
- If your transmitter is not on (no display), wake it up by pressing and holding the MODE button for 5 seconds. The Transmitter will display the active station.
- Use the up and down buttons to display the station you would like to start.
- Press the "Green Play Button" to start the station. The Transmitter will display the Transmit icon . If you are near the receiver, you will hear it beep 2 times. This indicates that the Receiver has received the command.
- Press the "Red Stop Button" to turn off any station that is on. The display will show the Transmit icon and receiver will beep again twice. The ROAM System is designed to turn on
one station at a time (unless you activate a program). Therefore, turning a station on
while another station is operating will cause the operating station to turn off.
NOTE: The ROAM remote can activate any station on the controller whether the controller dial is in the “SYSTEM OFF”, “RUN” or “RUN/BYPASS SENSOR” modes. If a sensor device has been wired to the controller, the ROAM remote will NOT override the sensor for manual operation. For more programming information, please see attached manuals for both the ROAM and ROAM XL remotes.
HCC - How do I connect the controller to the Internet?
Using the Connection Wizard
From Home screen touch Settings button then the Wireless button. Select your wireless network from the list shown on the controller display and press the Confirm button on screen. Enter your wireless password and press the OK button on keyboard.
Important: If your network is not listed then check that the unit is within wireless range. Make sure you press the OK button after you’ve entered your password. Pressing the HOME or BACK buttons will not save your changes.
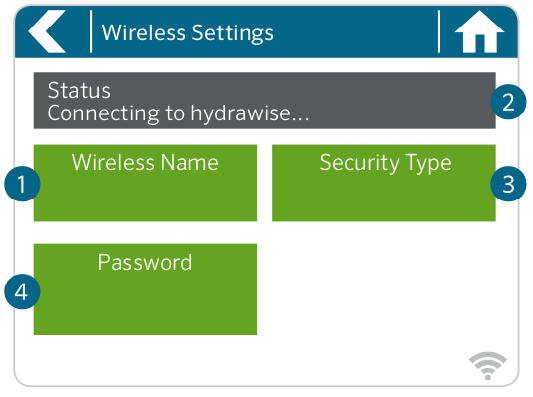
- Touch to change wireless access point.
- Current wireless connection status.
- Touch to change wireless security type.
- Touch to change wireless password.
When connecting to your wireless, the Wi-Fi icon at the bottom right of the controller screen will flash. Connecting takes about 30 seconds and when successfully connected the Wi-Fi icon will remain solid.
HCC - Running Two Zones Simultaneously
The HCC controller has the ability to operate two Hunter valves at one time, therefore, allowing for more than one program to run at the same time. Only two programs can be allowed to run concurrently. This is a great feature if you have a short water window and the available water to feed multiple stations; however, it could become an issue if the flow of your irrigation system cannot support operating multiple stations simultaneously. If you do not have the available water to operate multiple stations at one time, you will need to consider and calculate when each program will finish or review the total watering time for each program.
A few limitations exist when running two programs (zones) simultaneously with an HCC Controller.
| Cause | Solution |
| Incorrect Scheduling | The programs should not run past midnight. If they carry over midnight, stations will stack and push out the schedule. This might require you to adjust your run times within your available water window. The Watering Schedule feature under the reports tab will display the start and end times. Learn more |
| Suspend or Manual Operation Feature Used in Operation | Do not use the Suspend feature or Manual Operation during irrigation as it will cause the controller to stack stations. This will also push out the schedule and only run a single program. |
IMPORTANT: Running two zones simultaneously can be done through automatic programming or at the controller level. The Remote function will not allow you to run two zones simultaneously.
HCC - Can I retrofit the ICC or ICC2 controller to a Hydrawise-ready controller?
Important: Turn AC power off at the source, and verify that it is off.
- Disconnect the facepack ribbon cable.
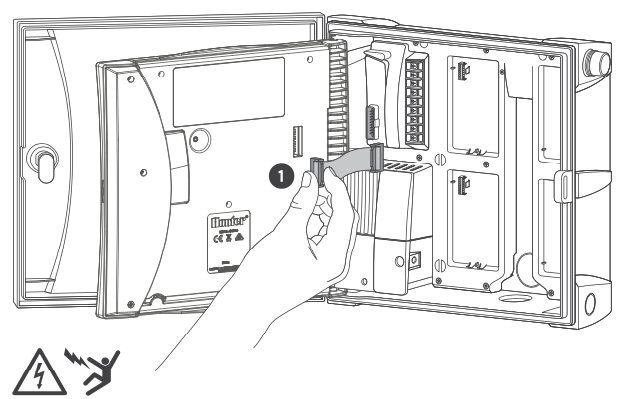
- Remove and replace the ICC or ICC2 facepack with the HCC Hydrawise-ready facepack.
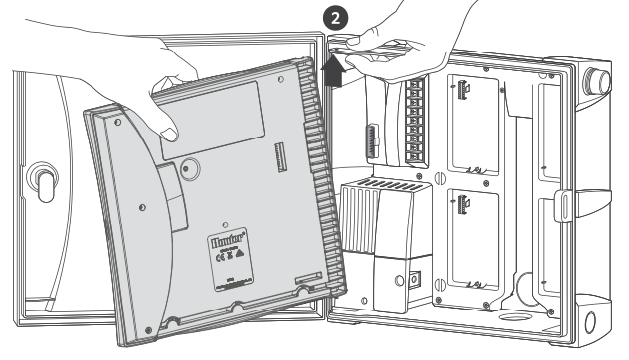
- Remove all wiring from the ICC or ICC2 power module.
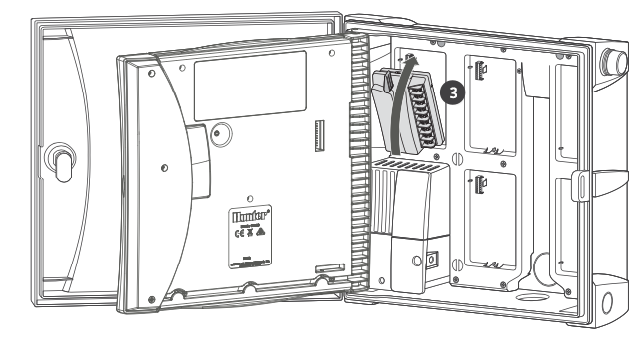
- Remove and replace power module by rotating the locking lever up, then insert the new power module and rotate the locking lever down.
- Reinstall power module wires.
- Reconnect ribbon cable to facepack and power module.
