Turn System Off Cycle
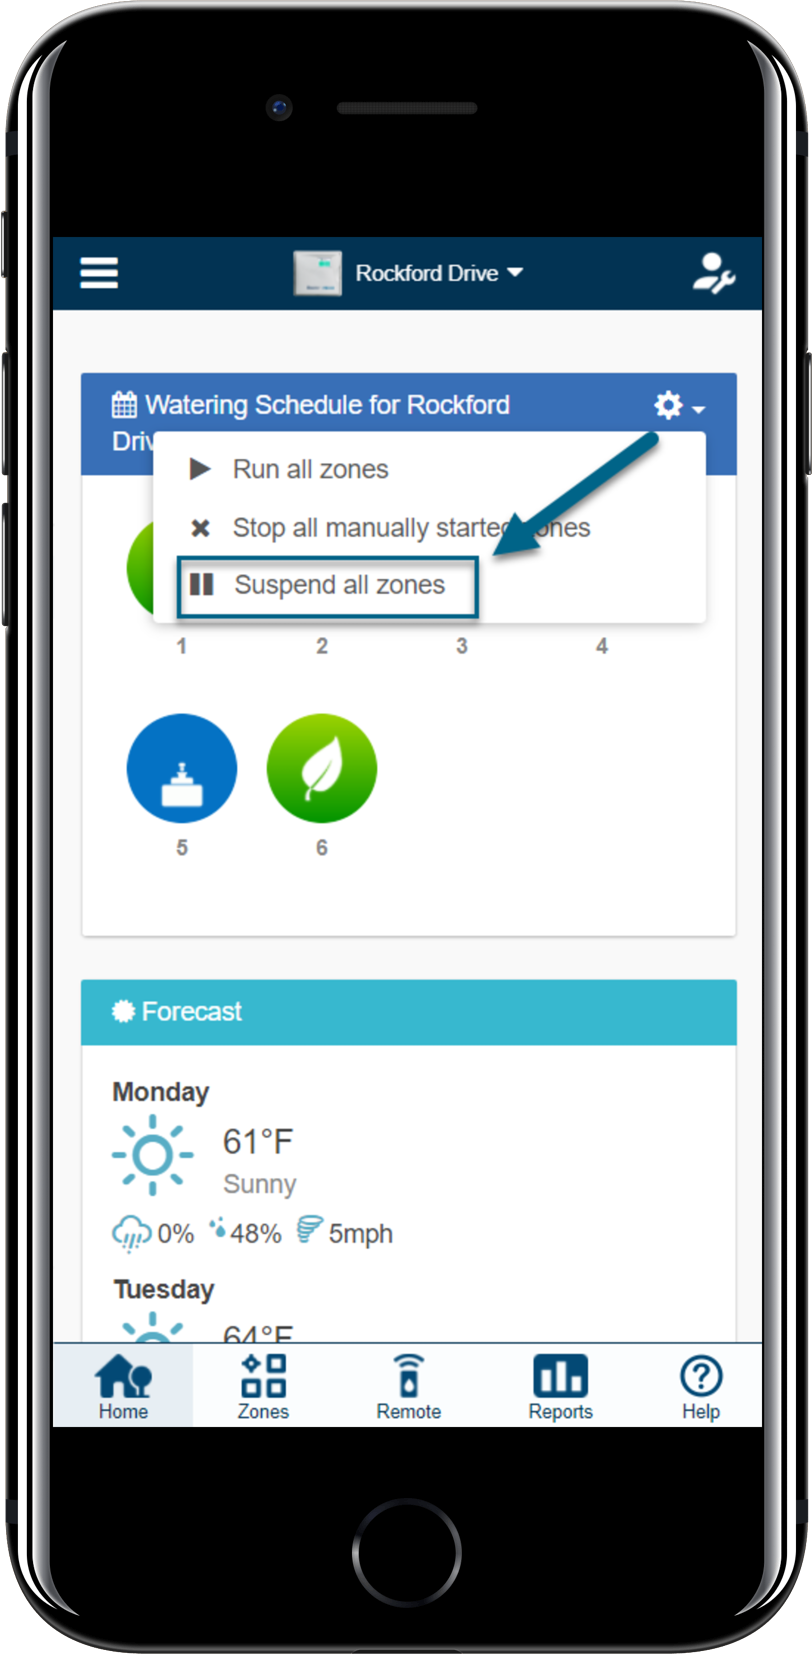
In the application (smart device, PC, or Mac), you can turn OFF your automatic cycle or turn off a single zone running manually by using the simple steps listed below.
- Log into the app.
- Click the
icon on the blue tab.
- Click on SUSPEND ALL ZONES.
- Next, select SINGLE-ZONE, MULTIPLE ZONES, CONTROLLERS, or CUSTOMERS.
- SINGLE ZONE - Used to suspend one of your zones (stations).
- MULTIPLE ZONES - Used for suspending all zones or selecting specific zones (stations).
- Select the date range for the suspension. Use the arrow in the gray drop-down box to select a day and month. Once the date is selected, click SUSPEND.
- Your zones should appear faded and you will see a note stating that watering has been canceled during this date range.
- Log into the app.
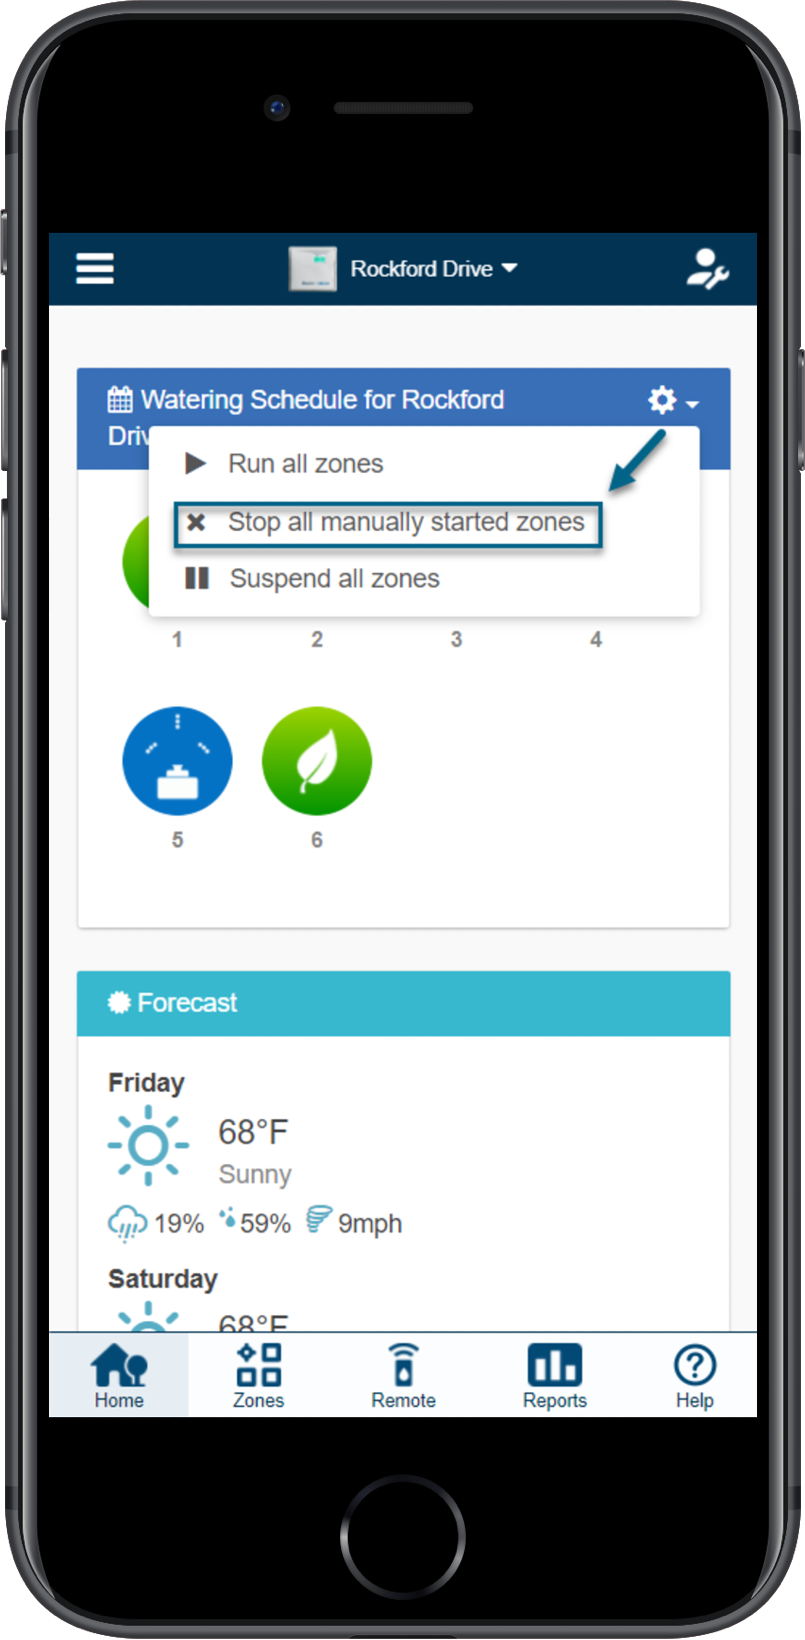
- Click the
icon on the blue tab.
- Click on STOP ALL MANUALLY STARTED ZONES.
Basic App Navigation
In this article, we will show you several ways to view and change your controller settings including the dashboard, reports, and configuration.
From the HOME dashboard, you can view the following:
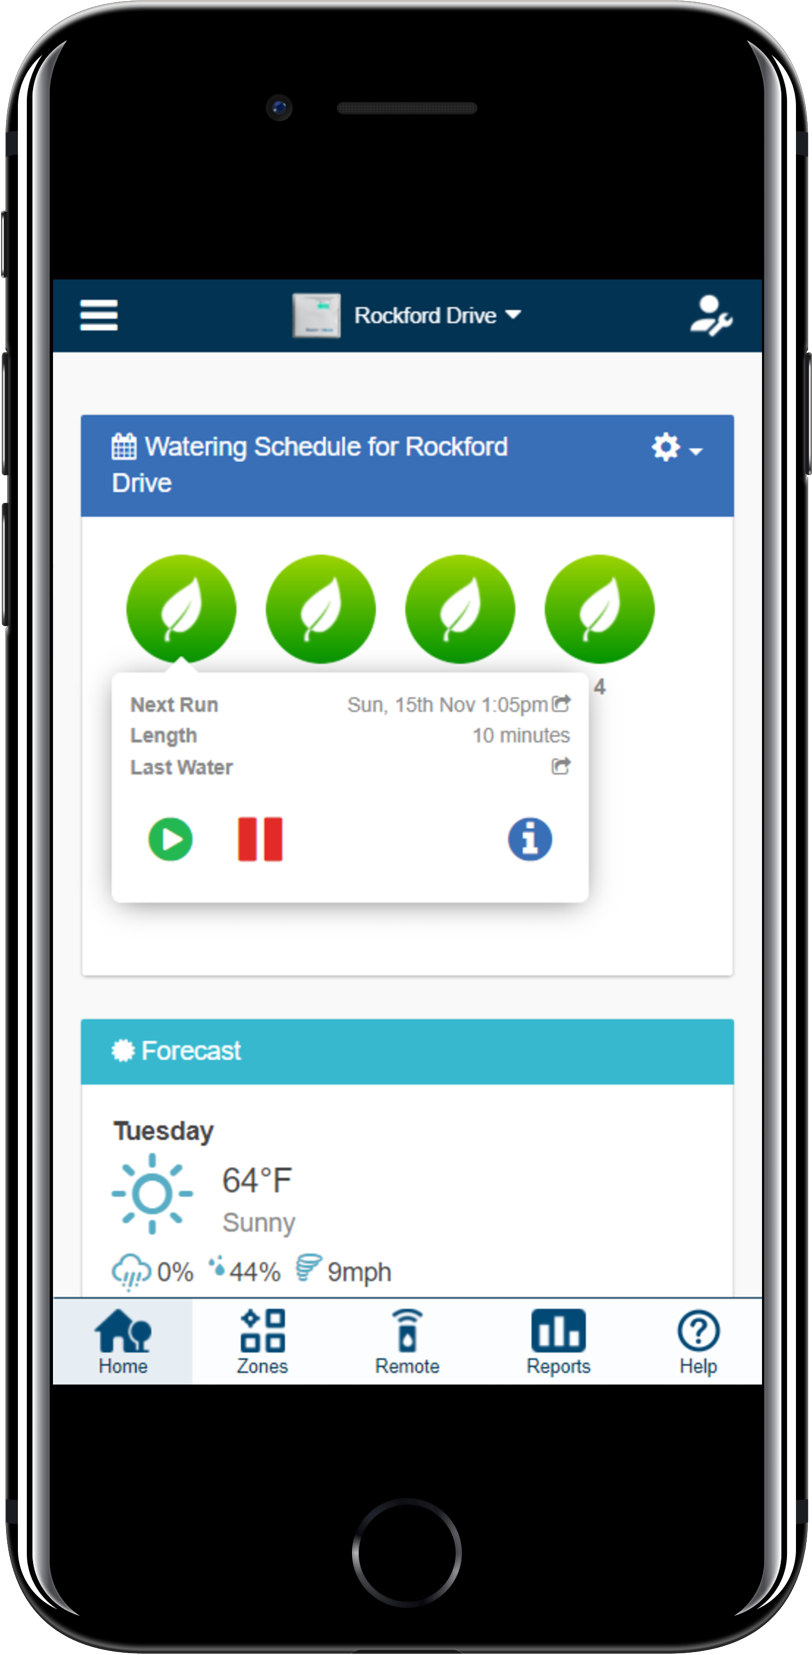
All your configured zones are listed here. To find more information about a zone, click on the zone. This will show when the zone is next scheduled to run, length and when it last watered. To run a zone, click the ![]() button. You will be prompted to run the zone for its normal watering time or choose a custom time. To suspend a zone, click the
button. You will be prompted to run the zone for its normal watering time or choose a custom time. To suspend a zone, click the ![]() button to suspend a single zone or suspend all zones using the article here. You will be prompted to choose when the suspension should end. Once a zone is suspended, it will display in a lighter color on the dashboard and you can click the pause button again to remove the suspension. To display zone information, click the
button to suspend a single zone or suspend all zones using the article here. You will be prompted to choose when the suspension should end. Once a zone is suspended, it will display in a lighter color on the dashboard and you can click the pause button again to remove the suspension. To display zone information, click the ![]() button after hovering over the zone. This will display information including the next watering time, watering frequency, and program start times.
button after hovering over the zone. This will display information including the next watering time, watering frequency, and program start times.
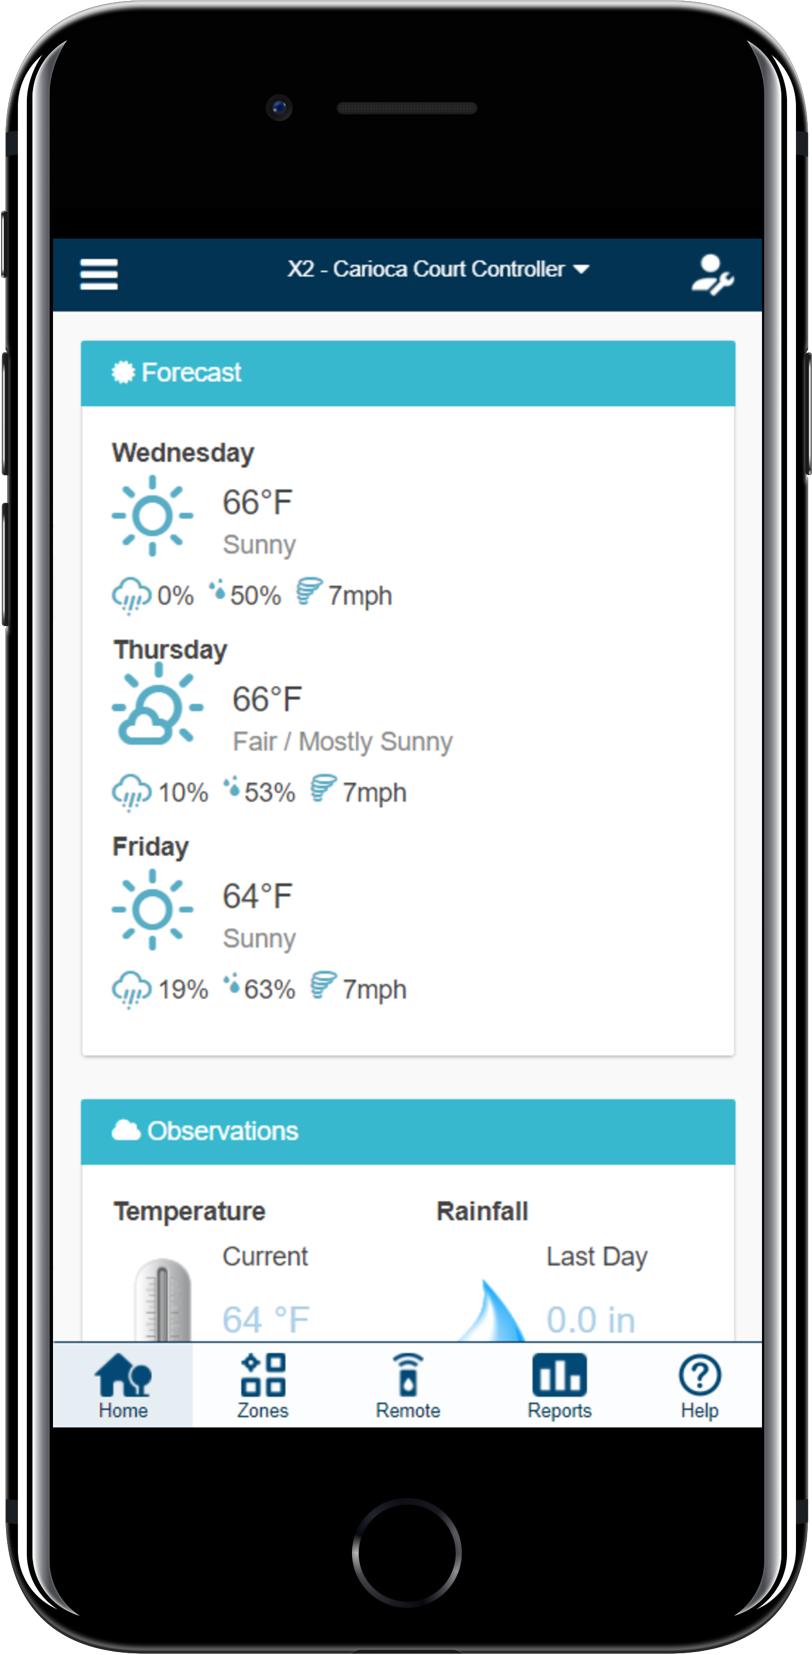
This area will show forecast temperature and weather conditions, including the percentage chance of rainfall, expected humidity, and expected average wind speed.
All temperature and rainfall values are calculated as the median of your weather stations. For example, if you are subscribed to three weather stations when on Enthusiast plan, the temperature or rainfall will be the average value.
-
Weather Stations:
- If your weather stations record maximum temperatures of 45°F, 48°F, and 56°F, the median will be 48°F.
- If your weather stations record maximum temperatures of 70°F, 75°F, 77°F, and 80°F, the median will be 76°F.
If your temperature or rainfall readings are consistently showing a low value, go to Reports, check each weather station rainfall or temperature, and adjust them accordingly.
Temperature
For customers on an Enthusiast Plan this will show the current and maximum temperatures for today. This is based on the median value of all the weather stations you have selected.
Rainfall
This panel will show you the amount of rain that fell yesterday and during the past week. This is based on the median value of all the weather stations you have selected.
If you have an Enthusiast Plan, instead of yesterday’s rainfall you will see rainfall for the past 24 hours.
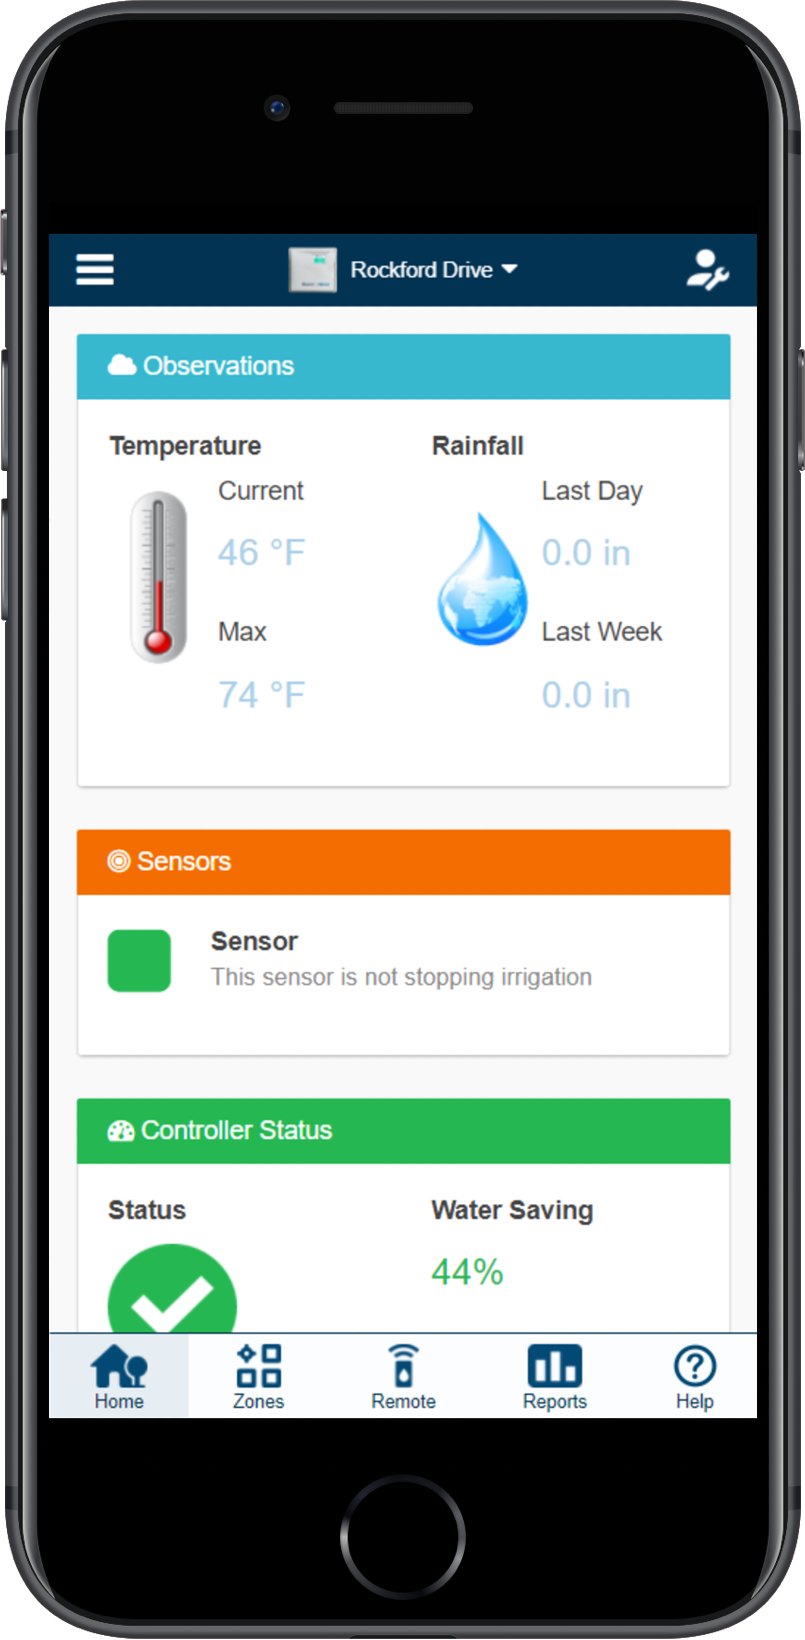
This area will show any sensor you currently have configured.
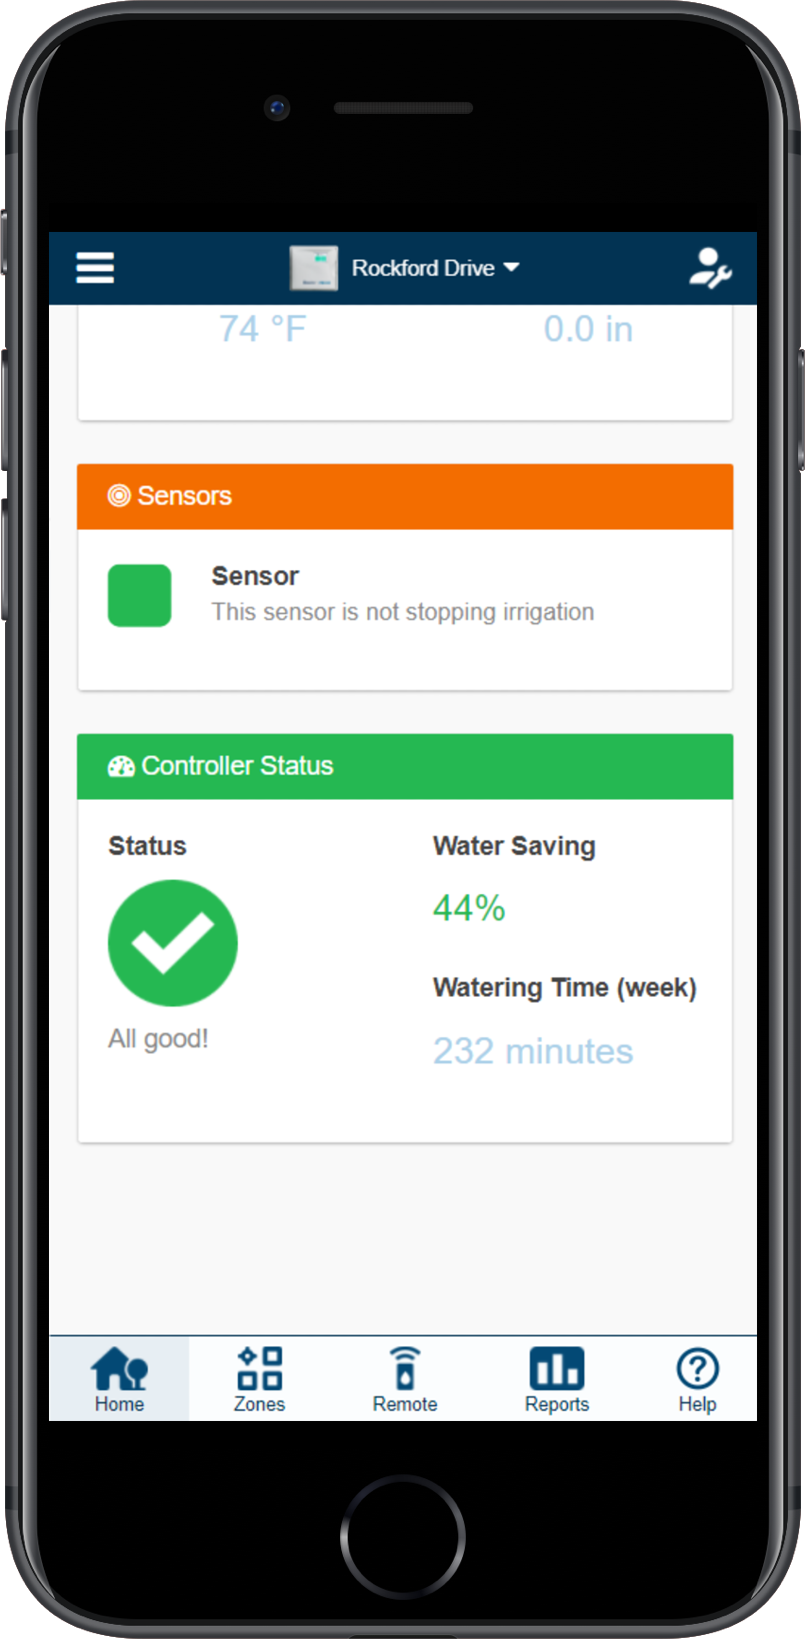
This area will display the status of your controller. If the controller is online you will see a green circle with a check. If the controller has been offline for 30 minutes or more, then you will see a red triangle with an exclamation mark. If your controller remains offline for 24 hours we will send you a notification email. For more information on the controller status, see this article here.
The Water Saving is calculated by comparing the original Watering Schedule as per the Zones page with the Watering History (actual). Water Savings = the planned irrigation minus the Predictive Watering™ changes or sensor stops plus any manual watering over a rolling seven-day period.
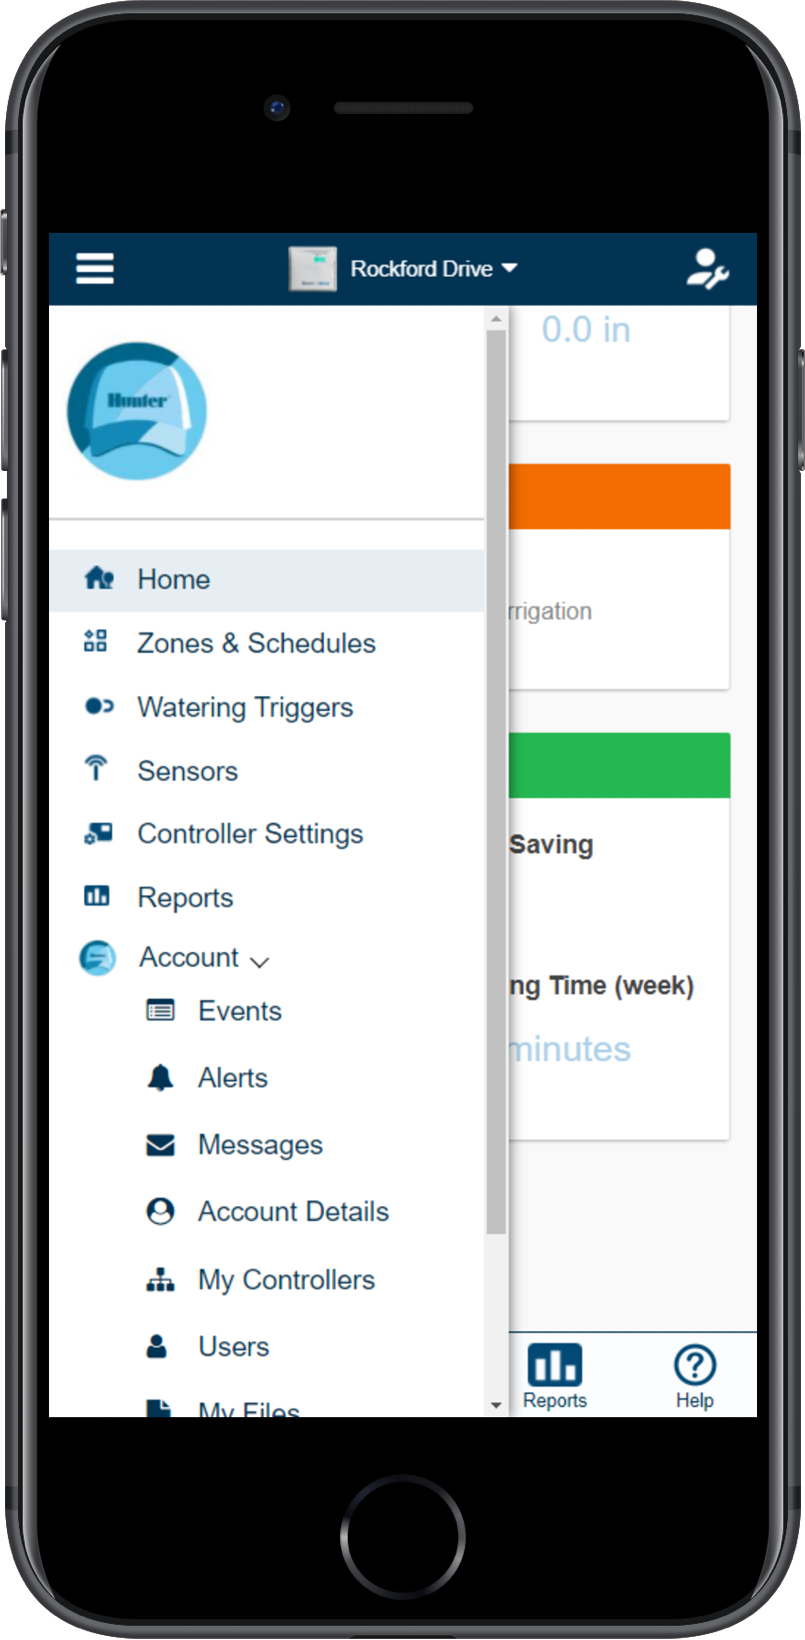
When you click the  icon in the upper left hand side of the app, you will open the following tabs to make changes.
- Zones and Schedules: Make changes to your water days, start times, and zone (station) run times.
- Water Triggers: Manage your watering based on weather forecasts. Choose which adjustments to apply when editing a zone.
- Sensors: Program and set up a rain sensor.
- Controller Settings: View controller, regional, and internet settings.
- Reports: View watering schedule.
-
Account Settings:
- Events: Hydrawise logs all actions then stores the results in the controller Event Log.
- Alerts: Alerts can be created when controller is not connected to the internet or for a rain sensor status change.
- Messages: **Contractor Only**
- Account Details: Here you can change your password, change your plan, and change your account visibility settings.
- My Controllers: Add or view controllers (Home Plan up to 3 and Enthusiast Plan up to 5).
- Users: Add another user (Enthusiast Plan only).
- My files: You can add, update, delete your files or upload new ones to our system.
- Log Out
Manual Operation
You can run an irrigation zone on demand from your web browser or from your Hydrawise app.
Please view the steps and screenshots to access this feature:
- From the home screen, click the REMOTE icon (
 ) at the bottom of the app.
 - Select one of four options to manually water listed below from the top dropdown.
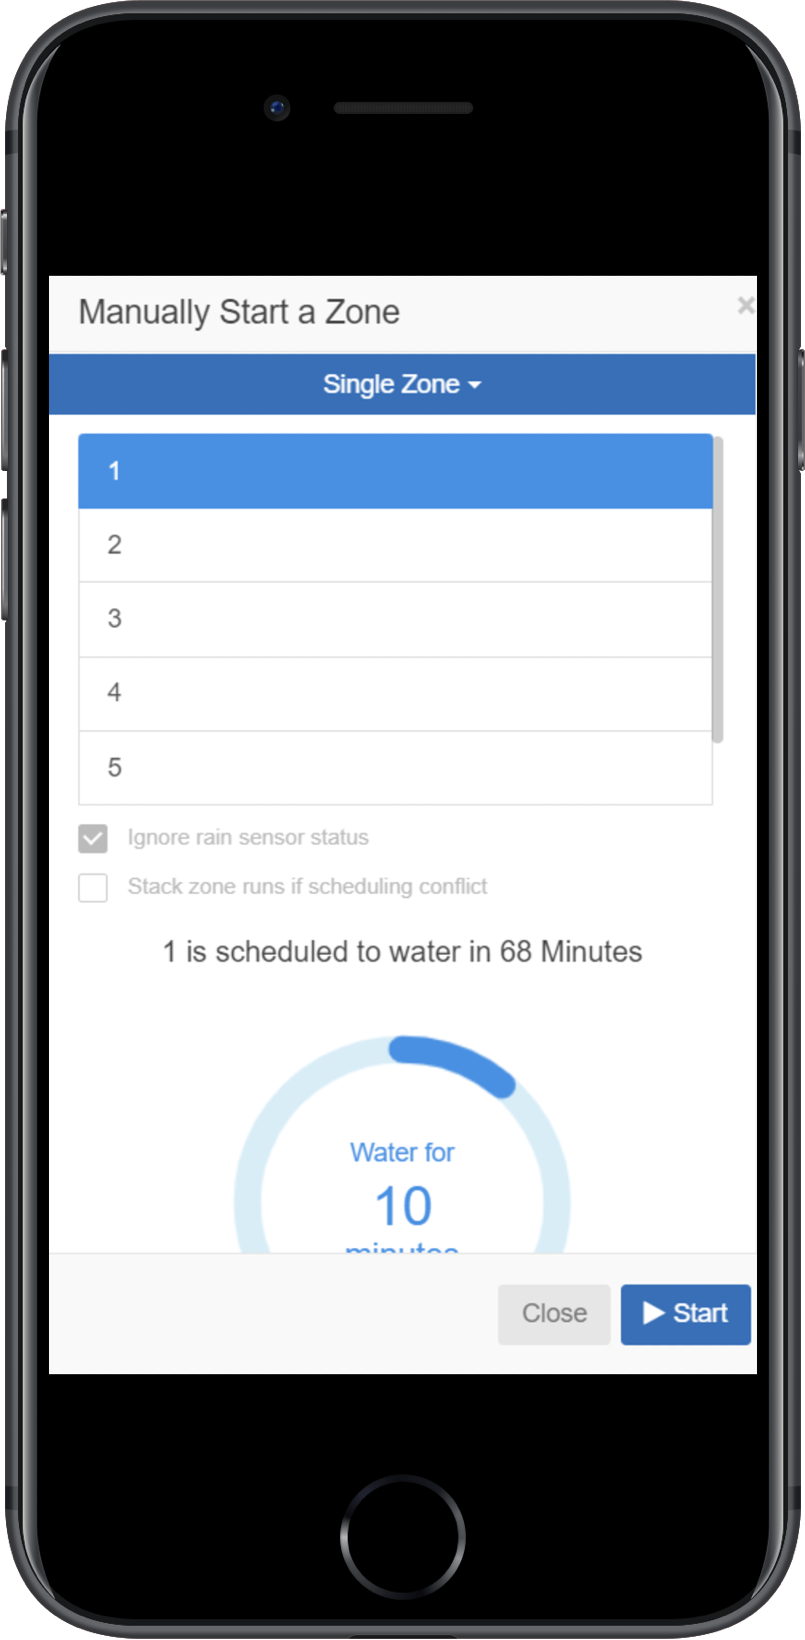
- Single Station – This allows you to manually start a single zone for the scheduled time or a time you manually change.
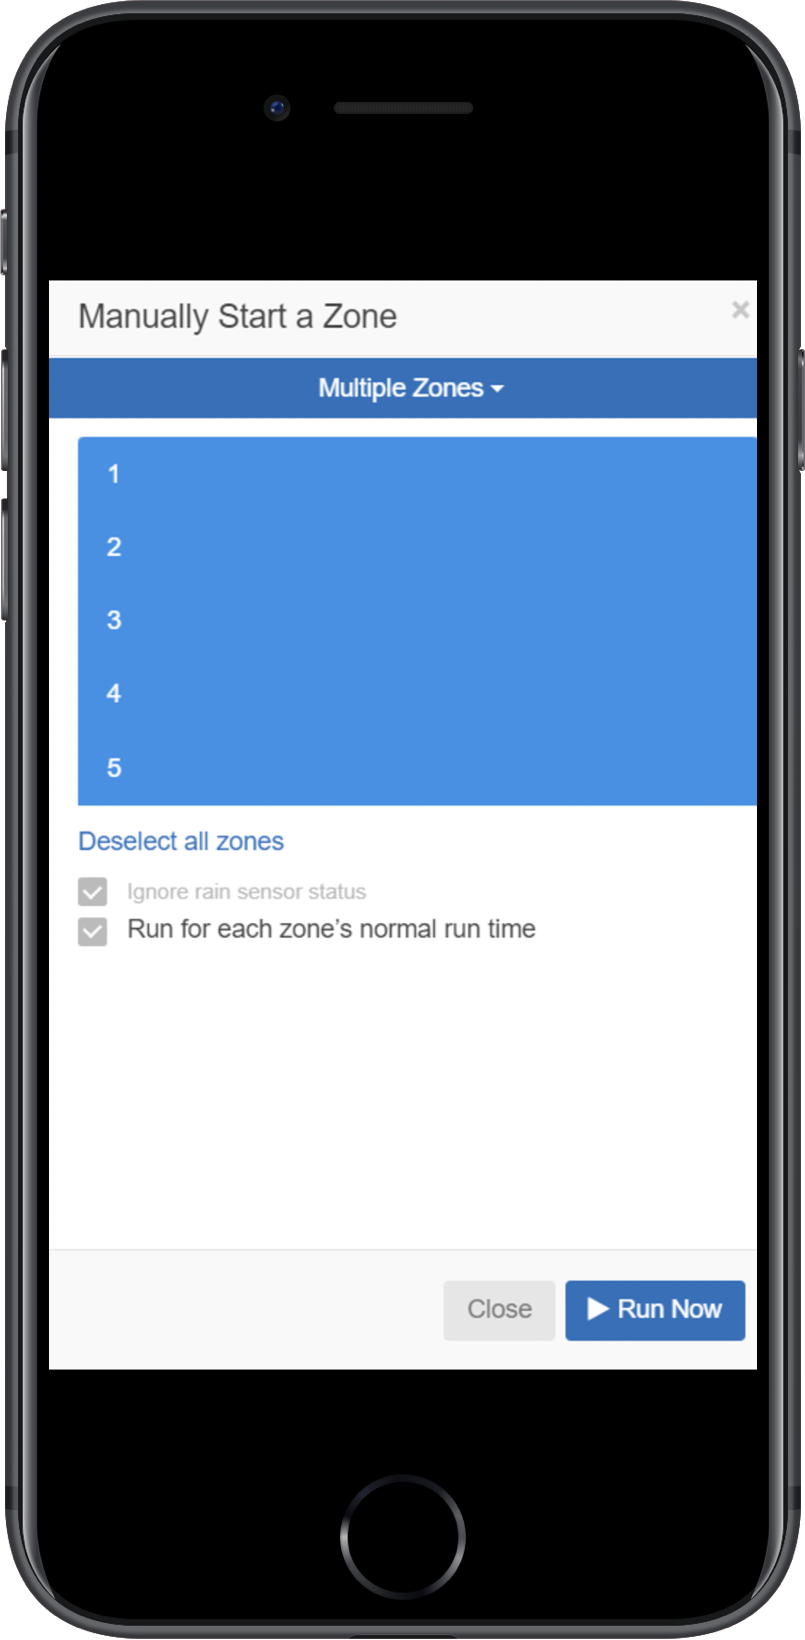
- All Zones – Runs all zones for the normally scheduled time or a time you manually change.
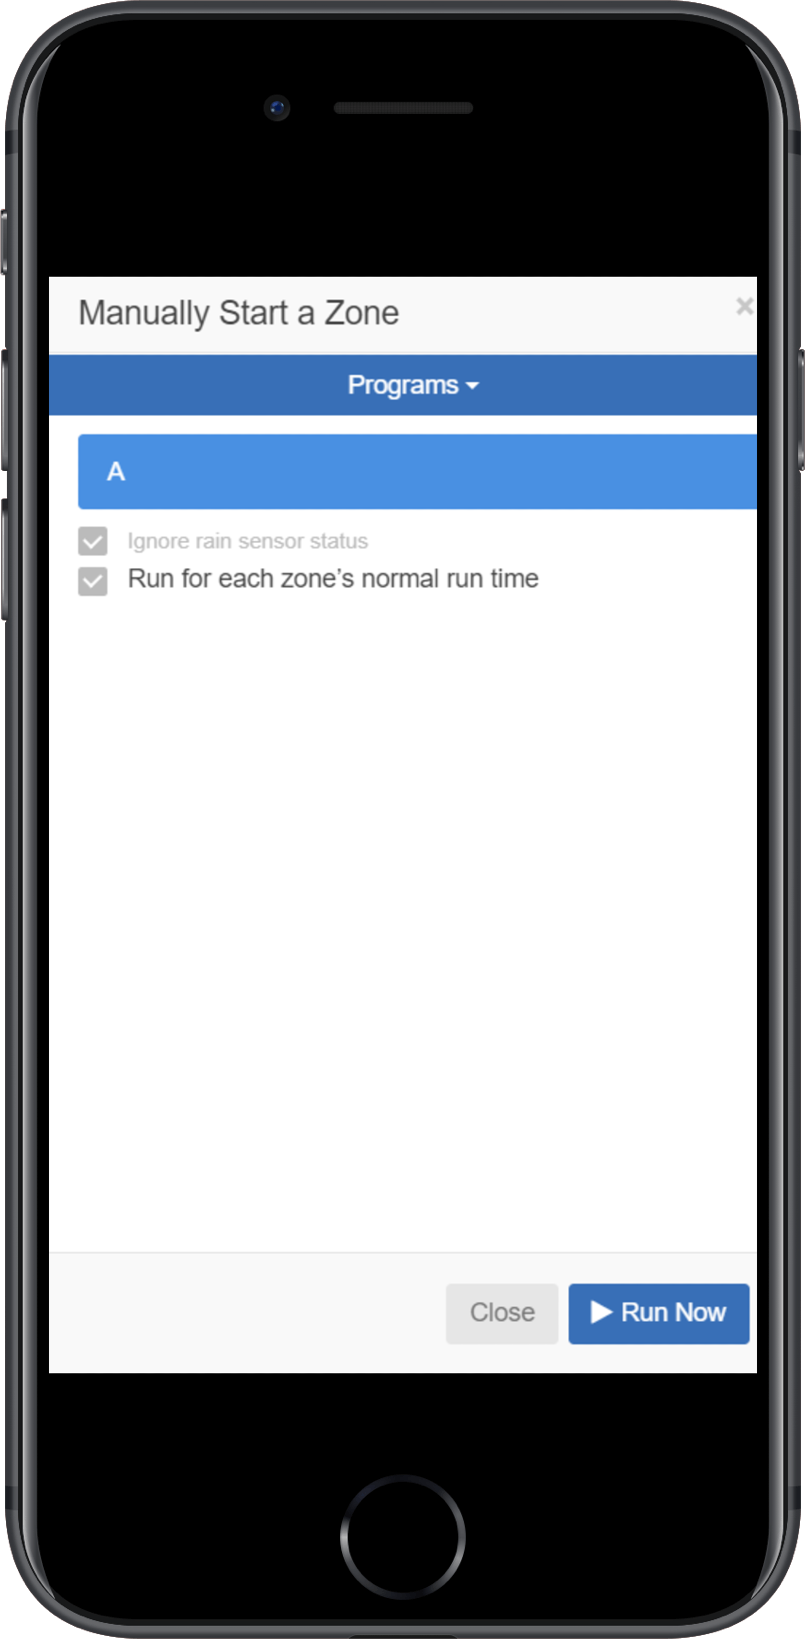
- Programs – Manually select either all or some zones to start.
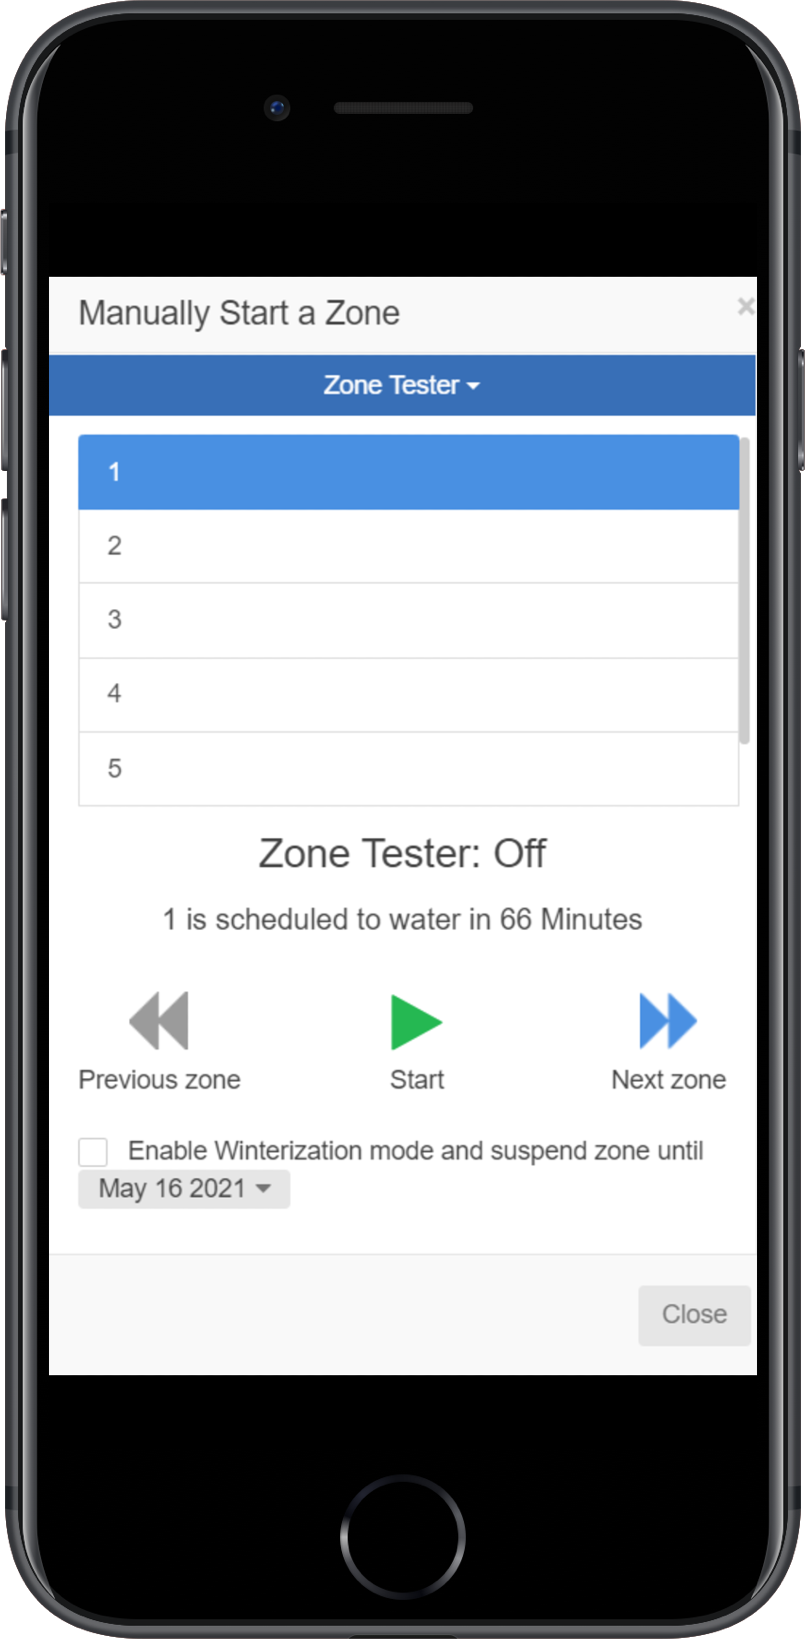
- Zone Tester and Winterization – Contractors use this tool for winterizing and testing your system.
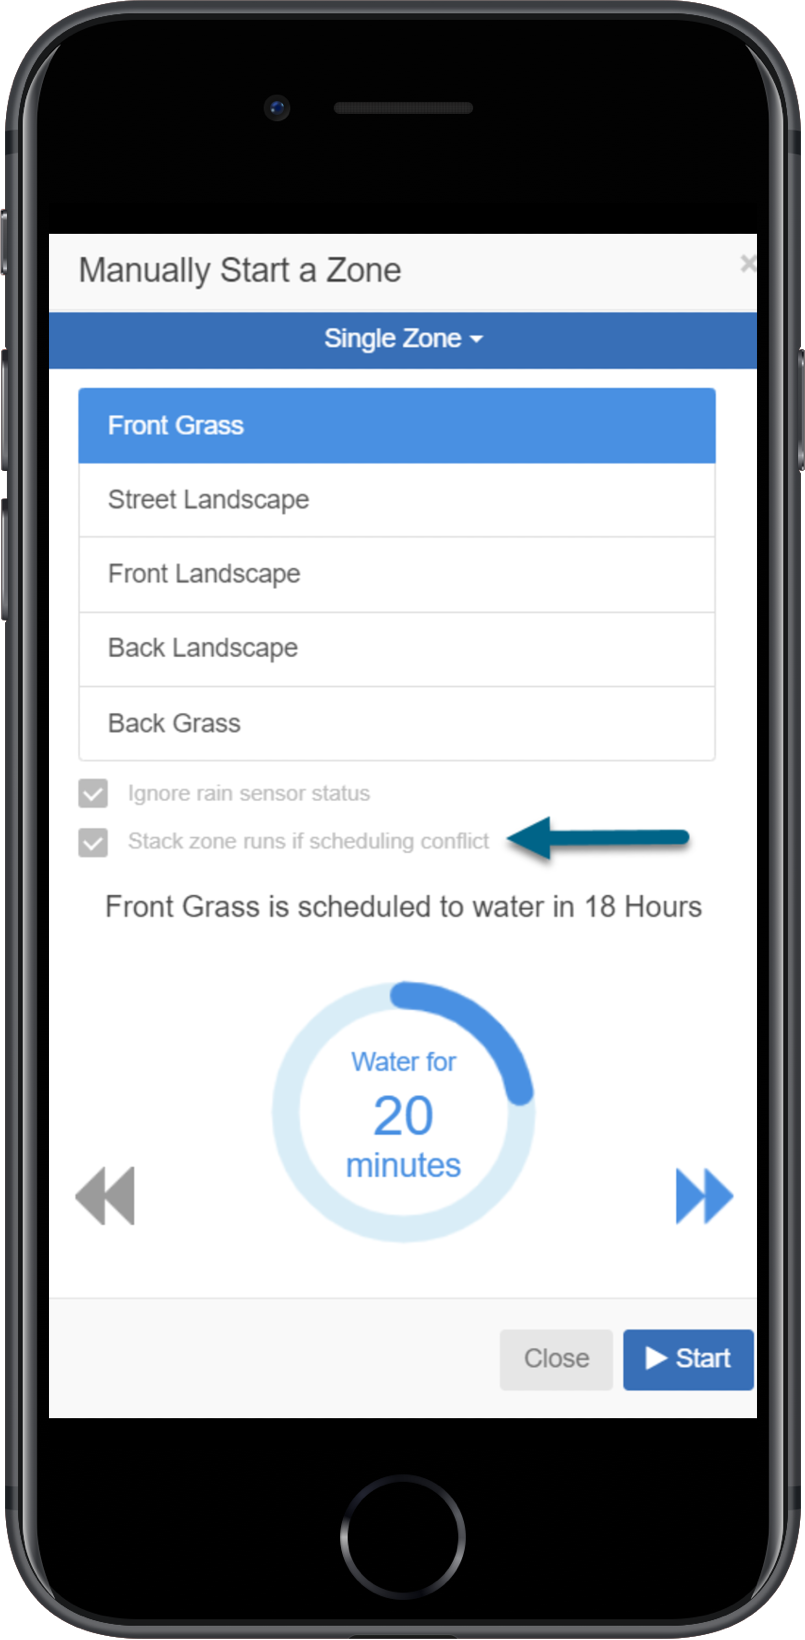
IMPORTANT: In the event you have a conflict with your automatic schedule, you can check the box titled Stack zone runs if scheduling conflict. This feature will allow the manual cycle to run shortly after the programmed cycle. If you leave it unchecked, your system will run manually now but will cancel the programmed cycle.
- Select the SINGLE-ZONE option at the top dropdown.
- Select a ZONE from the list.
- Change the RUN TIME inside the circle if desired.
- Click START.
- Select the ALL ZONES option at the top dropdown.
- Change the RUN TIME inside the circle if desired. Deselect a zone if you do not it to water.
- Click RUN NOW.
NOTE: Blue represents that zone will water and white represents that zone will not water.
- Select the PROGRAMS option at the top dropdown.
- Select a PROGRAM.
- Click RUN NOW.
This feature will allow you to run each zone manually, and then allow you to quickly advance to the next zone. If you enable Winterization Mode, the system will be suspended until the date set after your testing is complete (e.g., spring). This tool is most often used by irrigation professionals using the blow-out winterization method.
- Select the Zone Tester option at the top dropdown.
- If a suspension is required after this manual cycle, check the box for Winterization Mode and select a date.
- Select a Zone from the list.
- Click Start.
- Click the right Arrow to advance to the next zone for testing.
Controller Selection Options
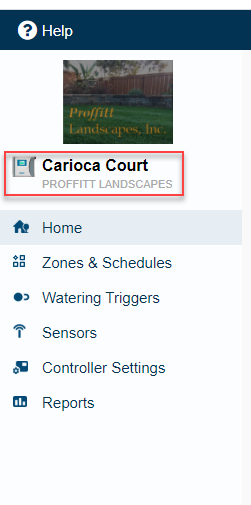
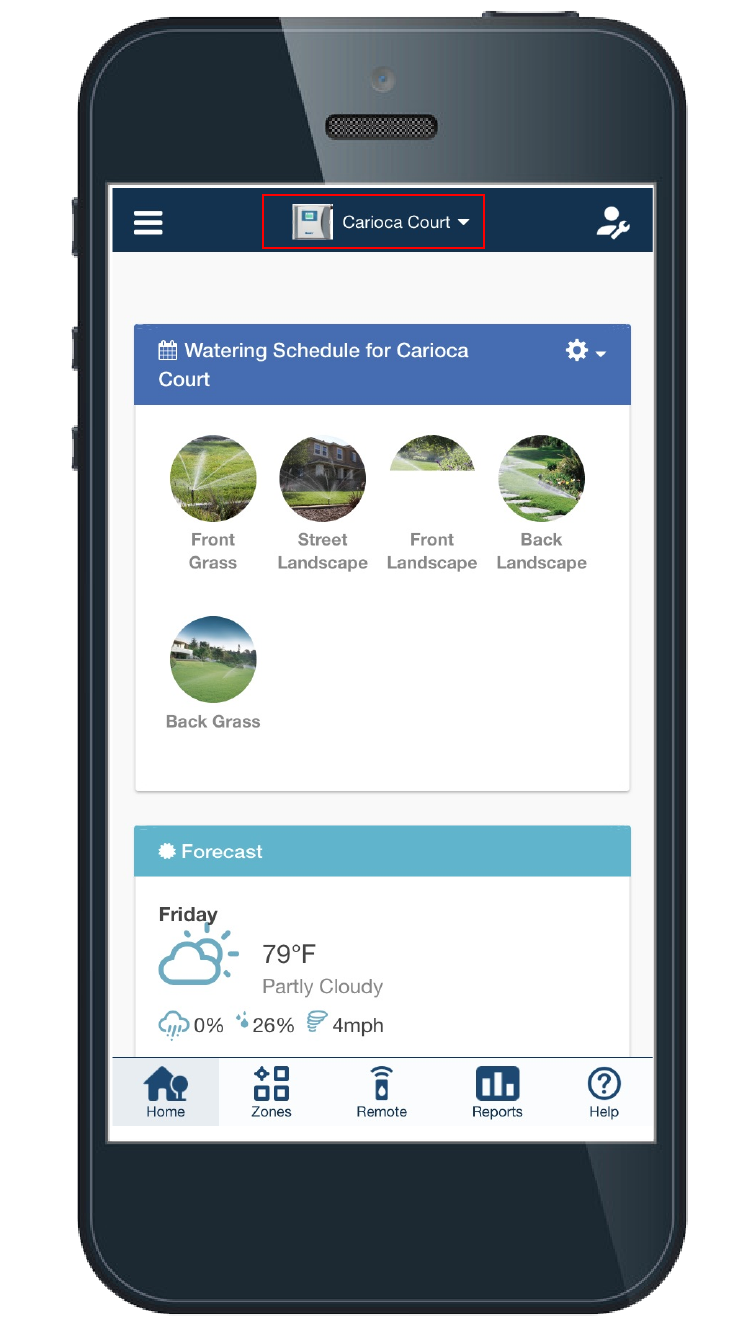
This option allows you to toggle between controllers as well as a few other features listed below. Click the CONTROLLER NAME on the left-hand side of the HOME screen. If you are using the Hydrawise app on a mobile device, you will see a drop-down list at the top center of the screen.
| Computer | Mobile |
 |
 |
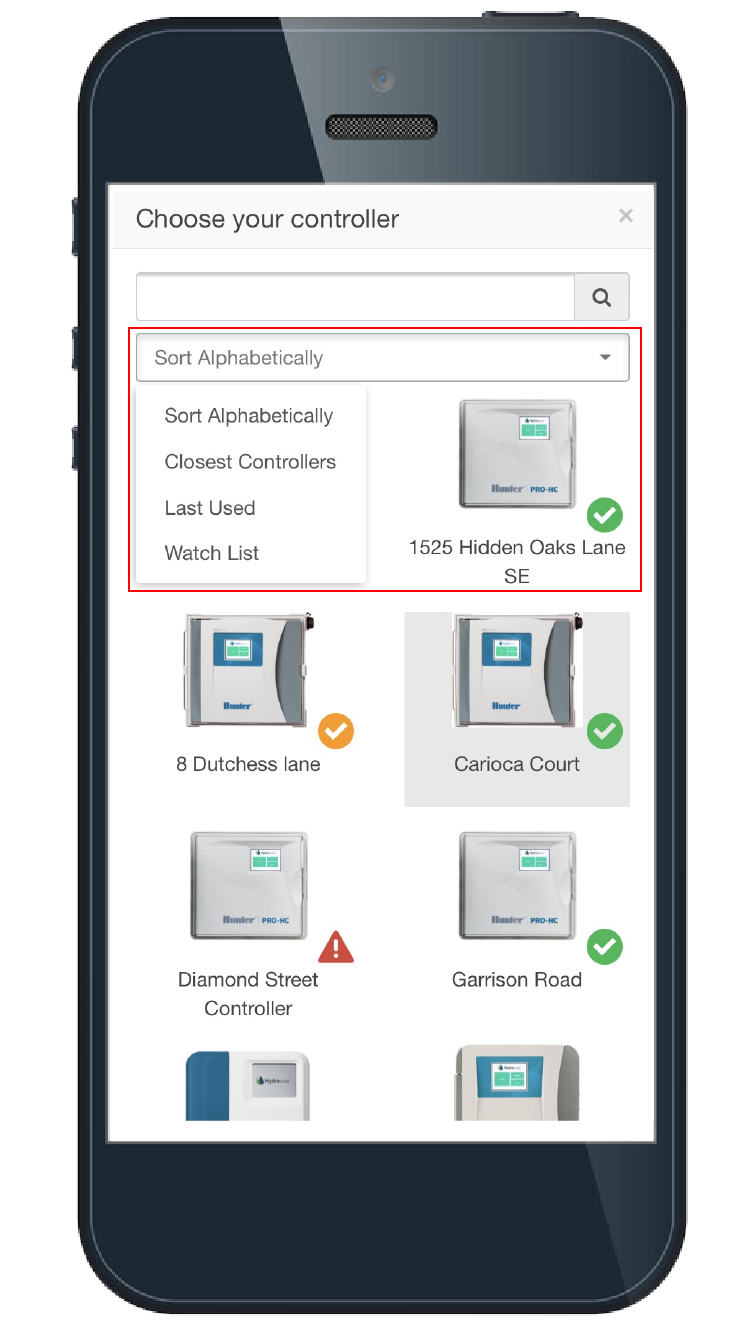
There are four helpful tools to help you quickly locate controllers.
- WATCH LIST: This option lets you group selected customers into a separate list (e.g., they could be on vacation and want you to take special care of their property, they could be your most important customers, or they could be paying you additional fees for monitoring).
- CLOSEST CONTROLLERS: You can sort your controllers based on location. To do so, select Location from the Controller Selection List. You will see controllers listed from closest to your present location to the farthest away. This option is ideal for making site visits.
- SORT ALPHABETICALLY: This option sorts controller names alphabetically.
- LAST USED: This option lists the controllers that were most recently used first.
To see the drop-down menu for these options, click the arrow to open the selection tab.
Controller Status
The CONTROLLER STATUS feature will allow you to determine the status of your internet connection. The three message options below will display on the home dashboard with an explanation of each status.
| Status | Description |
| All Good | The controller is connected to Hydrawise and has the latest configuration. |
| No Internet Connection | The controller is not connected to Hydrawise. We detect this within 7 minutes. Learn More |
| Waiting for Controller | The controller is missing the serial number. Learn More |
Managing Multiple Controllers
From the HOME menu, choose the Controller Name on the left hand side of the home screen.
This will give you a list of all the controllers in your account. Click on the controller name to change to configuring that controller.
Choose the controller you want to view.
Stacking Zones Manually
In manual mode, you can stack zone runs when a zone is already running. As you turn on individual zones, they will be put in a queue. Each zone will run when the previous zone is finished.
Note: This is only available on SINGLE ZONE runs. All other manual run features (e.g., All zones, Programs, Zone Tester) will automatically CANCEL any current run cycles.
Here's how to use this feature:
- Sign in to your Hydrawise account.
- Click any ZONE (
 ) icon.
 - Select the PLAY (
 ) button.
- SINGLE ZONE: This allows you to manually start a single zone for the scheduled time or a time you manually change.
- Check the box STACK ZONE RUNS IF SCHEDULING CONFLICT to enable this feature.
- Click START.
| Manual Start a Zone View |
 |
Suspend Zone(s)
In the Hydrawise software (smart device, PC, or Mac), you can Suspend (turn off) your system for any period of time for winterization purposes or for a basic system shutdown. This feature includes the following options: Suspend Single Zone, Multiple Zones, Suspend Controller (contractor plan only), Suspend Customer (contractor plan only), View Suspend, or Remove Suspend.
Important: When using this feature in editing mode, the default calendar setting will always show today as the END date. This does not indicate that your suspension will end today, but only a beginning reference point to set the suspension.
| Steps |
- From the Home screen, click on the Gear
icon.
- Select Suspend All Zones.
- Select Single Zone, Multiple Zones, Controllers, or Customers.
-
- Single Zone - Used to suspend one of your zones (stations).
- Multiple Zones - Used for suspending all zones or selecting specific zones (stations).
- Controllers - Used for suspending entire controllers on a customer account (contractor plan only).
- Customers - Used for suspending entire customers, including their controllers (contractor plan only).
-
- Select the Date Range for the suspension. Use the arrow in the gray drop-down boxes to select a beginning and end. Once the date is selected, click Suspend, then Close.
- To View your suspension, you can do so by selecting any zone from the home dashboard. Once selected, the remaining suspension will appear on top of the info box.
- To Remove your suspension before the due date, click the gear above your zones, then Suspend All Zones. Click Resume All Watering For This Zone. The suspension will be removed, and the system will be ready for watering.
NOTE: We recommend leaving the suspended controller plugged in so you continue to receive firmware updates.