Advanced Mode Overview - Zones and Schedules
Hydrawise supports 3 types of watering - Time Based, Smart (ET) Watering, and Virtual Solar Sync. Choosing which style of watering depends on a number of things, including your type of irrigation zone, if any watering restrictions exist in your area and personal preference (for example, for people who like to know that their irrigation will start on Mondays, Wednesdays and Fridays then Time Based Watering is ideal). Other topics covered in this article include:
Configure Program Start Times and Water Days
Configure Preconfigured Water Schedule
Adding a Zone
To add an irrigation zone, navigate to the Zones & Schedules page in your Hydrawise account and click on Add a New Zone. The Zone wizard will be displayed.
Fill in the Zone Details:
Zone Name: Name for each irrigation zone. Zone names are displayed on the Hydrawise controller and are used in your Hydrawise account to show run times and allow manual modification of watering schedules.
Zone Number: The zone number for each irrigation zone should match the number you have used when wiring the controller.
Zone Icon: Choose an icon which will be used to display the zone on the dashboard. If you have uploaded an image for this zone you can choose it to be displayed on the dashboard instead.
Watering Type: Select a watering mode for this zone. A zone can use Smart (ET) watering or Time Based watering, which are described below.
Depending on the type of watering you chose, fill in the details for Time Based, Smart (ET) Watering or Virtual Solar Sync.
Time Based Watering
Watering Type: Choose whether to set the information manually or choose from a list of preconfigured watering schedules.
Enter Time and Frequency: allows you to manually set the watering length and frequency.
Use a Preconfigured Watering Schedule: add a preconfigured watering schedule or use one you’ve previously created. If your controllers are managed by a contractor, you may see preconfigured watering schedules that your contractor has created, which you can also use.
Enter Time and Frequency: If you choose to enter the time and frequency, the following fields are available:
Watering Length: The number of minutes this zone will run for each time.
Watering Frequency: Choose how often to water the zone.
Schedule Adjustment: Choose how to adjust the watering time based on your weather triggers.
Use a Preconfigured Watering Schedule: If you choose to use a preconfigured Watering Schedule you can either choose from a list of schedules you’ve previously created, or add a preconfigured watering schedule by entering the watering length and frequency and schedule modifications as per the fields above. If your controllers are managed by a contractor, you may see preconfigured watering schedules that your contractor has created, which you can also use.
Cycle and Soak: Cycle and Soak is the ability to break the watering time for a zone into periods of watering (cycle) and pause (soak) to allow the water to soak into the soil without runoff.
You can enable or disable Cycle and Soak. If you enable it, you need to specify the cycle and soak periods:
- Cycle Time: the maximum number of minutes the zone can run for
- Soak Time: the minimum time between zone watering to allow the water to soak into the soil
Tuning: Adjust the watering time for this zone from the calculated time. This allows you to fine tune your watering if your zone appears to be too dry or wet.
Smart (ET) Watering
Watering Type: Choose whether to set the information manually or choose from a list of preconfigured watering schedules.
Enter Time and Frequency: allows you to manually set the watering length and frequency.
Use a preconfigured Watering Schedule: add a preconfigured watering schedule or use one you’ve previously created. If your controllers are managed by a contractor, you may see preconfigured watering schedules that your contractor has created, which you can also use.
Enter Time and Frequency: If you choose to enter the time and frequency, the following fields are available:
Watering Length: The number of minutes this zone will run for each time.
Peak Season Watering Frequency: How often the zone will normally run during your peak irrigation period. This frequency will be automatically adjusted throughout the year based on actual evaporation and rainfall.
Use a Preconfigured Watering Schedule: If you choose to use a preconfigured Watering Schedule you can either choose from a list of schedules you’ve previously created, or add a preconfigured watering schedule by entering the watering length and frequency and schedule modifications. If your controllers are managed by a contractor, you may see preconfigured watering schedules that your contractor has created, which you can also use.
Note that the Schedule Adjustment option in a preconfigured Watering Schedule is not used for Smart (ET) watering zones.
Cycle and Soak: Cycle and Soak is the ability to break the watering time into periods of watering (cycle) and pause (soak) to allow the water to soak into the soil without runoff. You can enable or disable Cycle and Soak. If you enable it, you need to specify the cycle and soak periods:
- Cycle Time- the maximum number of minutes the zone can run
- Soak Time- the minimum time between zone waterings to allow the water to soak into the soil
Tuning: Adjust the watering time for this zone from the calculated time. This allows you to fine tune your watering if your zone appears to be too dry or wet.
Adding Zone Images
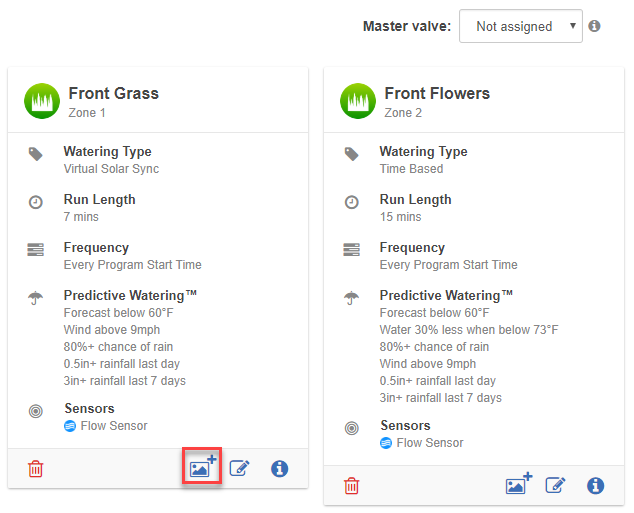
You can upload multiple pictures of each of your irrigation zones to the Hydrawise system. To upload an image click on the Image Add button  next to the Zone Edit button.
You can upload multiple images per zone. The total number of images that can be uploaded is based on the images size and is different for each account’s Plan Subscription.
After an image is uploaded you can select an image to be displayed on the Dashboard by editing the zone  and selecting the image in the Zone Icon list
Configuring a Master Valve (Sensors and Valves Section)
A master valve is an automatic valve that is installed at the point where the irrigation system connects to the water supply. (Sometimes this circuit is called a “pump start circuit.” Both types of circuits work similarly and can be used for a pump and/or a master valve.) The controller turns the master valve on and off.
Zone valves are the individual valves that operate a group of sprinklers or drip emitters. Typically one zone valve is turned on at a time, and controls the irrigation in a specific area of your garden. Whenever one of the irrigation zone valves is told to open by the controller, the controller also signals the master valve to open - the master valve acts like a back up valve, or a fail-safe valve. The purpose of the master valve is to shut off the water to the irrigation system when none of the zone valves are operating.
The image below shows a master valve operating connected to Zone 12 on a Hunter HC controller.
Different Hydrawise-Ready controller models have different options when selecting a master valve. With a Hunter HC controller, any one of your ordinary zones can be configured to act as a master valve, with all other Hydrawise-Ready controller models there is a dedicated master valve.
The master zone is configured on the Zones & Schedules page underneath your list of irrigation zones as highlighted in the image below.
Configuring Master Valve - PRO-HC
With the Pro-HC, setting the master valve (MV) is similar. All you need to do is select whether you have a MV as shown below.

You no longer have to select which zone the MV is connected to, as the option will be different depending on the controller you select when setting up your controller for the first time.
Initially there is no master valve configured.
Configuring Master Valve - HPC-FP (Panel for PC-400 controller)
The default is for all stations to have the master valve/pump start circuit ON. The master valve/pump start can be set ON or OFF by station, regardless of which program the station is assigned.
Please follow the steps for initializing the P/MV for each zone.
- Click the
icon for the zone in "zones and schedules"
- Click Next three times to enter the advanced section or programming.
- You can now choose either of the following:
- Use Global Master Valve Setting (Turns the P/MV circuit ON)
- Use Disable Master Valve (Turns the P/MV circuit OFF)
Configuring Program Start Times
Your controller's watering Program Start Times specify when your controller is permitted to do any watering. If multiple zones are using the same Program Start Time, then they will be started in sequence (only one zone can run at a time).
To add a program start time, navigate to the Zones & Schedules page in your Hydrawise account and click on Add Watering Time.
Start Time: Enter the time for this Program Start Time.
Watering Type: Choose the watering type for this Program Start Time. For example, choose odd or even weeks.
Watering Days: Choose which days this Program Start Time applies to. For example, choose odd or even days, or select specific days of the week.
Then select the zones to which this Program Start Time applies. Either apply it to all zones or select from a list of zones or Preconfigured Watering Schedules.
Configuring Preconfigured Schedules
Preconfigured Watering Schedules allow you to group together zones with identical watering properties.
Each Preconfigured Watering Schedule determines how long a group of zones will run and how the schedule should be modified based on your local weather. Zones will water only at your defined Program Start Times.
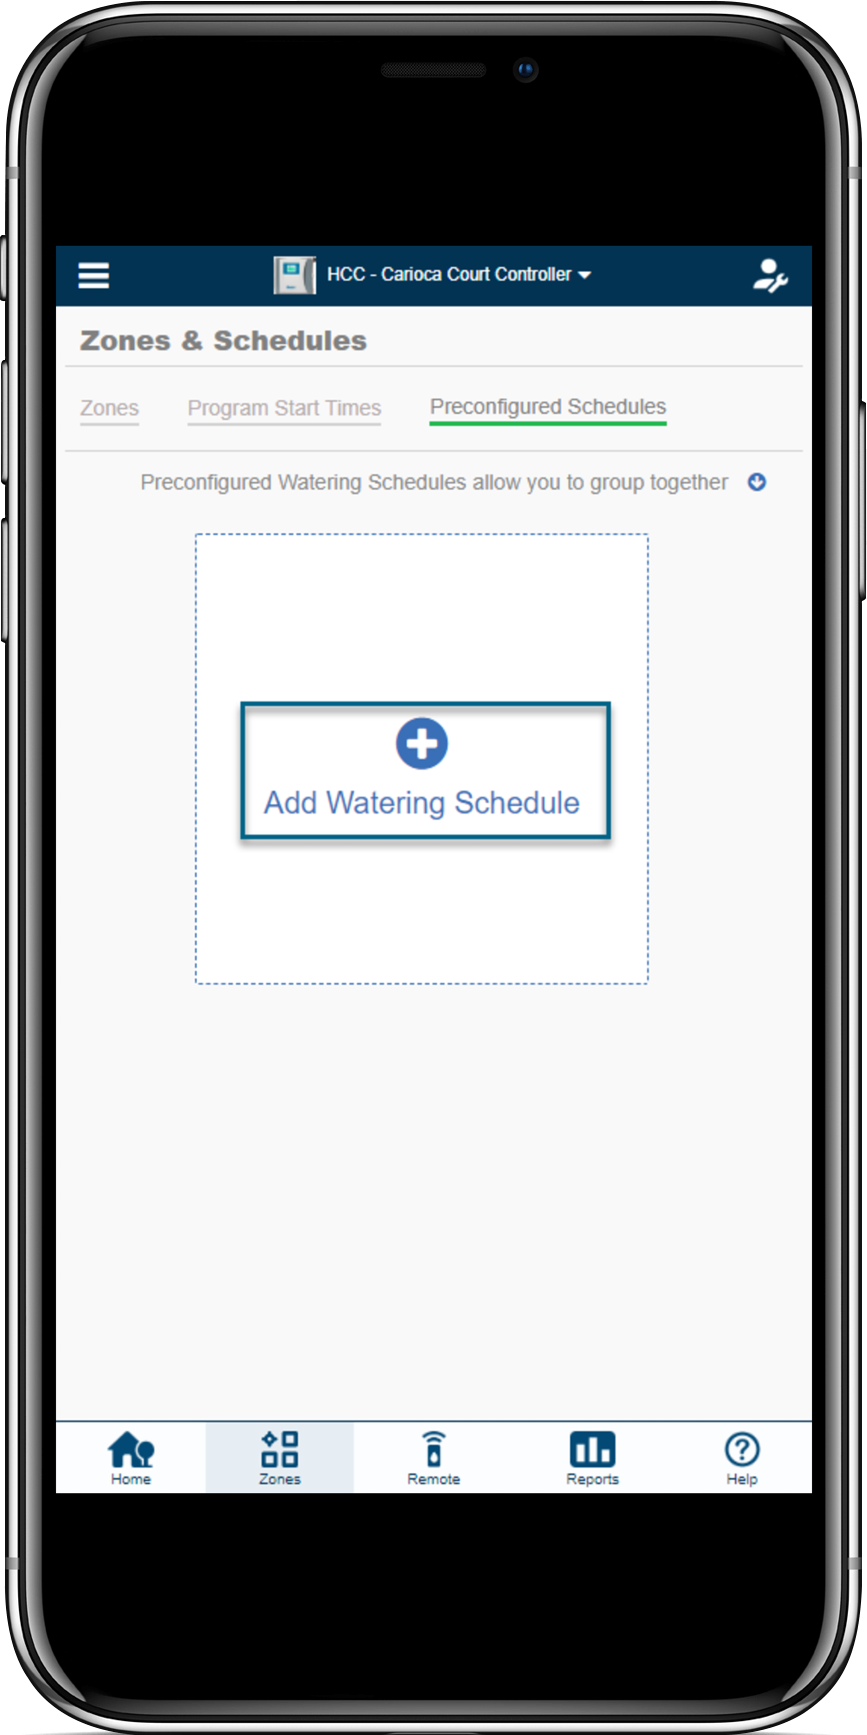
To add a preconfigured watering schedule, navigate to the Zones & Schedules page in your Hydrawise account and click on Add Watering Schedule.
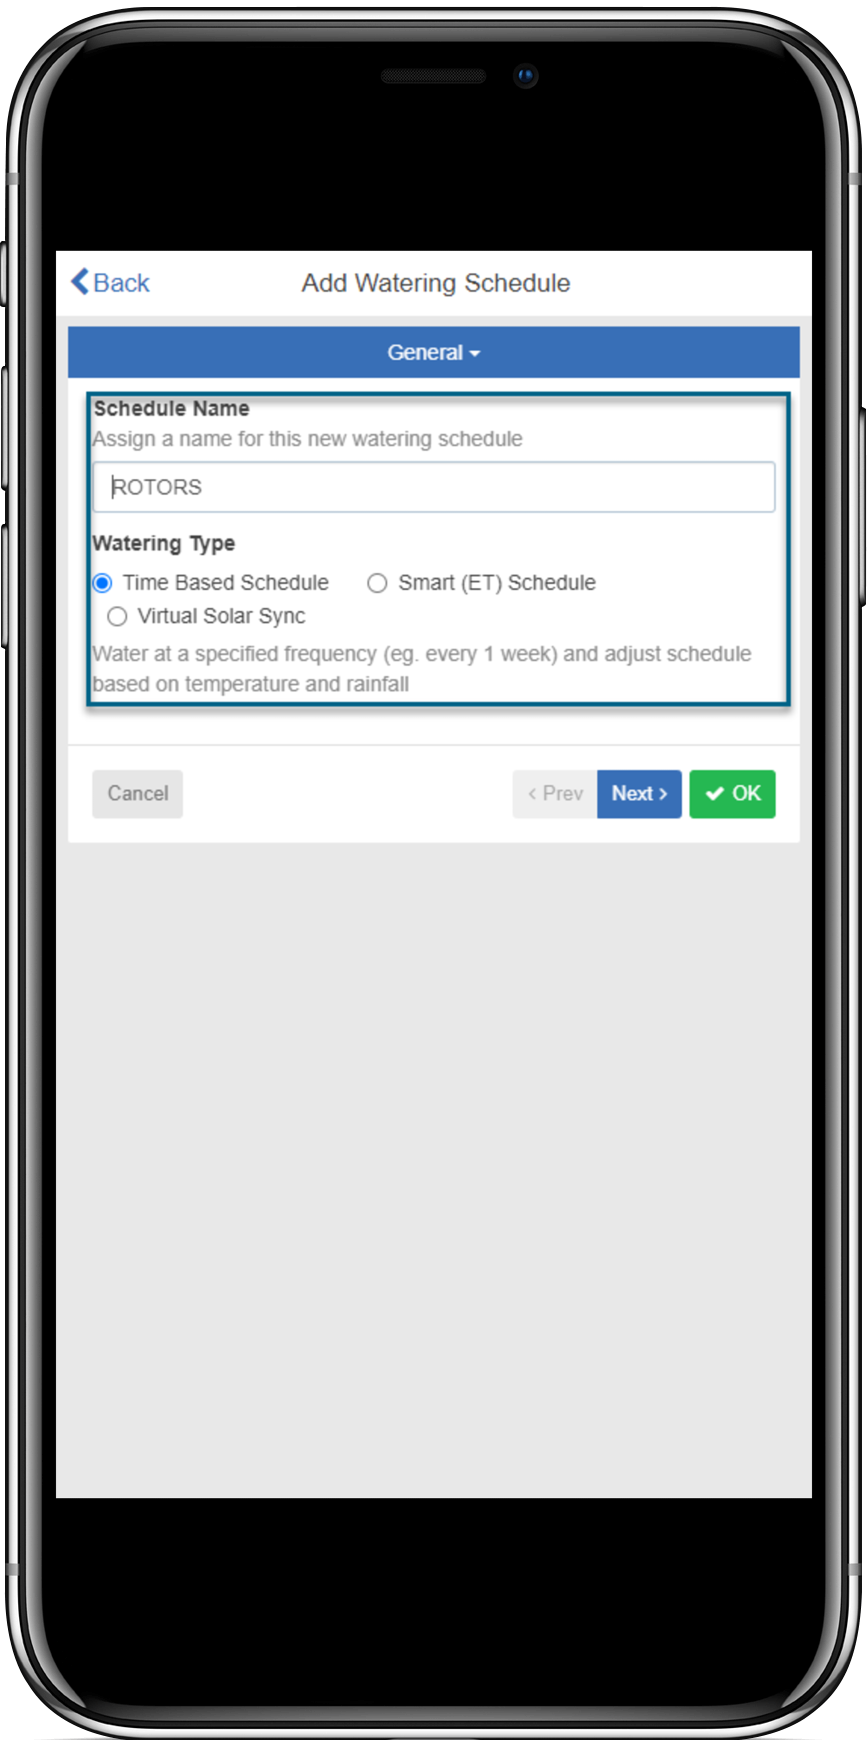
Schedule Name: Give the schedule a name.
Run Time: Choose how long each irrigation zone associated with this Preconfigured Watering Schedule will run.
Run Frequency: Choose how often each irrigation zone associated with this Preconfigured Watering Schedule will run.
Schedule Modification: Select how the watering schedule for this Preconfigured Watering Schedule is modified based on temperature and rainfall. Note: if you apply this watering schedule to a Smart (ET) Watering zone, the schedule modification is not used.
Viewing Preconfigured Watering Schedules
You can see all your preconfigured watering schedules on the Zones & Schedules page.
If your controllers are managed by a contractor, you may also see preconfigured watering schedules that your contractor has created. These will have a group symbol next to them as highlighted below. You can use these preconfigured watering schedules but you can’t edit or delete them – only the contractor can do that.
Zones - Using the Watering Type Time Based
Time-based watering will water on specific days (unless delayed by rainfall or forecast rainfall) and will vary the watering length based on your watering triggers. The controller will use the Watering Triggers you’ve set to automatically adjust its watering schedule. This Watering type would be most common as it allows the user to set the information manually or choose from a list of pre-configured watering schedules.
Please view the steps and screenshots to access this feature:
Click on ZONES AND SCHEDULES from the home dashboard, then select ZONES. Scroll down to the first zone you choose to edit. Click on the  icon.
icon.
- Choose TIME BASED as the watering type and click NEXT.
- Choose the following options for the Time Based Schedule.
- Watering type - time and frequency or preconfigured schedule.
- Watering length - run time for zone in minutes (1 min to 1439 mins).
- Watering frequency -
- Every Program start time - This will allow the program to start at the designated time set in start times.
- Interval days - See article here for details
- Predictive watering adjustments - Adjusted based on your water triggers
- Monthly adjustments can be made using a chart as well.
- Click NEXT when adjustments are complete.
- Choose ENABLE OR DISABLE the cycle soak feature.
- Finally, the Advance Section will allow you to select a WATERING ADJUSTMENT as a %.
| STEP 1 |
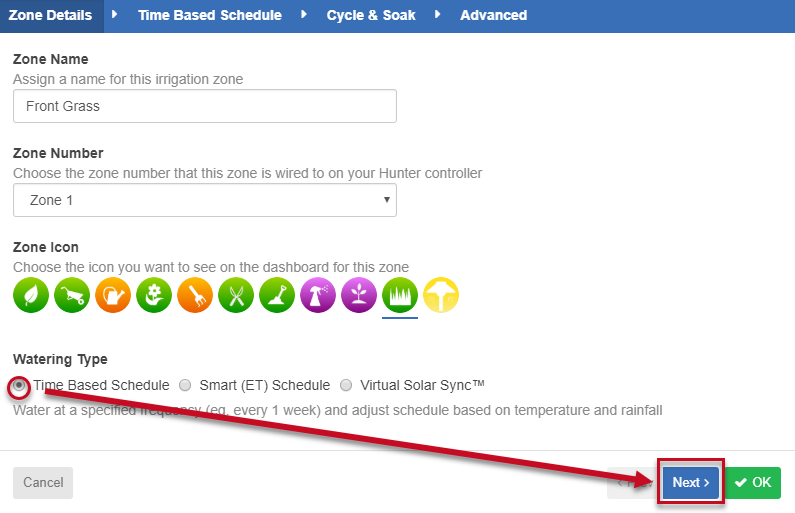 |
| STEP 2 |
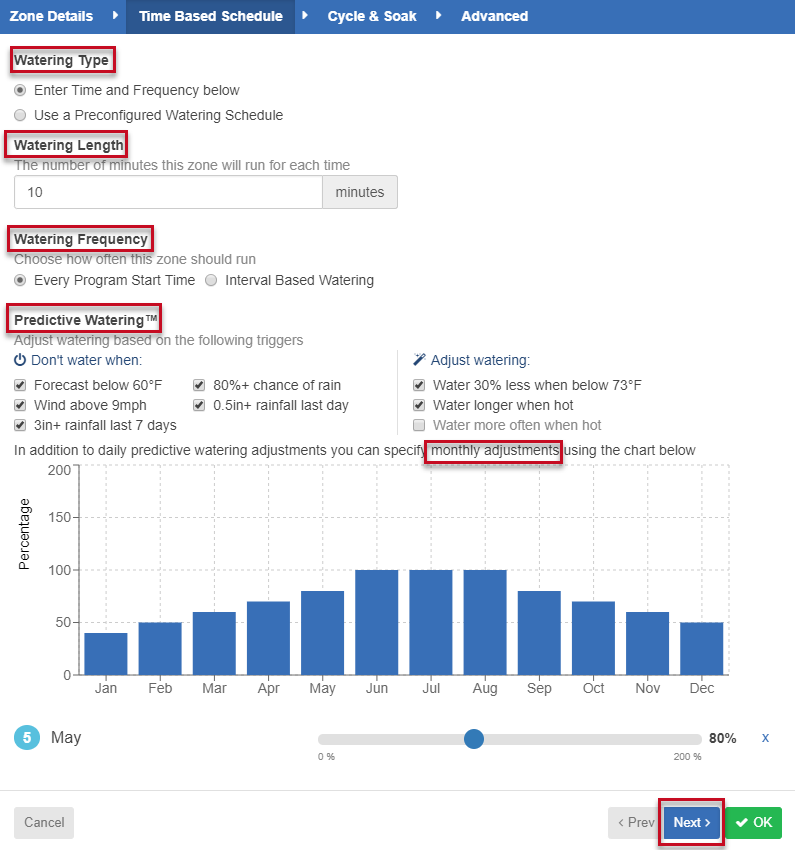 |
| STEP 3 |
 |
| STEP 4 |
 |
Zones - Using the Watering Type Virtual Solar Sync
This operates the same way as the Hunter Solar Sync by adjusting the run time per zone. It uses daily ET from your selected weather stations instead of on-site ET so it does not require on-site Solar Sync sensor installation. If no weather station ET is available, then it will fall back to using forecast ET and historical ET. The virtual Solar Sync makes its adjustments based on the rolling average of the last three days of data.
| Hunter’s Solar Sync Region and Water Adjustment settings | |
| Region | Determined automatically based on your controller’s location from the weather station selected. |
| Water Adjustment | Use the Advanced Tab when editing a zone to adjust the zone’s watering. See step 4 below: |
| Run Times | Set station run times (1 min to 1439 min) for peak summer watering. For assistance on establishing correct run times for your system, see run time calculator. |
Please view the steps and screenshots to access this feature:
Click on ZONES AND SCHEDULES from the home dashboard, then select ZONES. Scroll down to the first zone you choose to edit. Click on the  icon.
icon.
- Choose VIRTUAL SOLAR SYNC as the watering type and click NEXT.
- Choose the watering length, watering frequency, and weather adjustments, and click NEXT.
- Choose ENABLE OR DISABLE the cycle soak feature.
- Finally, the Advance Section will allow you to select a WATERING ADJUSTMENT as a %.
| STEP 1 |
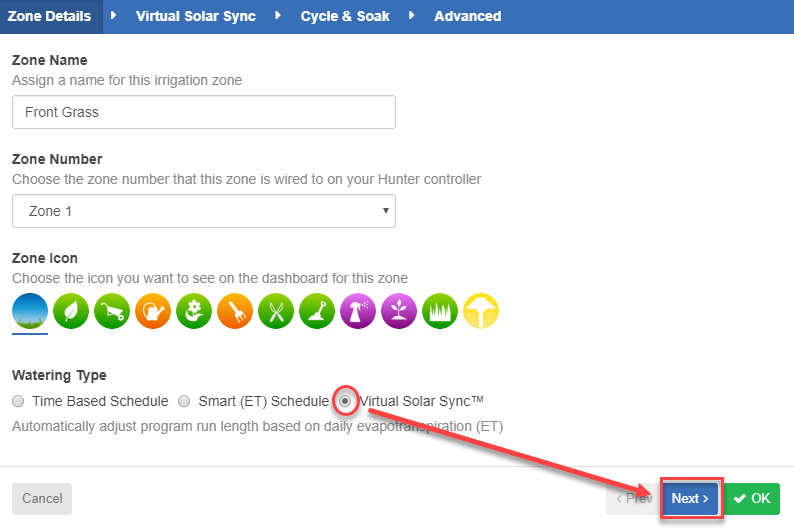 |
| STEP 2 |
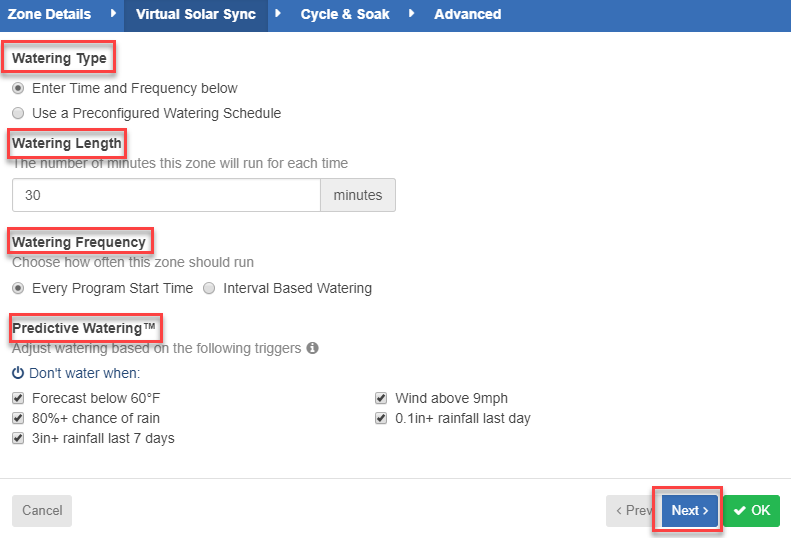 |
| STEP 3 |
 |
| STEP 4 |
 |
After Virtual Solar Sync has been installed and programmed, it is recommended to allow the system to run for a few days at the initial setting. Because of the variety in site conditions, the initial setting may require adjustment in order to achieve the desired performance.
Virtual Solar Sync and Pre-Configured Watering Schedule Note:
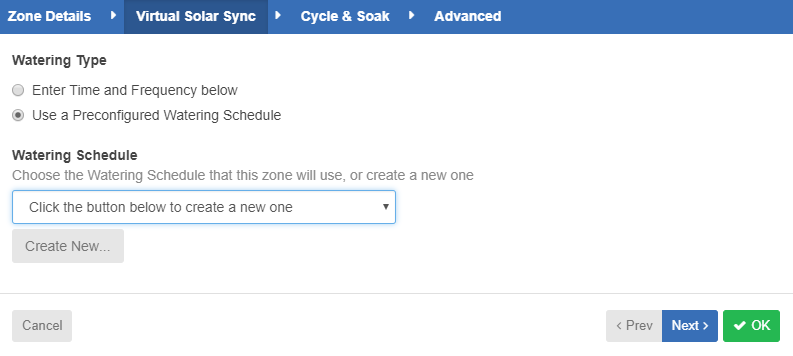
In order to use Virtual Solar Sync with Pre-Configured Schedule, you must first have a Pre-Configured Schedule assigned in the account. The drop down here will not display any schedule without completing the necessary steps found in the article here or simply click CREATE NEW as shown in the section below.
| Pre-configured Watering Schedule Drop Down |
 |
Zones - Using the Watering Type Smart (ET) Watering
Smart (ET) Watering is an automated schedule that uses information about environmental conditions to ensure your plants get the optimal amount of water. Evaporation will draw moisture from your garden, while rainfall and irrigation will add moisture. Understanding these conditions allows Hydrawise to decide when the time is right to water your garden. ET stands for evapotranspiration and is explained further below.
For each zone, you will have to assign the watering length and peak watering frequency:
- The watering length is how long watering needs to run to water your zone thoroughly.
- The peak watering frequency is how often you usually water this zone during your peak irrigation period.
The controller will vary your watering frequency based on actual evaporation and rainfall in your area on a day to day basis. In contrast to Time Based Watering and Virtual Solar Sync, Smart Watering will always water a zone for the same run length, and it will vary the frequency (days) of watering based on temperature and rainfall. Learn More
Please view the steps to set up Smart (ET) Watering.
- Click on Zones & Schedules from the home dashboard.
- Select Zones. Scroll down to the first zone you choose to edit (
).
- Enter the zone name and number, and choose the icon.
- Choose Smart (ET) Watering as the watering type and click Next.
- Choose the following options for the Smart (ET) schedule.
- Watering type - Time and frequency or preconfigured schedule.
- Watering length - Run time for the zone in minutes.
- Peak Season Watering frequency - Days between watering in the peak (hottest time) of the season.
- Predictive watering adjustments - Uses ET data from weather stations.
- Click Next.
- Choose Enable or Disable for Cycle Soak. Click Next. Learn More
- In the Advanced section, you can fine-tune your watering if needed. This feature is designed to slow down or speed up the drying process. If the soil is too wet, then we allow it to dry for longer, too dry; smart watering will allow less drying time.
- When setup is complete, click ok.
How it Works
Hydrawise looks at the data that you enter, the watering time and frequency. We reverse engineer the Penman-Monteith formula for ET using proprietary algorithms and ten years of history for that address.
If extra watering occurs, there is likely a lot of rainfall during the Peak Irrigation month; this is accounted for. However, there are days when there is no rainfall, and the ET becomes artificially high as there has been no rainfall. Hence, we need to irrigate more than you expect.
The Math
You get these from the Reports > Weather > Monthly Evapotranspiration on the web browser application.
(Monthly ET - Monthly Rainfall) / number of days in the month = Daily ET.
Peak Month is Month—You can find this by going to a zone, editing it, then going to the Smart (ET) tab and clicking the “Help me set up?” link.
Example:
ET 162mm
Rainfall 225mm
(162-225)/31= -2.03mm
Daily ET is - 2.03mm, so with peak watering set to 1 day, this means we should require -2.03 x 1 = -2.03mm of ET to be used before we water. This is bad since the ET is negative.
The daily ET reports show the current average is 5.1mm.
This means the schedule will irrigate every day based on the current calculations since the ET will always be negative. We can recommend using the Time-Based Watering type coupled with the watering triggers, which provides a much better controller over when you want the schedule to irrigate.
Program Start Times
The PROGRAM START TIMES are the specified times when your controller is permitted to water. Watering will not occur with no start times even if run time is added to all the zones. Please view the steps and screenshots to access this feature:
| Edit Program Start Time or Water Days |
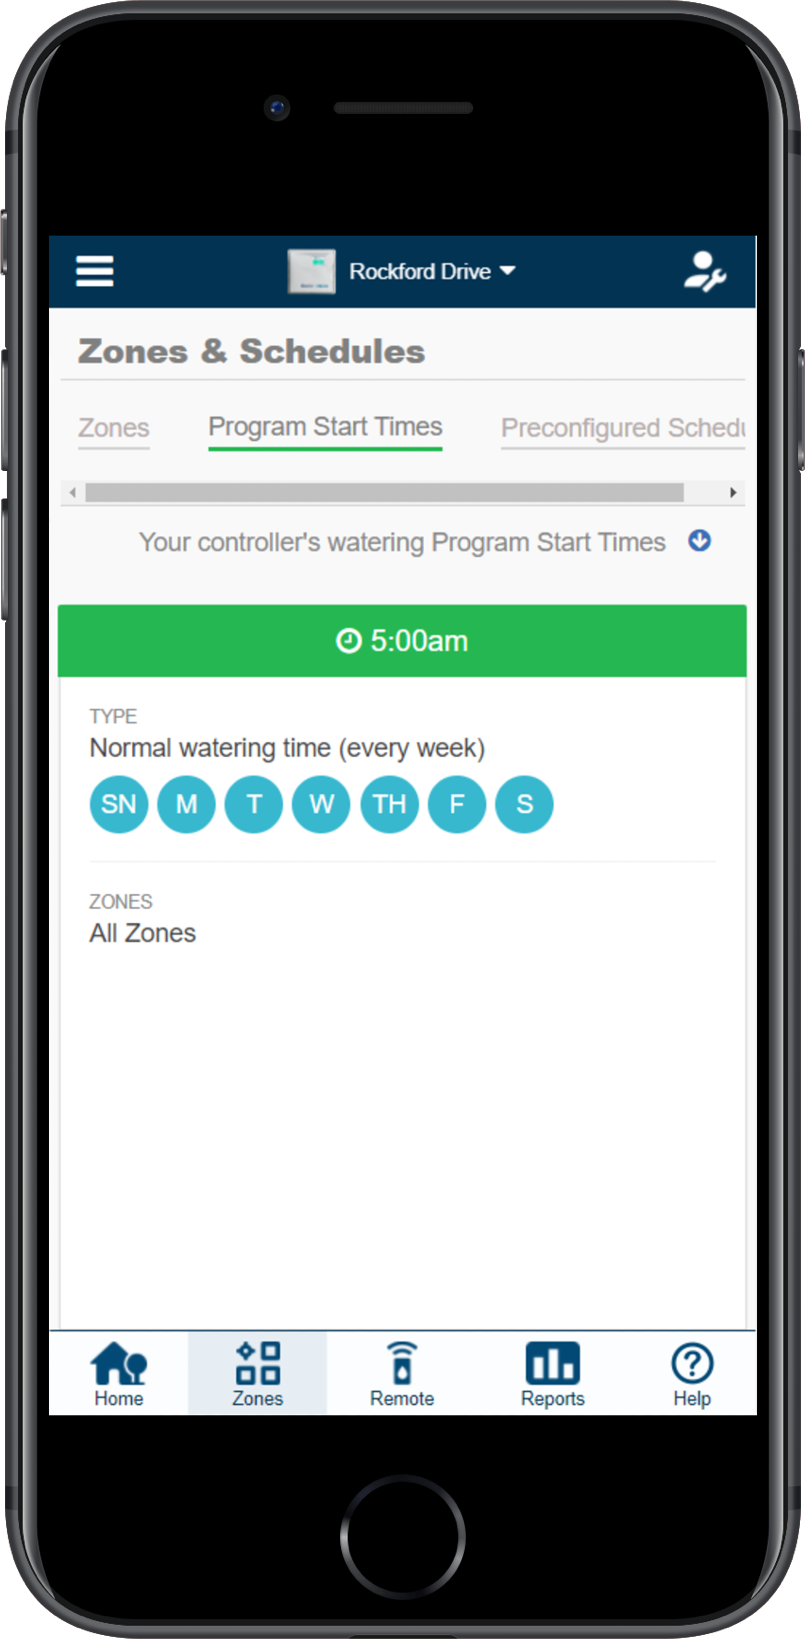
- Click on ZONES at the bottom of the app or ZONES AND SCHEDULES on a web browser from the home dashboard. Select PROGRAMS START TIMES.
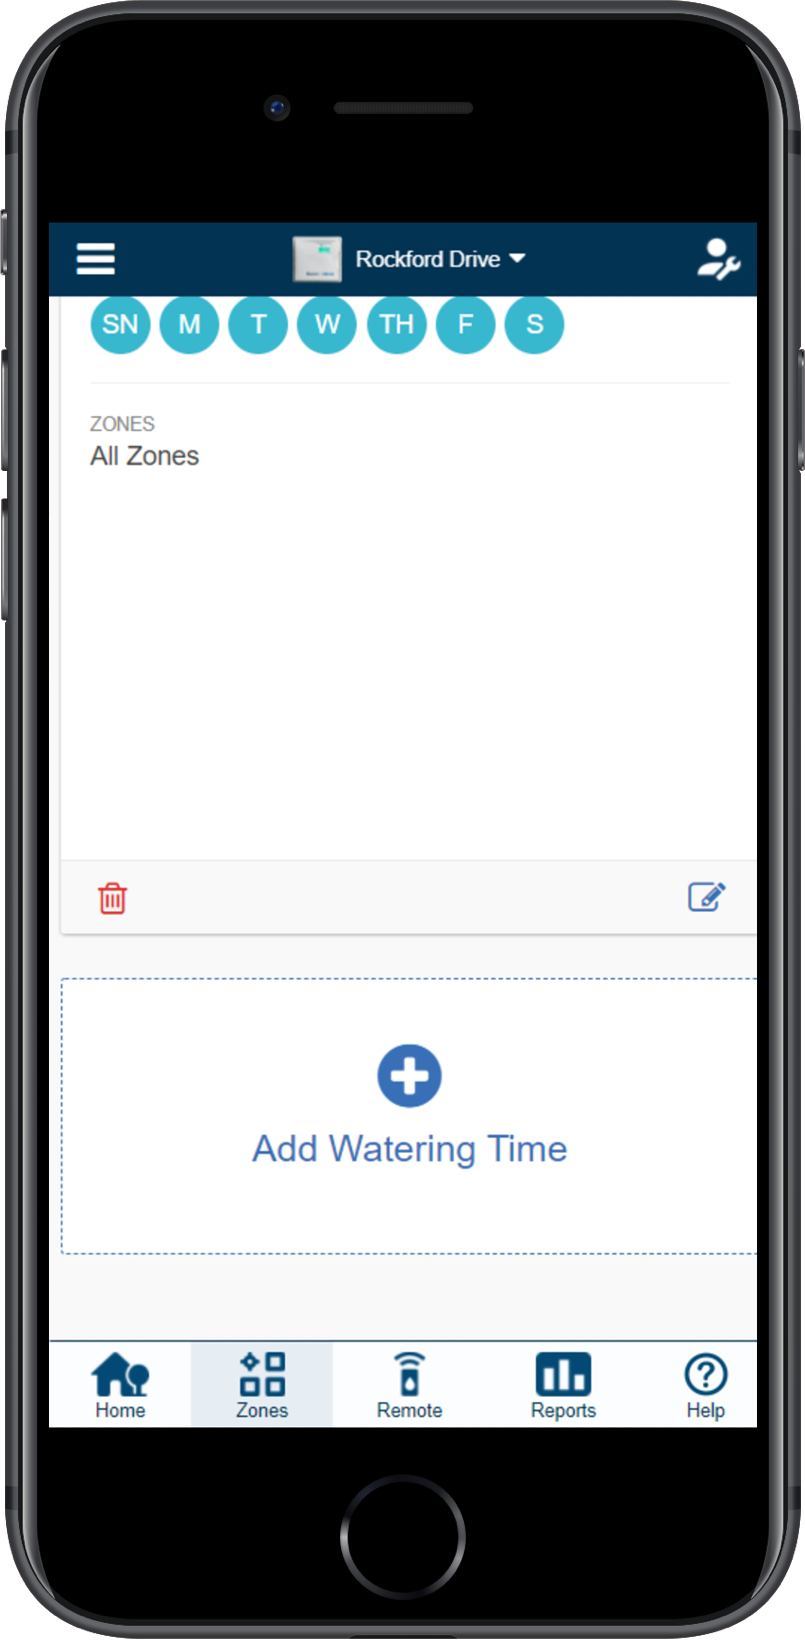
- Click on the (
) icon for a NEW start or select the (
 ) box for a current start that may just require a change.
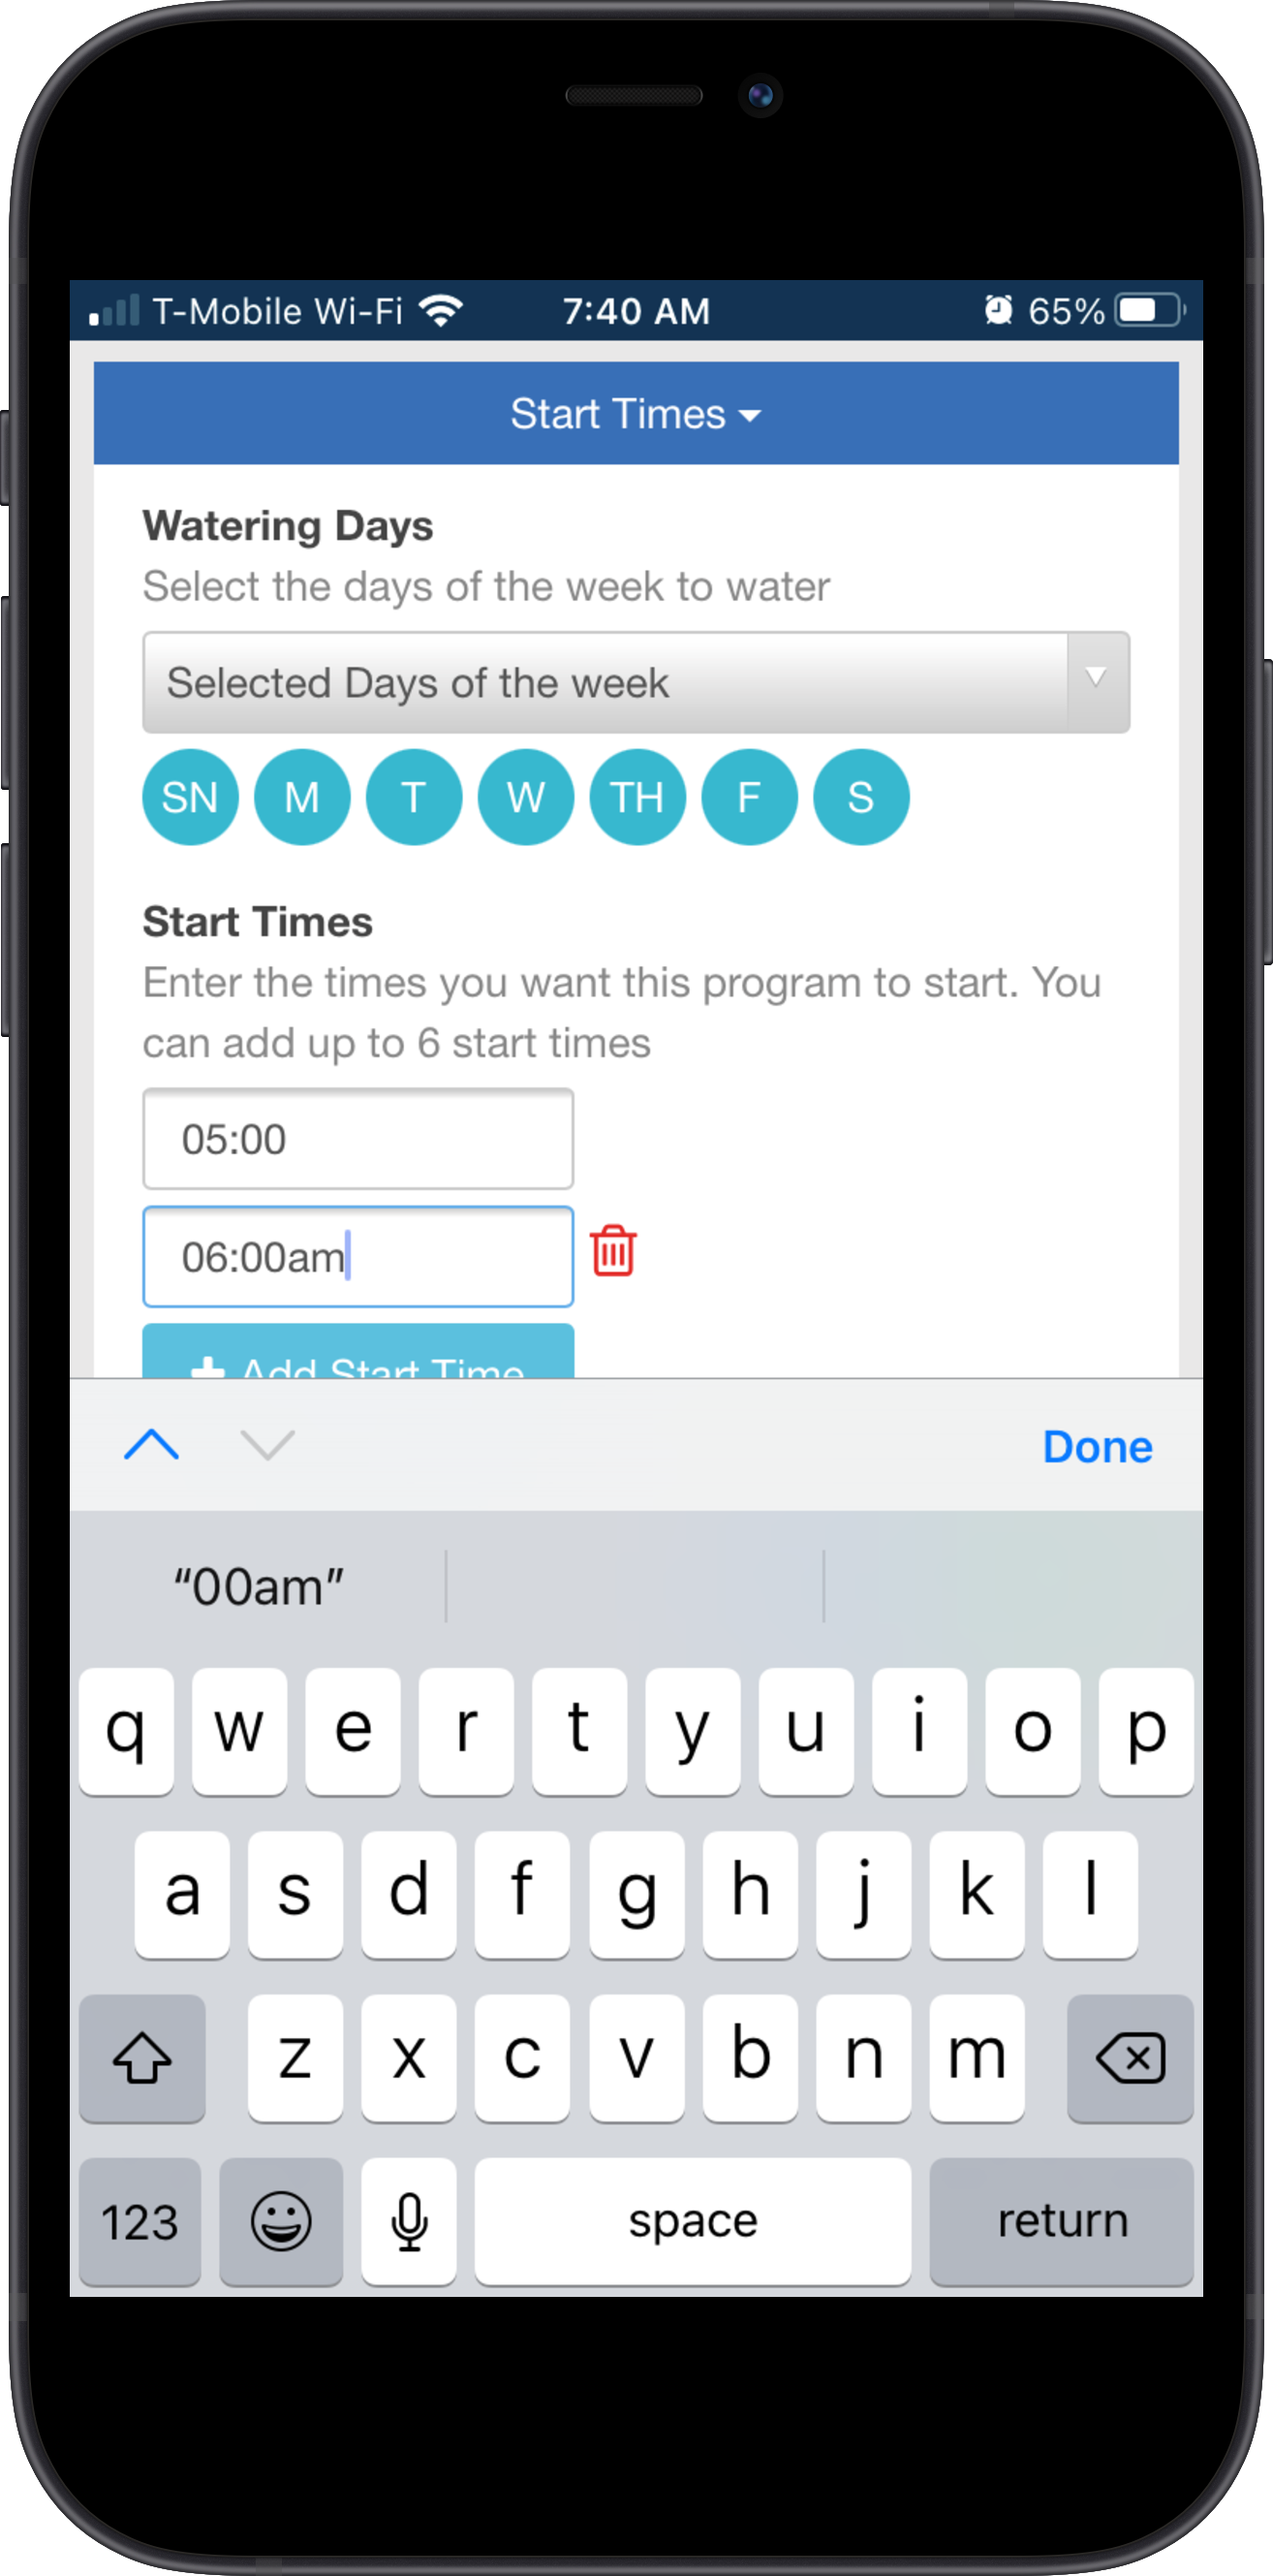
 - Enter your START TIME. This is the time your program cycle will begin.
- Select your WATERING TYPE. The most commonly used type is "Normal Watering Time."
- Select your WATERING DAYS. You have the option to select specific days, odd days, or even days. Learn more or Select NEXT.
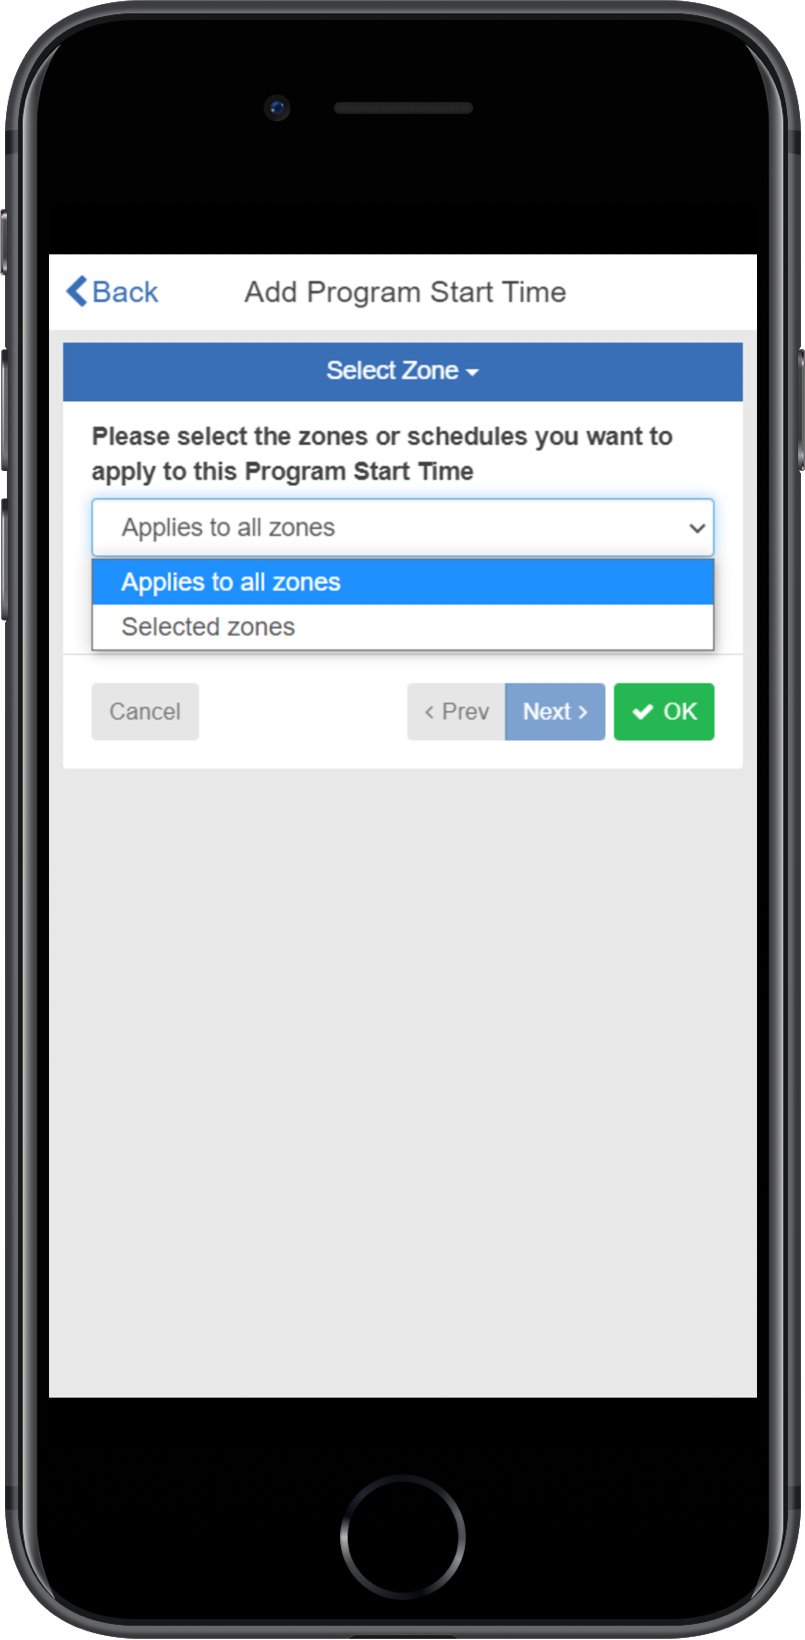
- Choose ALL ZONE or SELECT SPECIFIC ZONES then click OK.
| STEP 1 | STEP 2 |
 |
 |
| STEP 3-5 | STEP 6 |
 |
 |
Watering Type Options:
| Normal watering time (every week) | This watering time is used first when determining when the controller is permitted to run. |
| Watering even weeks only | This watering time is only used on even weeks. We use the ISO 8601 definition of even and odd weeks, where each week starts on a Monday. You can check if a particular date is on an even or odd week using an online tool. When watering on even weeks, you can choose to water on specific days of that week or only odd or even days of the week. |
| Watering odd weeks only | This watering time is only used on odd weeks. We use the ISO 8601 definition of even and odd weeks, where each week starts on a Monday. You can check if a particular date is on an even or odd week using an online tool. When watering on odd weeks, you can choose to water on specific days of that week or only odd or even days of the week. |
| Low priority water | Low-priority watering times are used when there are no Normal, Odd Week, or Even Week watering schedules available and a zone needs to run. A low-priority watering time can be useful where you want the controller to insert extra watering cycles between your normal watering cycles on hot days. This watering type works in combination with How to Set Up "Water More Often When Hot." |
Watering Day Options:
|
|
|
| Select days of the week |
You can specify the days on which you want this program start time to be effective. Note: Blue means selected, so by default all days are selected. You can deselect a day by clicking on it and it will turn white. |
| Even days | Will only allow this program start time to start on even days of the month |
| Odd days | Will only allow this program start time to start on odd days of the month |
| Applies to all zones | This automatically applies the specified program start time to all zones. If you remove or add irrigation zones, they will automatically be applied to this program start time |
| Selected zones | This will only allow the selected zones to use this program start time. If you add more irrigation zones, you may be required to add them to this program start time if you want them to use this program start time. |
NOTE: If multiple zones use the same Program Start Time, they will be started in sequence.
Remember that there are many variables that can affect your Program Start Times. To understand how each one works, spend some time looking at the different options and settings to see how they affect your watering schedule. If you would like to know more about how Watering Triggers can affect your program start times, refer to these links:
Preconfigured Schedules
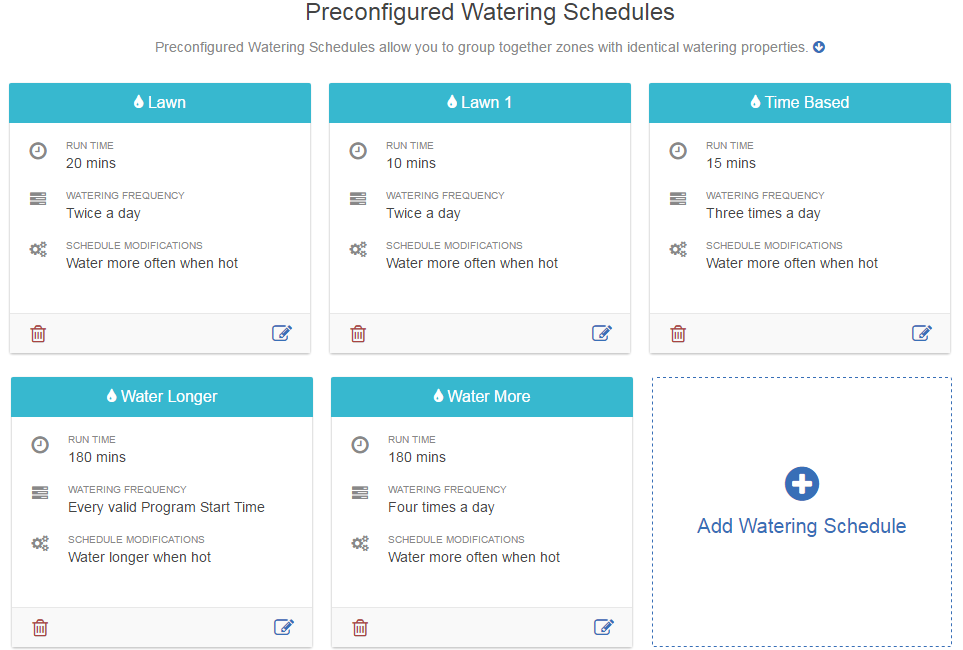
Preconfigured Watering Schedules allow you to group together zones with identical watering properties. Each Preconfigured Watering Schedule determines how long a group of zones will run and how the schedule should be modified based on your local weather. Zones will water only at your defined PROGRAM START TIMES.
NOTE: This feature is only an option when using the Advanced Programming mode. Learn more
| Example Schedules |
 |
Setting a preconfigured watering schedule
Please view the steps and screenshots to access this feature:
- Click on ZONES at the bottom of the app.
- Click on PRECONFIGURED WATERING SCHEDULE.
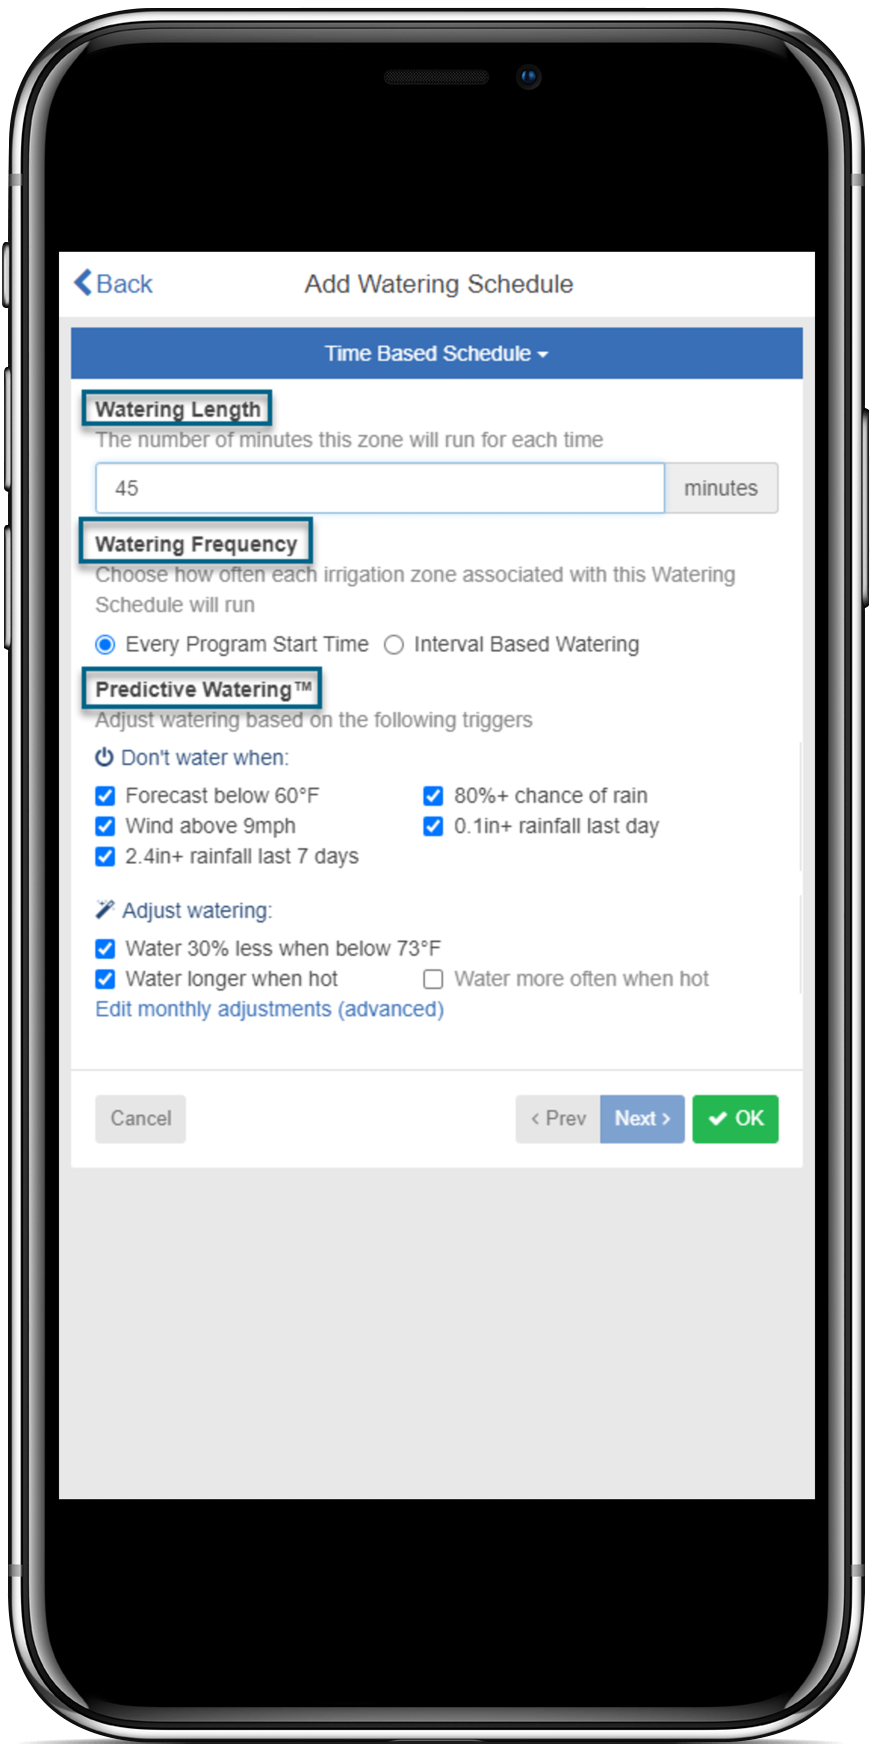
- Add a SCHEDULE NAME and choose a WATERING TYPE. The example below will be the most common which is Time Based.
- Finally, add WATER LENGTH, WATERING FREQUENCY, and PREDICTIVE WATERING ADJUSTMENTS.
- Click OK.
| STEP 1 |
 |
| STEP 2 |
 |
| STEP 3 |
 |
Watering Schedules can be used for zones that are running either Time-Based Predictive Watering or Smart Watering. However, when using Smart Watering zones, the Schedule Adjustment option in a Preconfigured Watering Schedule is not used. Learn more
Fields in Preconfigured Schedule
| Schedule Name | This is the name of the Watering Schedule. |
| Run Time | This is the watering time for this landscape type under normal conditions (if it is too hot or cold, this value will be automatically adjusted globally). |
| Watering Frequency | How often this schedule needs to run. |
| Schedule Modifications |
|
Assigning to Start Time
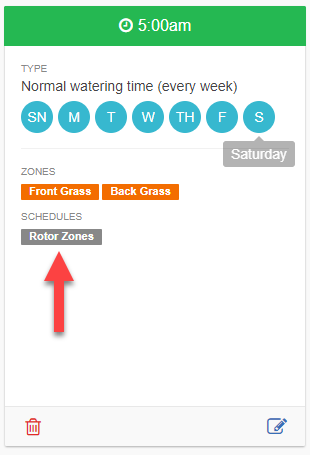
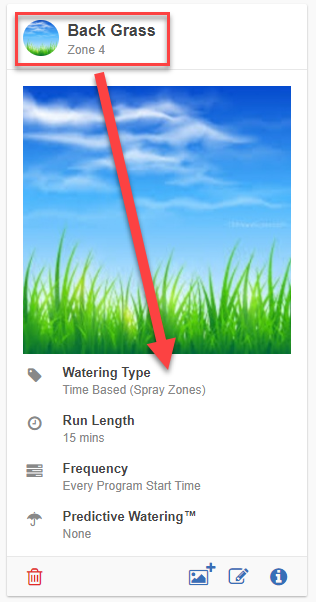
It is best practice to assign the preconfigured schedule to a start time without adding the zones that are tied to a preconfigured schedule as well. You will see in the example below that you can assign multiple schedules to a start time.
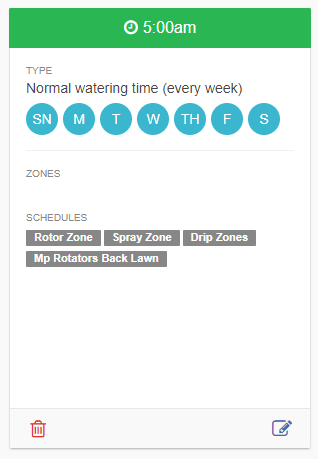
| Example: Assigned Schedules |
  |
How to Change the Run Times in Advanced Mode
If you choose to edit the RUN TIME for each station (zone) in ADVANCED MODE, please review the steps and screenshots below to access this feature. For information on changing your run times in STANDARD MODE, please visit the support article here.
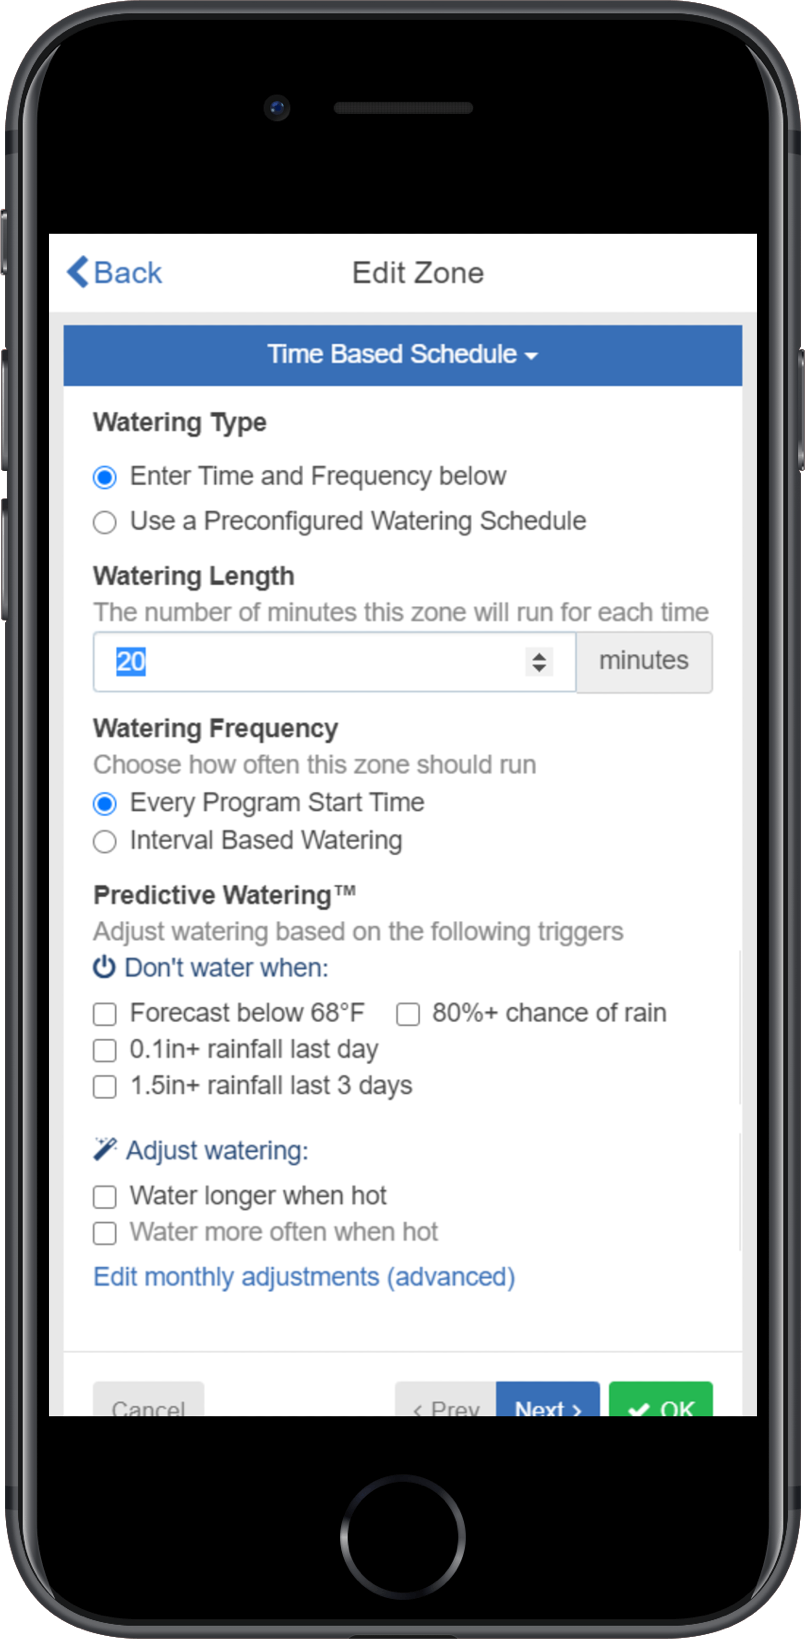
The following fields are also available when accessing this feature:
| Time and Length | |
| Watering Length: | The number of minutes this zone will run for each time. |
| Watering Frequency: | Choose how often to water the zone. The most common is Every Program Start Time. |
| Schedule Adjustment: | Choose how to adjust the watering time based on your weather triggers. |
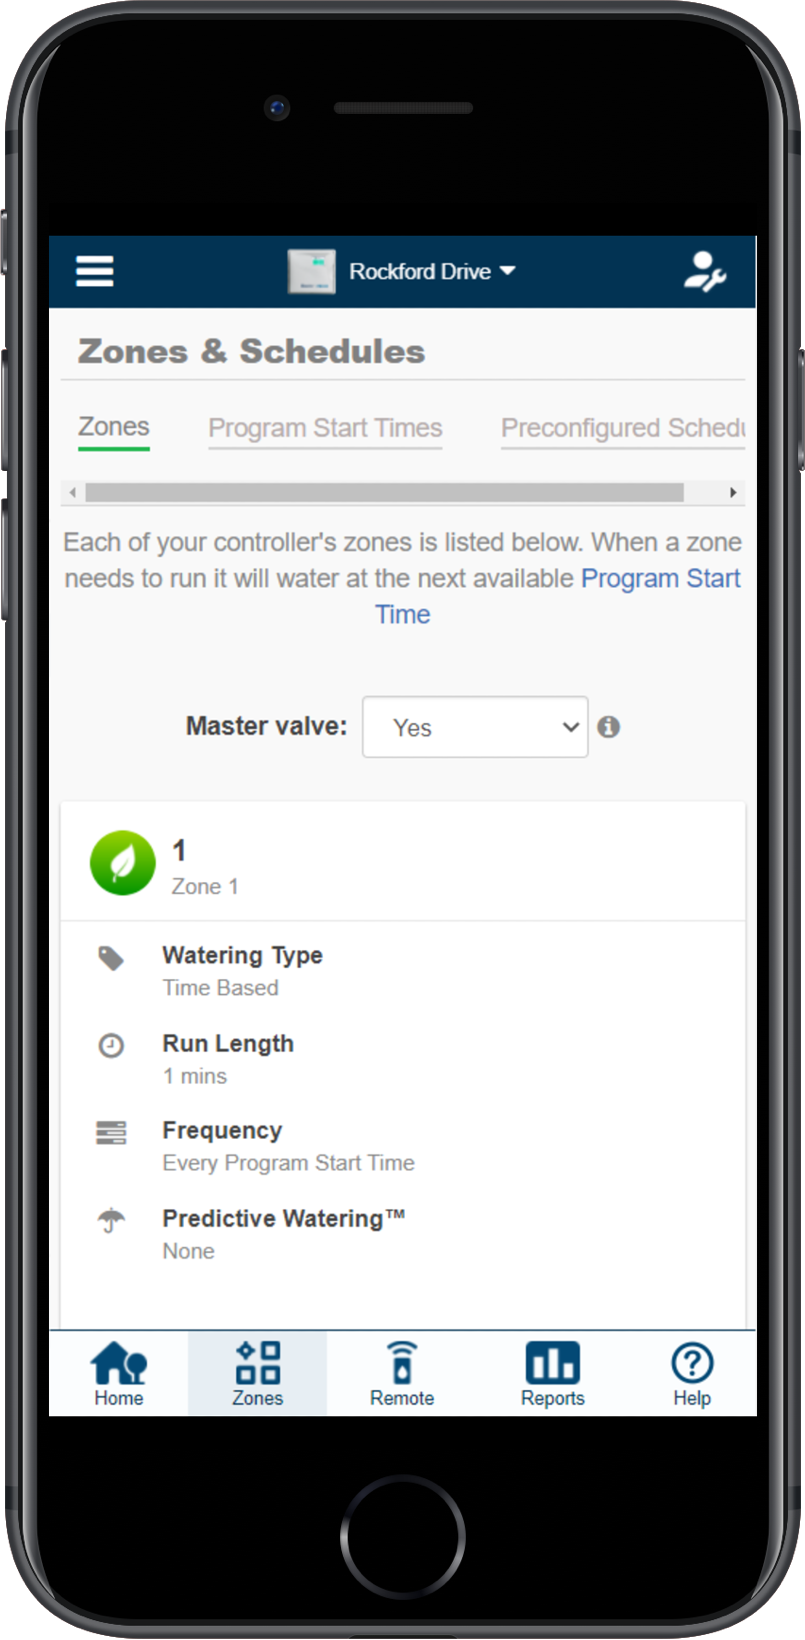
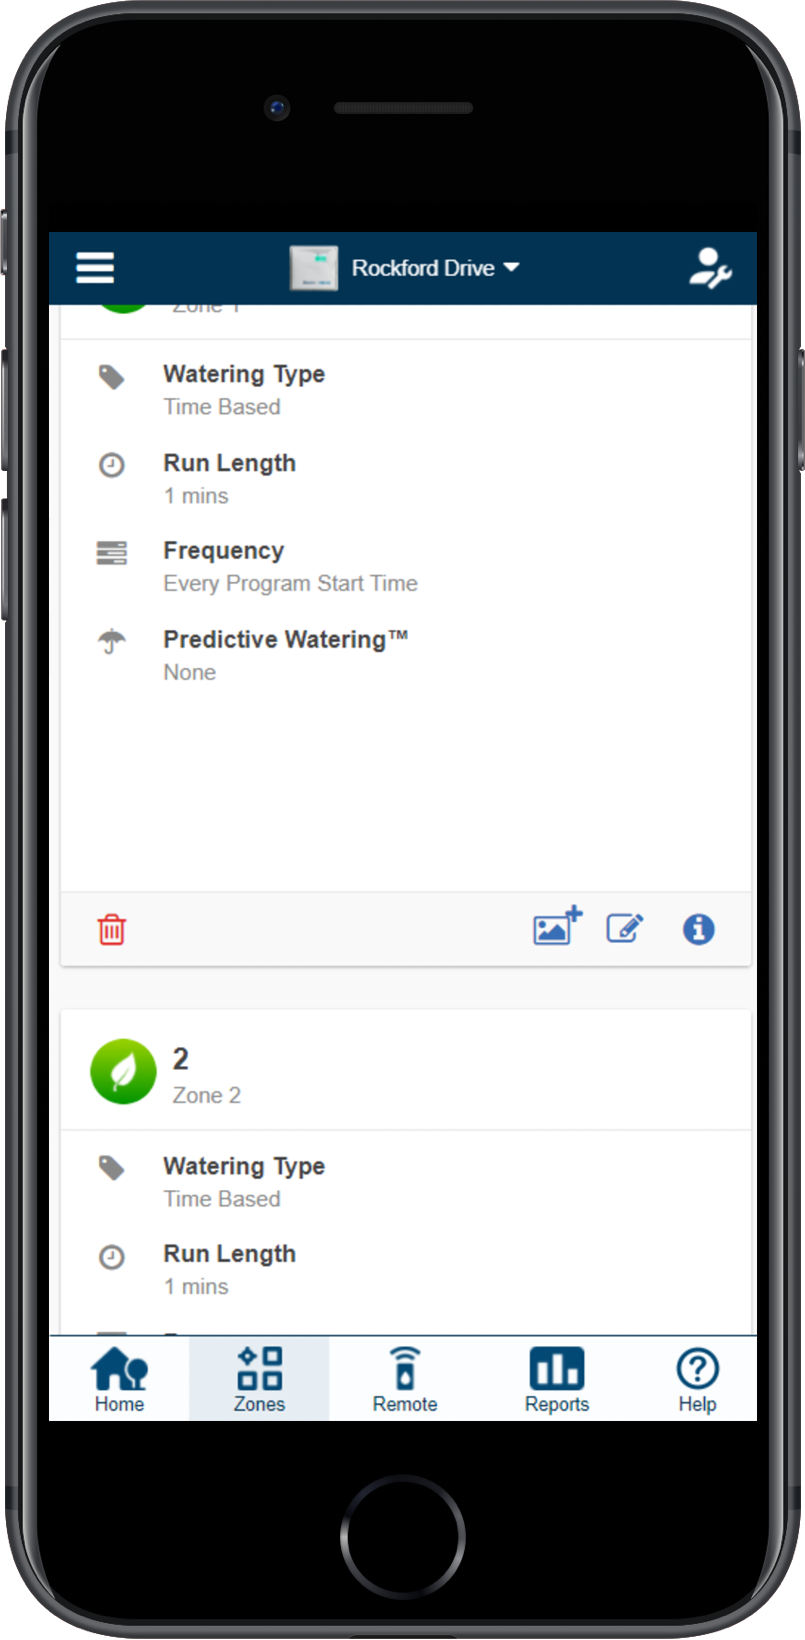
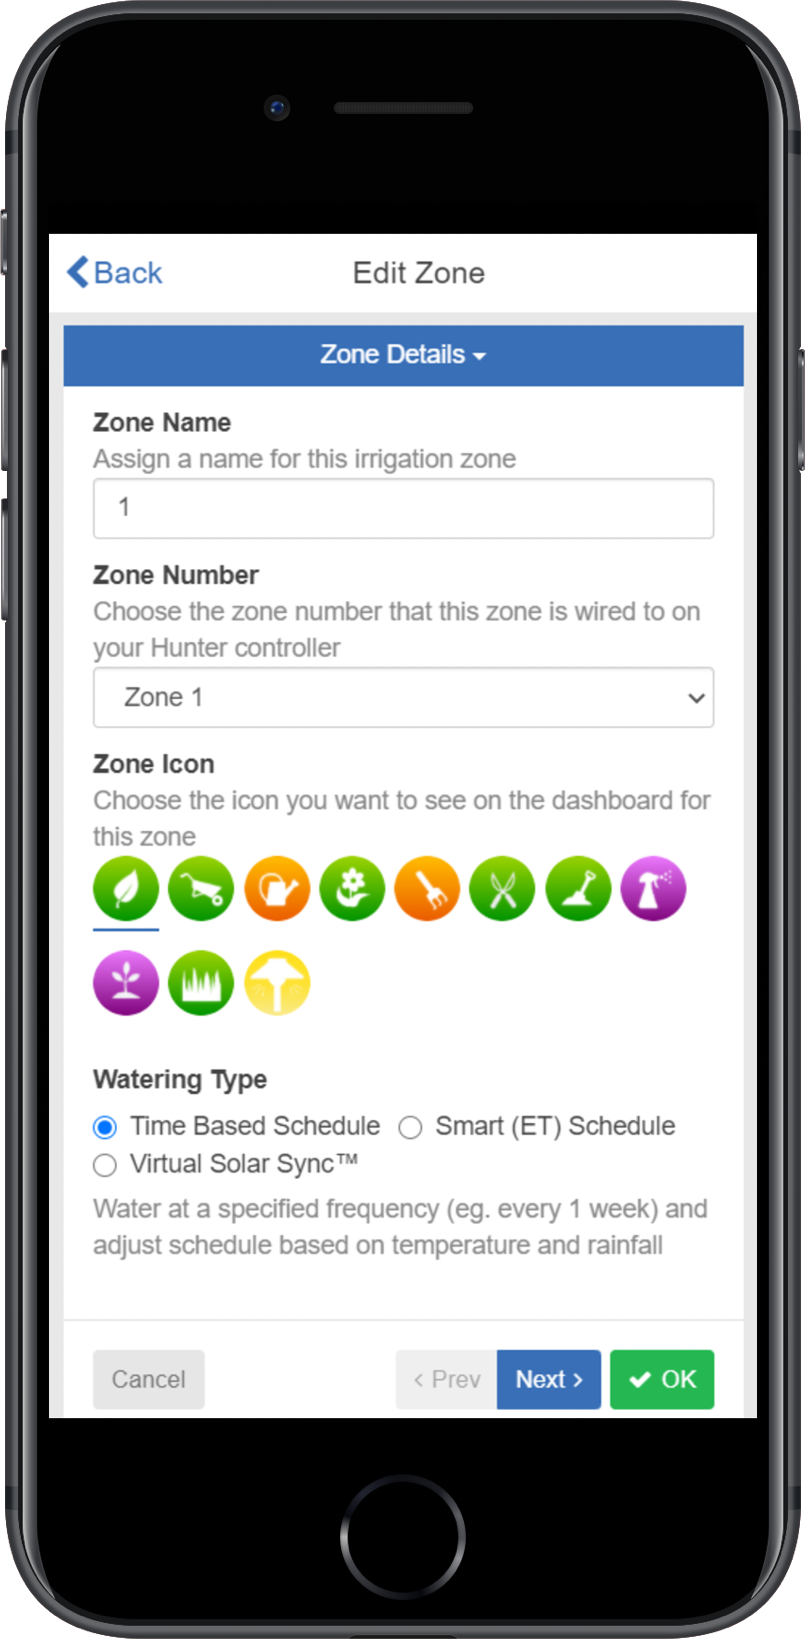
| Edit Run Times |
- Sign-in to your Hydrawise account using your email.
- Click on ZONES at the bottom of the app or ZONES AND SCHEDULES on a web browser from the home dashboard.
- Scroll to the ZONE that requires the change and select the (
) icon.
- Select NEXT at the bottom of zone details.
- Enter the watering RUN TIME in minutes for the zone in the open text box under WATERING LENGTH. Select DONE, then OK to save.
| STEP 1-2 | STEP 3 |
 |
 |
| STEP 3 | STEP 4-5 |
 |
 |
Changing to Standard Mode
The steps and screenshots below describe how to change the programming mode on your controller:
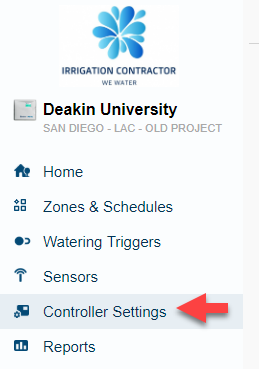
- Select CONTROLLER SETTINGS from the Home dashboard on the left-hand side.
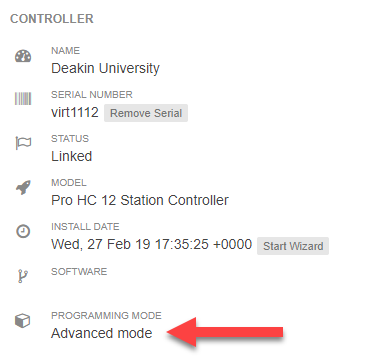
- Once the configuration screen has loaded, click the
 icon to edit the mode.
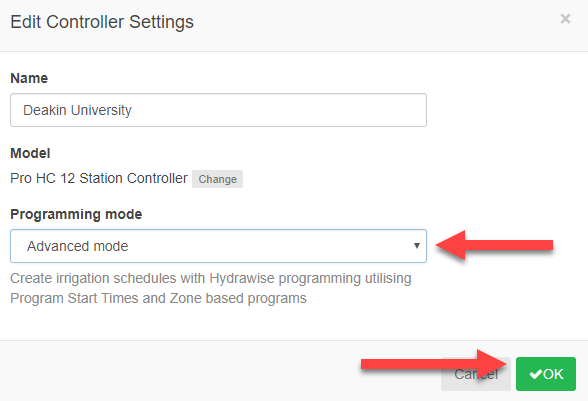
 - After you enter the desired mode for your controller, click OK.
For more information on comparing the two different programming modes, click here.
IMPORTANT: The controller model HC does not have the STANDARD MODE feature so this dropdown will not appear in the software.
| Step 1 |
 |
| Step 2 |
 |
| Step 3 |
 |
Advanced versus Standard Mode
Your Hydrawise system can be configured in two programming modes: Advanced and Standard. The four charts below describe the features and benefits of each of the modes. For more information on switching modes, click here.
Important: In Advanced Mode, every program and individual zone counts as its program. It is easy to exceed the 6-program limit. When this happens, the programs can get too large and exceed the controller's memory. This extra programming could result in an error message Configuration To Large.
| Standard Mode | |
| Features | Yes/No |
| Industry Standard Programming | Yes |
| Stations can have different run lengths | Yes |
| Multiple start times from the same program | Yes |
| Odd / Even / Interval Watering | Yes |
| Name Programs or Start Times | Yes |
| Preconfigured Schedules | No |
| Time - Based Watering | Yes |
| Virtual Solar Sync Watering | Yes |
| ET (Smart) Watering | No |
| Water More often when hot | No |
| Controller Model | # Programs | # Start times per program | Total Start times per controller | Number of concurrent stations | MV allocation by the station |
| X2 with WAND | 3 | 6 | 18 | 1 + MV | No |
| Pro-HC (PHC) | 6 | 6 | 36 | 1 + MV | No |
| Pro-C Hydrawise (HPC) | 6 | 6 | 36 | 1 + MV | Yes |
| HCC Controller (HCC) | 6 | 6 | 36 | 2 + MV | Yes |
Use ADVANCED MODE to create irrigation schedules with zone-based programming, which enables complex watering programs and small station count controllers. NOTE: The X2 controller model is not compatible with advanced mode.
IMPORTANT: The controller model X2 with WAND does not have the ADVANCED MODE feature so this dropdown will not appear in the software.
|
Advanced Mode |
|
| Features | Yes/No |
| Industry Standard Programming | No |
| Stations can have different run lengths | No |
| Multiple start times from the same program | No |
| Odd / Even / Interval Watering | Yes |
| Name Programs or Start Times | No |
| Preconfigured Schedules | Yes |
| Time - Based Watering | Yes |
| Virtual Solar Sync Watering | Yes |
| ET (Smart) Watering | Yes |
| Water More often when hot | Yes |
| Controller Model | # Programs | # Start times per program | Total Start times per controller | Number of concurrent stations | MV allocation by the station |
| HC Controller (serial number C0) - Old model | N /A | N /A | N /A | 1 + MV |
No
|
|
HC Controller (serial number 05) - New model |
6 | 6 | 36 | 1 + MV | No |
| Pro-HC (PHC) | 6 | 6 | 36 | 1 + MV | No |
| Pro-C Hydrawise (HPC) | 6 | 6 | 36 | 1 + MV | Yes |
| HCC Controller (HCC) | 6 | 6 | 36 | 2 + MV | Yes |
Water Days - Interval Watering
This feature is convenient if you want to have a more consistent watering schedule without having to worry about the day of the week or the date. The interval you select is the amount of days between watering including the water day (e.i. 2 day interval will water every other day).
This article will walk you through the process for setting interval days for Online Advanced and Standard mode.
Offline mode (Standard Only) instructions can be viewed in the article here.
Online Mode (Advanced)
The steps and screenshots below show how to set a interval for advanced mode online:
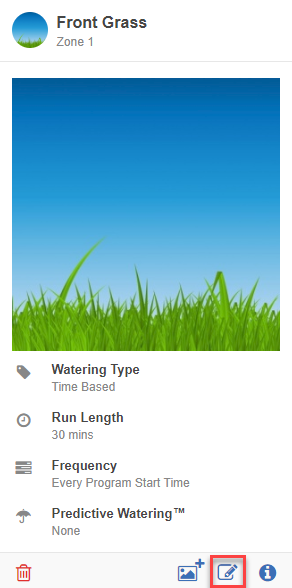
Click "Zones & Schedules" from the home Dashboard. Select the zone "Edit" icon.
| Step 1 |
 |
Select "Next" to view the watering type screen.
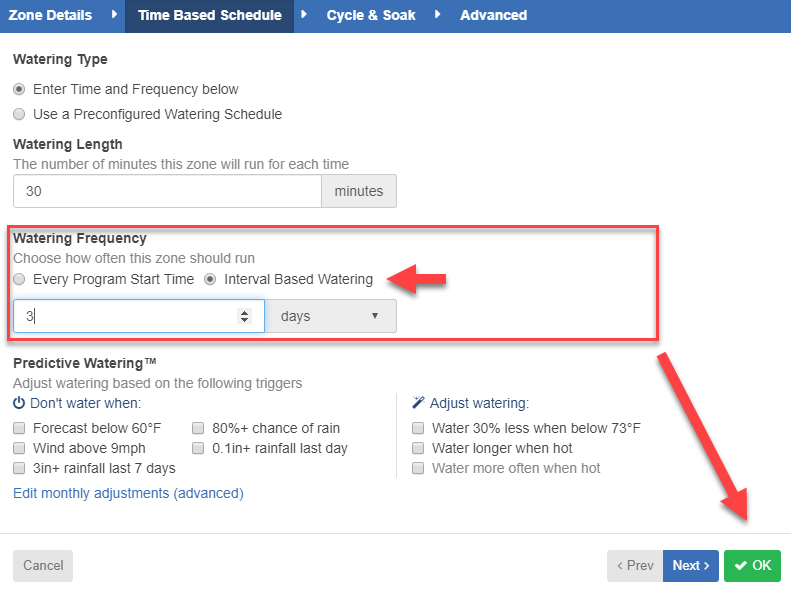
Check the box for "Interval Base Watering."
Use the "Up/Down" arrows to select your interval number for days.
Select "Ok."
| Steps 2-5 |
 |
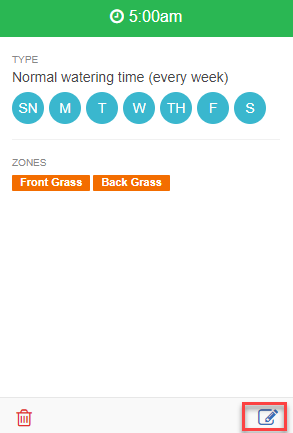
Next click "Zones & Schedules" from the home Dashboard. Select the "Program Start Times" mode.
Select the start time "Edit" icon.
| Step 6-7 |
 |
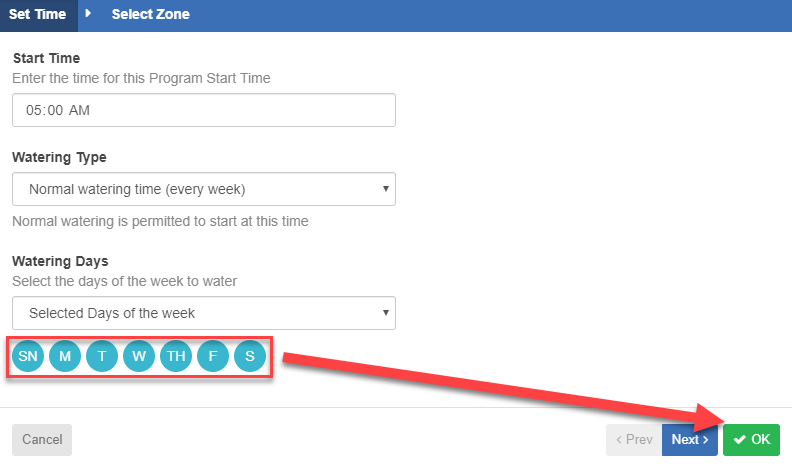
Makes sure all the days of the week are selected. Deselecting any days may result in losing another watering cycle if the interval falls on that day.
Click "OK." Interval is now set for the zones assigned to this start time.
| Step 6-7 |
 |
Online Mode (Standard)
The steps and screenshots below show how to set a interval for standard mode online:
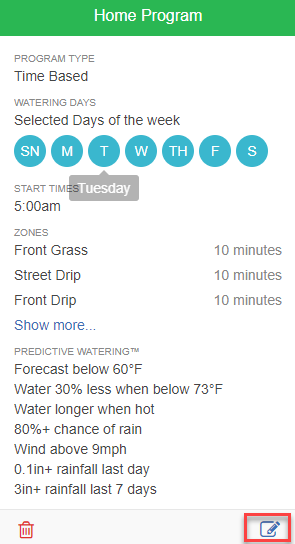
Click "Zones & Schedules" from the home Dashboard. Select the programs "Edit" icon.
| Step 1 |
 |
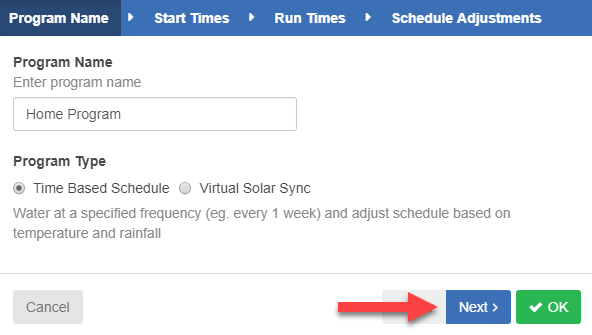
Select "Next" to view the start times screen.
| Steps 2 |
 |
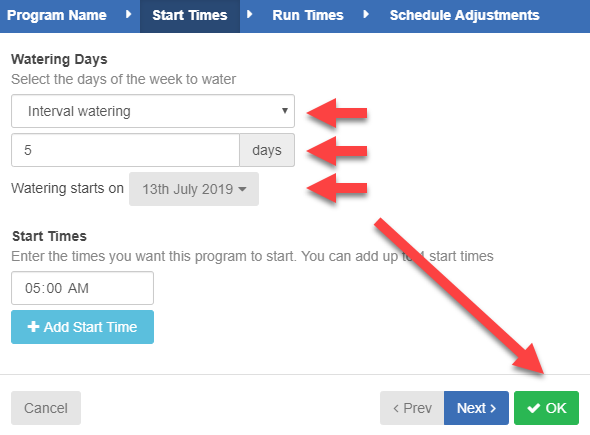
Select the drop-down for "Interval Base Watering."
Use the "Up/Down" arrows to select your interval number for days.
Select when the day when the watering will "Start."
Select "Ok."
| Step 3-6 |
 |
Cycle/Soak Operation
The Cycle and Soak feature allows users to split each station’s run time into more usable, shorter-duration watering. This feature applies particularly to slopes and tight soil (such as clay) because Cycle and Soak will help prevent excessive runoff. You should enter the Cycle time as a fraction of the station’s watering time and the Soak time as the minimum soak required before watering the next portion. The total number of cycles is determined by dividing the total programmed station run time by the Cycle time.
IMPORTANT: If a flow sensor is installed with Alert - Auto suspend for high flow configured, the system will shut down after the FIRST CYCLE if using this feature.
- Cycle Time (3-minute minimum) is the minimum number of minutes the zone can run at a time. The minimum time is to conform with the EPA requirements. Learn More
- Soak Time (3-60 minute range) is the minimum time between zone watering to allow water to soak into the soil.
Example: Station 1 requires 20 minutes of water, but after only 5 minutes, runoff occurs. However, after 10 minutes, all the water was absorbed. The solution would be to program 20 minutes for the Station Run Time, 5 minutes for the Cycle time, and 10 minutes for the Soak. Station 1 will water for 5 minutes, and then the rest of the stations in the program will water. After all the other stations have watered, the controller will check to see if Station 1 has soaked for at least 10 minutes. If it had, then Station 1 will water for another 5 minutes. This process would repeat itself until Station 1 was watered four times for 5 minutes each, a total of 20 minutes.
To test Cycle and Soak, you must have an automatic cycle scheduled since running a zone manually from the app does not allow Cycle and Soak to take effect.
If your controller goes offline, your default watering schedule will still run, but Cycle and Soak will not work. Each zone will water its full length while offline.
Configuring Several Watering Lengths One Zone
You will now learn how to achieve different watering times using one zone (or many zones, if you understand the concept of stacking start times).
Stacking start times means creating Program Start Times one after the other based on the duration of the watering length set for each zone.
For example, if you wanted Zone 1 to run for 10 minutes in the morning and 30 minutes in the evening, you would have to set up Zone 1 with a watering length of 10 minutes. Then you would use Program Start Times to achieve the watering times you want.
| Example 1 |
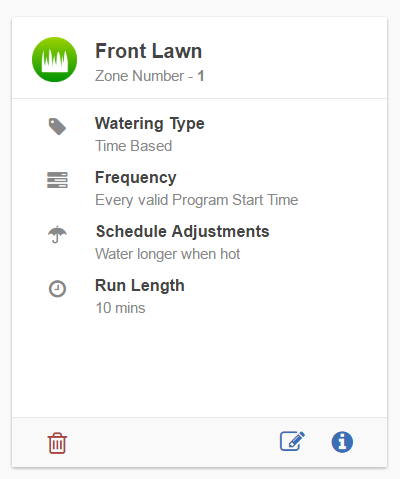 |
To water for 10 minutes in the morning, you would create one start time at 7 a.m., for example, that allows Zone 1 to run for 10 minutes.
| Example 2 |
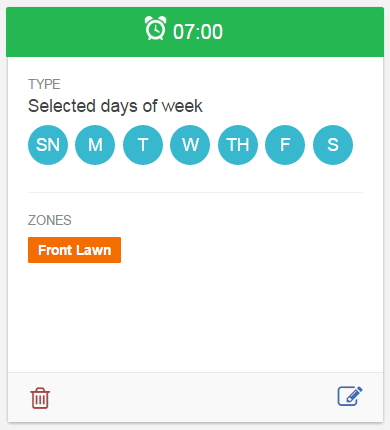 |
For Zone 1 to run for 30 minutes in the evening, you will need to stack start times. For example, you will need to create program start times for Zone 1 at 7 p.m., 7:10 p.m., and 7:20 p.m., so the zone runs for a total of 30 minutes.
| Example 3 |
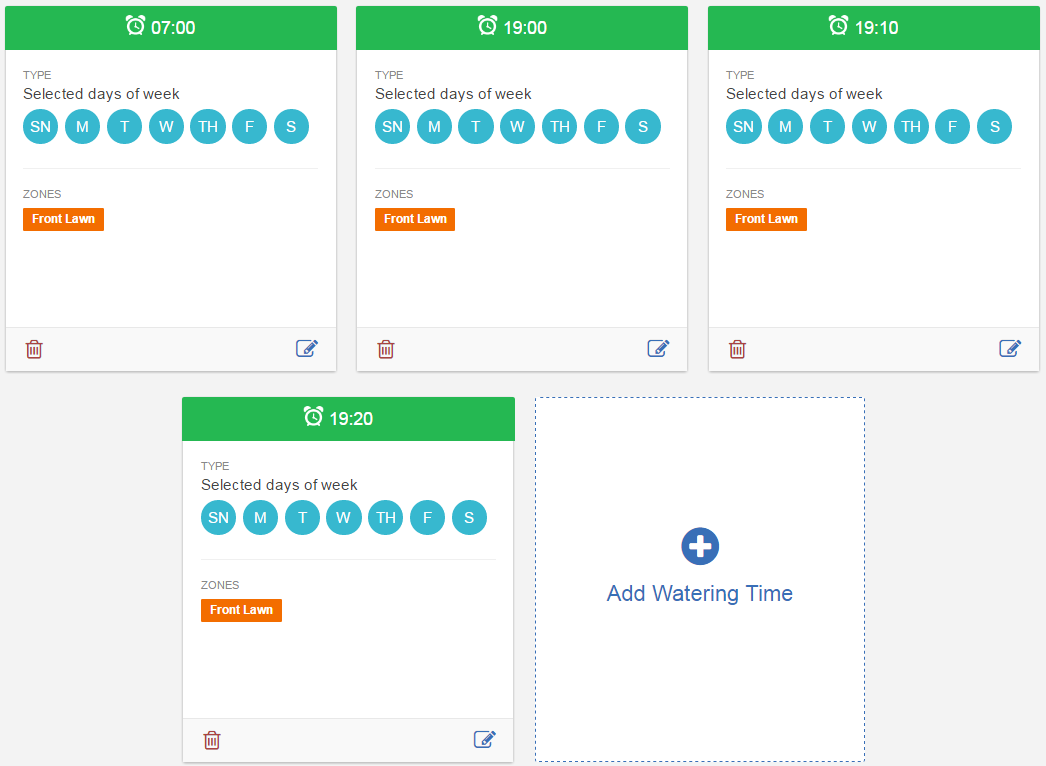 |
By having the program start times dictate when zone one is allowed to water, we have achieved 10 minutes of watering in the morning and 30 minutes of watering in the evening without modifying the irrigation zone's configuration. See below for what the schedule will look like.

You can see there are 10 minutes of watering at starting at 7 a.m. Then, starting at 7 p.m., there is a total of 30 minutes of watering as a result of stacking your Program Start Times.
Working with Images in App
Assign images to individual zones within your landscape to make it easier to identify each zone. If the images are taken with your smartphone, be sure to capture them in the correct orientation (landscape mode), as seen in the illustration below:
The total number of images that can be uploaded is based on image size and is different for each account plan subscription. Your current plan is visible on the Controller Settings menu. You can upgrade to the next plan if you are currently over your limit. Learn More
| Plan | Total Data |
| Home | 25MB |
| Enthusiast | 100MB |
| Steps |
- Sign in to the Hydrawise App.
- Select Zones at the bottom next to the help icon.
- Scroll down to the zone where you would like to Assign an image. Click the
icon.
- You can Upload multiple images per zone or take photos using the smartphone camera.
- Once you upload an image, you can select it to be displayed on the Home Dashboard from the Zone icon list using the
icon. After selecting the icon, click Ok. The updated image icon will be displayed on the Home screen.
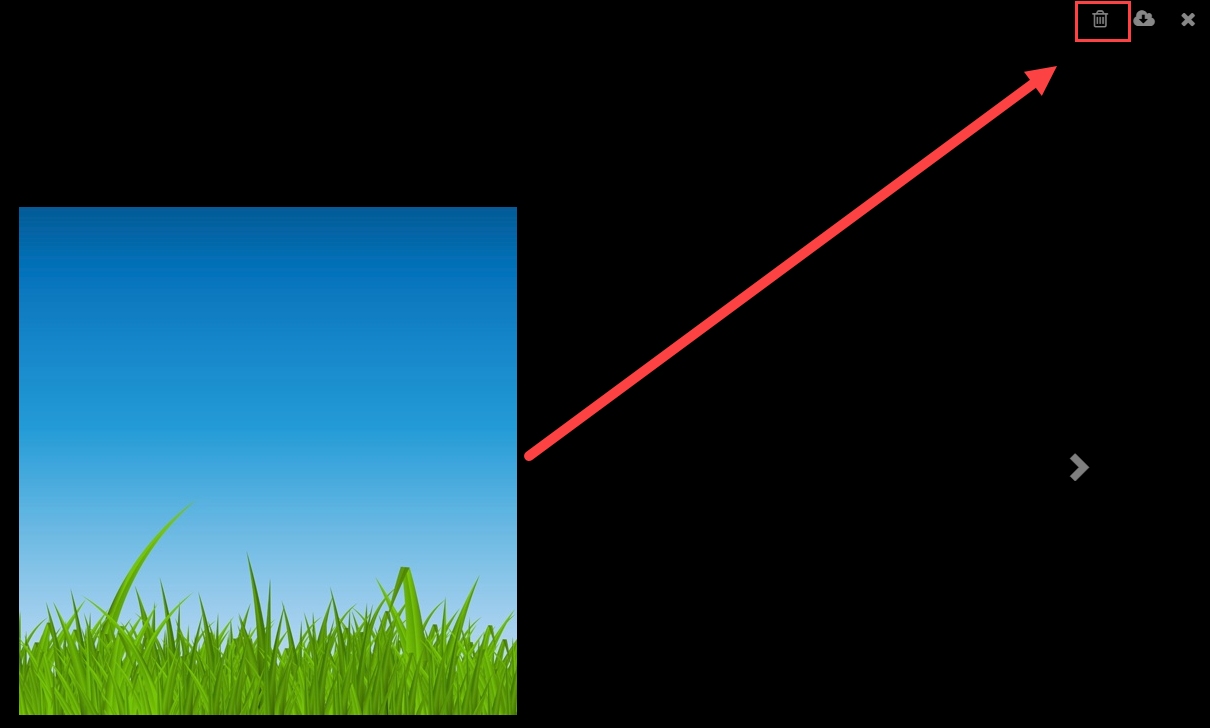
- To Remove an image, click on the image in the Zones settings. Use the trash icon to delete the existing image and add a new one using the cloud download icon.
IMPORTANT: Photos taken with higher-resolution cameras (modern-day smart devices) can increase your current data usage.
Assigning/Removing Images on PC
Please view the steps and screenshots to access this feature:
Assigning New Image
Click on "Zones and Schedules" from the home dashboard, then select "Zones." Scroll down to the first zone you choose to edit.
- Click on the "picture plus icon."
- Choose "file name" to upload as your zone image.
- Image will now be added to your zone.
For information on image storage for your account, please us this article.
| Step 1 |
|
| Step 2 |
 |
Removing Image
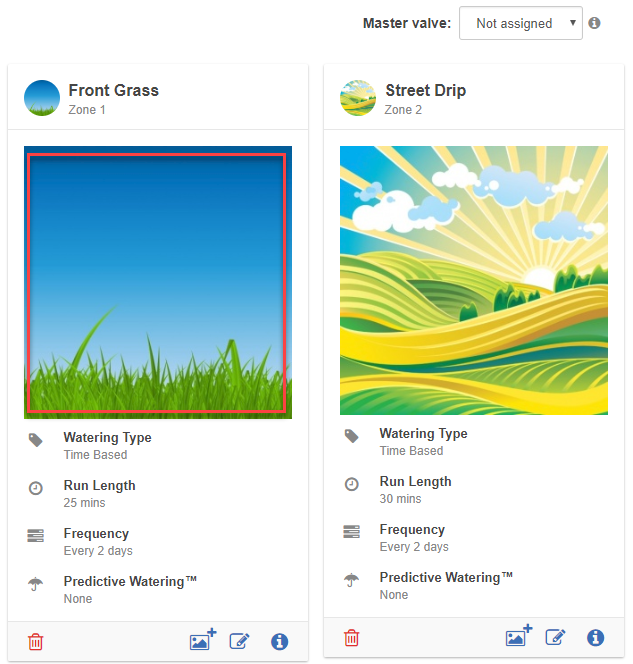
Click on "Zones and Schedules" from the home dashboard. Scroll down to the first zone you choose to edit.
- Click on the "assigned image."
- Choose "delete icon" on the upper right hand side of the screen.
- Image will now be removed from your zone.
| Step 1 |
 |
| Step 2 |
 |
Smart Watering - Quick Reference
| How Does it Work? | Description |
| When does it water? | Waters when estimated moisture level reaches 0% in zones and schedules. |
| Choosing Run Times | See run time calculator here or consult with local contractor/distributor. |
| How is ET calculated? | The calculation is done through the run times and the last 10 years of ET history based on the hottest time of the year for that location. |
| Forecasting High Temperature | Forecast three days in advance. |
| Programming: Zones and Schedules | Description |
| Enter Watering Length | Enter the number of minutes you want the zone to run (hottest time of the year) |
| Enter Peak Watering Frequency | Enter the time between watering in the peak of your irrigation (hottest time of the year) Example: 1 day interval means the system will water every day in the summer schedule. |
| Next Available Start Time Box | Checking this box will reset the smart water balance to 0. If this box is not checked when changing from time based to smart watering then the bar will automatically be at 100%. |
| Cycle/Soak | This helps reduce runoff by running small increments with same total run time. This is used instead of soil type and slope. Example: Station 1 requires 20 minutes of watering, but after 5 minutes, runoff occurs. However, after 10 minutes all the water is absorbed. The solution would be to program 20 minutes for the station run time, 5 minutes for the Cycle time, and 10 minutes for the Soak time. |
| Advanced | Fine tuning: This feature is designed to slow down or speed up the drying process. If the soil is too wet, then we allow it to dry for longer, too dry, smart watering will allow less drying time. |
Example: If we have every 2 days set as the frequency, this is not the minimum frequency as it is merely a reference point based on the driest time of the year. If we experience a drier time, we may need to water each day. Likewise, if we have a wetter time the frequency will increase, allowing for more time between watering.
| Water Triggers | Description |
| Use forecast temperature to predict Smart Watering | This trigger allows frequency adjustment based on the current season. |
| Use forecast rainfall to delay Smart Watering | This feature assists in delaying irrigation when rain is predicted. |
Smart Watering - Adjustment and Changes
Smart Watering is an automated watering schedule that uses information about environmental conditions to ensure your plants get the optimum amount of water. Evaporation will draw moisture from your garden, while rainfall and irrigation will add moisture. Understanding these conditions allows Hydrawise to decide when the time is right to water your garden.
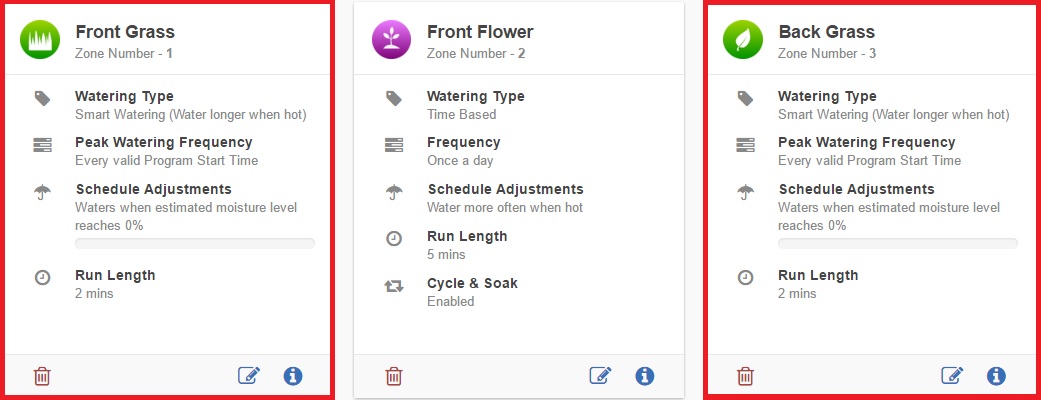
In this example, there are two Smart Watering zones highlighted in red:
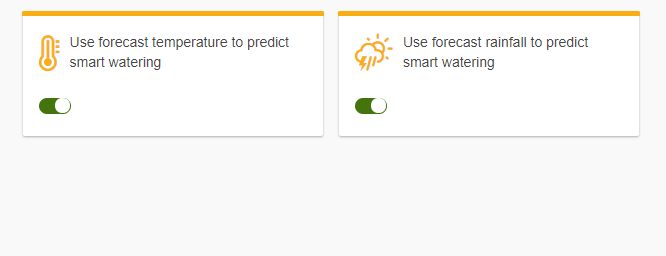
The Watering Triggers use Smart Watering Adjustments and have been left as default, with both switched on:
The second option, USE FORECAST RAINFALL TO PREDICT SMART WATERING, assists with delaying irrigation when rain is predicted. Refer to the example below to see how this is affected when it is turned off.
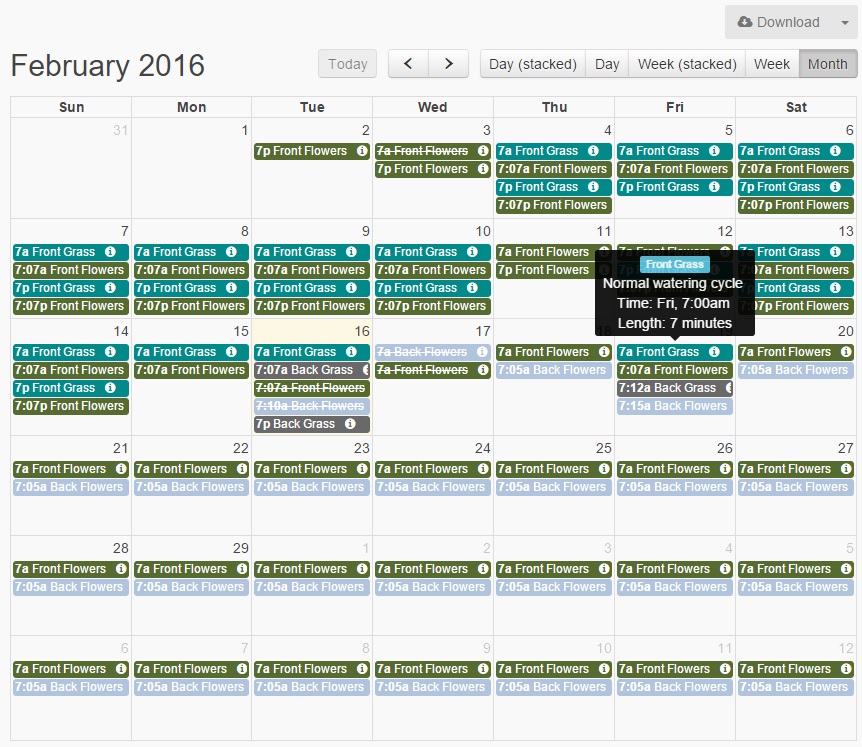
Your watering schedule will look like these settings combined with the weather forecast from your selected weather station.
Now, if we are to change the watering trigger on the second option to off as shown below:
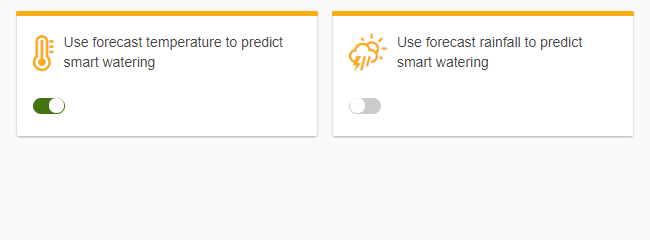
When checking your watering schedule, you will notice that it has been changed to water a day earlier on both zones. This is because the trigger "Use forecast rainfall to delay Smart Watering" is on (this is based on the calculations from the weather station; there is rain predicted on 18th). It has not been scheduled to water on that day, and watering has been pushed to the 19th. However, since we turned off this feature, watering will occur regardless of rain is predicted.
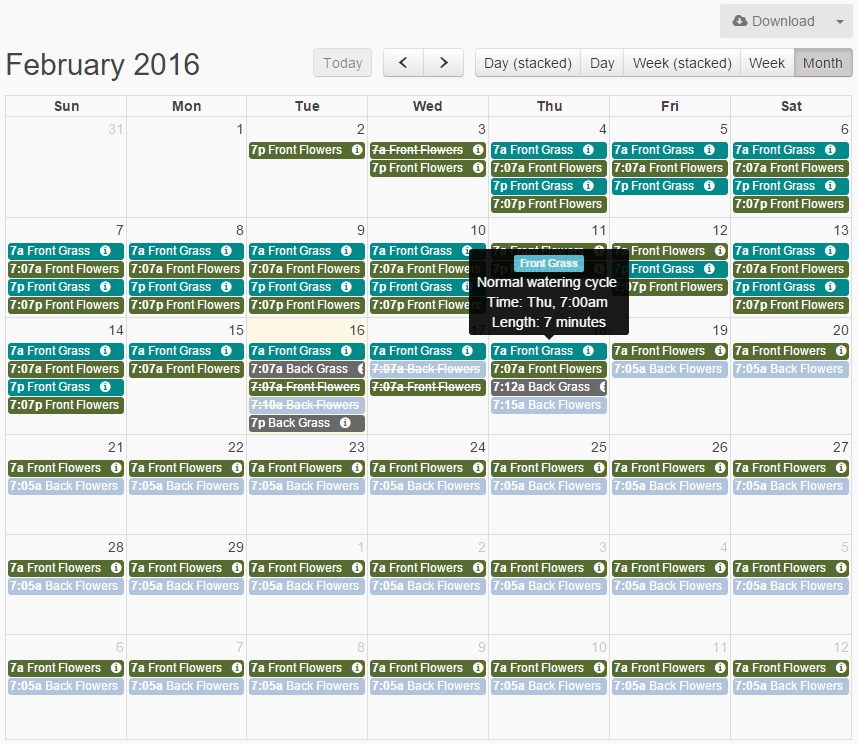
If you choose to change the watering adjustment, you can always go to the tuning tab on any zone for Smart Watering Predictive Watering™ to modify the peak watering day as shown below: For example, if you have a peak watering day set to 2 and the slider is changed to -50%, this will add a day to the peak watering day making it 3.
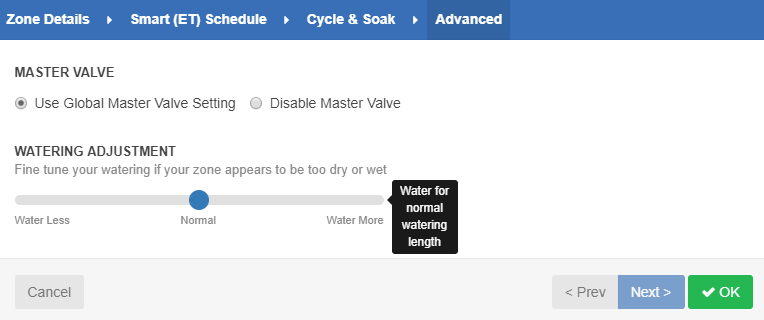
Please refer to this link to gain further understanding of smart watering if needed.
Smart Watering and time-based Predictive Watering™ achieve similar water savings due to “predictive weather” watering triggers, time-based watering is easier to understand and adjust.
When will my zone next run using smart ET watering?
With Smart Watering, your zone will run when your estimated soil moisture reaches zero.
To check your estimated soil moisture, go to the Zones and Schedules page. Next, view the Schedule Adjustments field for the zone you want to check. This will display the estimated moisture level. When the soil moisture reaches 0%, the zone will water.
You can also check your estimated soil moisture balance in the Reporting section of the app.