How do I add a new customer?
Adding a New Customer will allow you as the contractor to manage their software account from your Multi-Site Manager (MSM) (). This will assist you with determining alarm messages that need attention, incorrect water usage (if a flow meter is installed), plus much more. The videos below will walk you through the steps on your mobile device for setup.
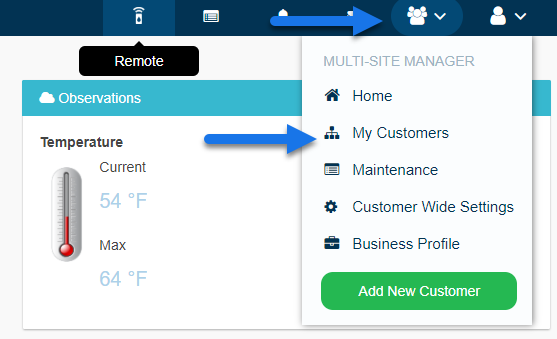
- Click on the Multi-Site Manager (
) on the upper right-hand side.
- Next, click Add New Customer.
- Enter the customer's Email Address or search for an existing customer account using a serial number. If you don't have this information, click Skip. You can add their email at a later time when you do have information readily available. Learn more
- Click Next.
- If the customer already set up an account, you will be prompted to click Request Access. This will send the customer an email asking for access to manage their controller.
-
If your customer doesn't have an account, please enter the Email Address requested by the customer. You’ll then be able to create an account immediately.
-
Selections Descriptions Customer's Email The email address that the customer will use to log in to their account Customer's Name The customer’s name Type of User - If you want your customer to have full control over their system, select “Can modify configuration and run zones.”
- If you don’t want your customer to change their configuration, select “Can view configuration, manually run zones.”
Send Notifications To Choose where to send emails about controllers being offline or plans to require renewal. This can be either your email address or your customer’s email address. Send activation email to me instead of customer’s email address If you don’t want the customer to receive an account activation email, check this box and the activation email will not be sent to the homeowner. Once you click CREATE, you’ll be taken through a wizard to set up your customer’s controller. The controller will be linked to your account. Your new customer will then be visible in your list of customers in your My Customer list. The homeowner will receive email notification automatically from Hydrawise to set up a password.
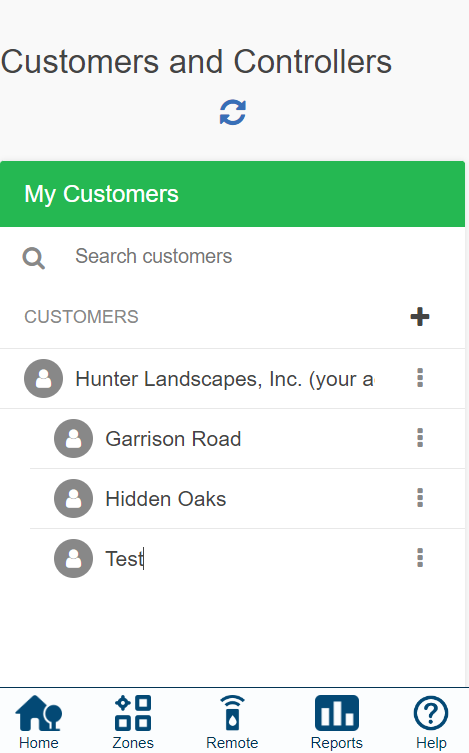
Customers and Controllers Overview
The map below displays all your customers' controllers. You can see the status of a controller by clicking the icon on the map or the controller you want on the left side. From here, you can also Add a Customer.
Controllers on the map are color-coded by their status:
- Green: Online
- Red: Offline
- Yellow: This controller is not yet linked to a physical device. You can configure the controller and attach a serial number.
Click on a controller on the map to see status information.
You can use the search box to find your customers by name, email address, controller status, or serial number. Clear the search box if you want to see all your customers.
To manage a customer, either click on their name or use the menu next to their name to show their details. You can also use the menu to remove a customer from your account. Once you’re looking at a specific customer, you can configure plans, controllers, and users.
| Customers and Controllers |
 |
Managing Another Contractor
When using the Multi-Site Manager function, you have the option to manage other contractors with your account if necessary. This article covers features that can be accessed using the Multi-Site Manager:
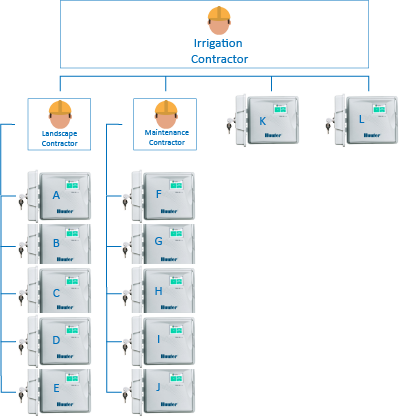
- Overview scenario including an irrigation contractor, a maintenance contractor, and a landscape contractor shown in Figure 1.
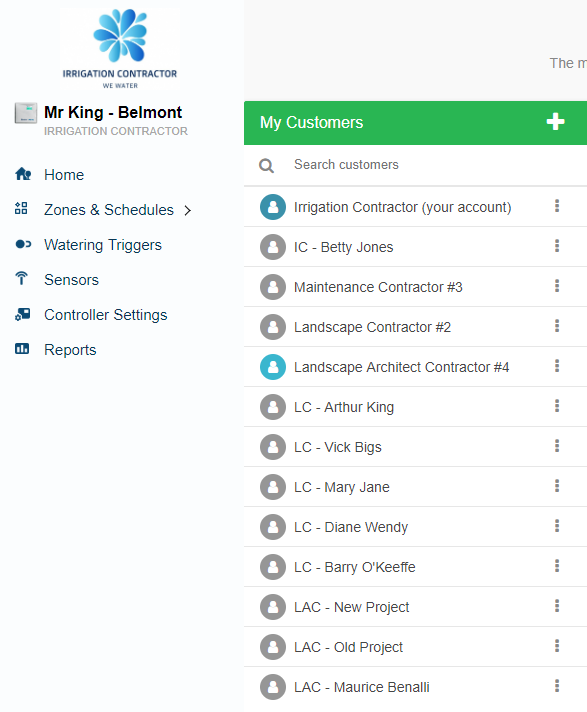
- Manage all your customers from your Master Account. See Figure 2.
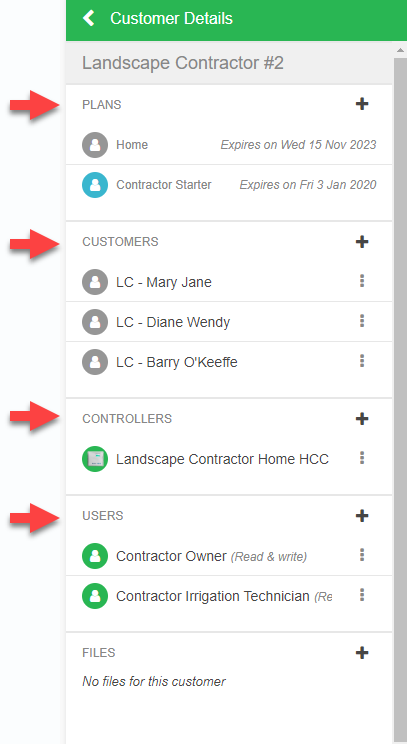
- View customers of your sub-contractors, locations, or regions. See Figure 3.
- Create customers for your sub-contractor accounts. See Figure 4.
- Move customers to a sub-contractor or region. See Figures 5A and 5B.
Overview
An irrigation contractor can add sub-contractors using the same steps they would use to add customers. See this link for details. See an example of how this setup would work with three contractors.
- The irrigation contractor (master account) can see all customers and controllers shown in the illustration below.
- The maintenance contractor only has visibility of controllers labeled F–J.
- The landscape contractor only has visibility of customers labeled A–E.
| Figure 1 |
 |
Master Account (Irrigation Contractor)
We have provided a second scenario where the irrigation contractor has created abbreviations to organize different groups. Changing the organization name is key to understanding which contractor manages the different customers. For more information on editing the organization name, click here.
The example below shows the following:
IC – Customers are managed by the IRRIGATION CONTRACTOR.
LC – Customers are managed by the LANDSCAPE CONTRACTOR.
LAC – Customers are managed by the LANDSCAPE ARCHITECT CONTRACTOR.
| Figure 2 |
 |
Viewing the Sub-Contractor or Region Account
This account will provide the plan of the sub-contractor, the customers in the account, the personal controllers in that account, and the users.
- Click on the SUB ACCOUNT.
- You will see the information that the sub-contractor or region can see.
| Figure 3 |
 |
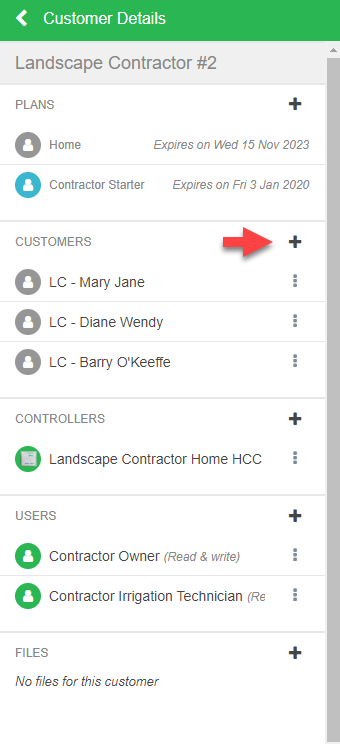
Create Customers
This is the normal setup for the new customer. However, this customer is now a customer of your sub-contractor. Your main Account will also retain visibility.
- Click on the SUB ACCOUNT.
- You will see the information that the sub-contractor or region can see.
- Click the + button next to CUSTOMERS.
| Figure 4 |
 |
Move Customers
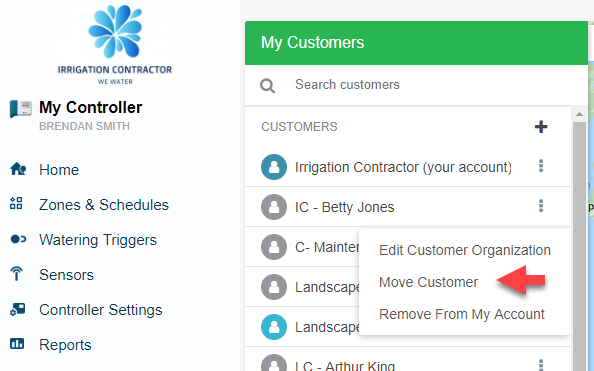
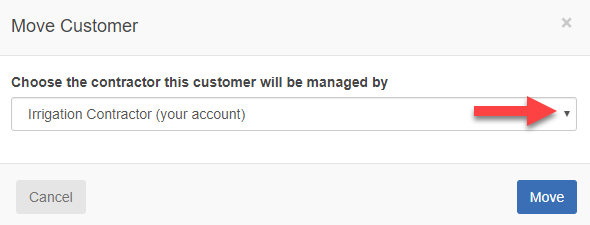
If a customer already exists in the master account, you can easily move the customer to one of your sub-contractors or regions.
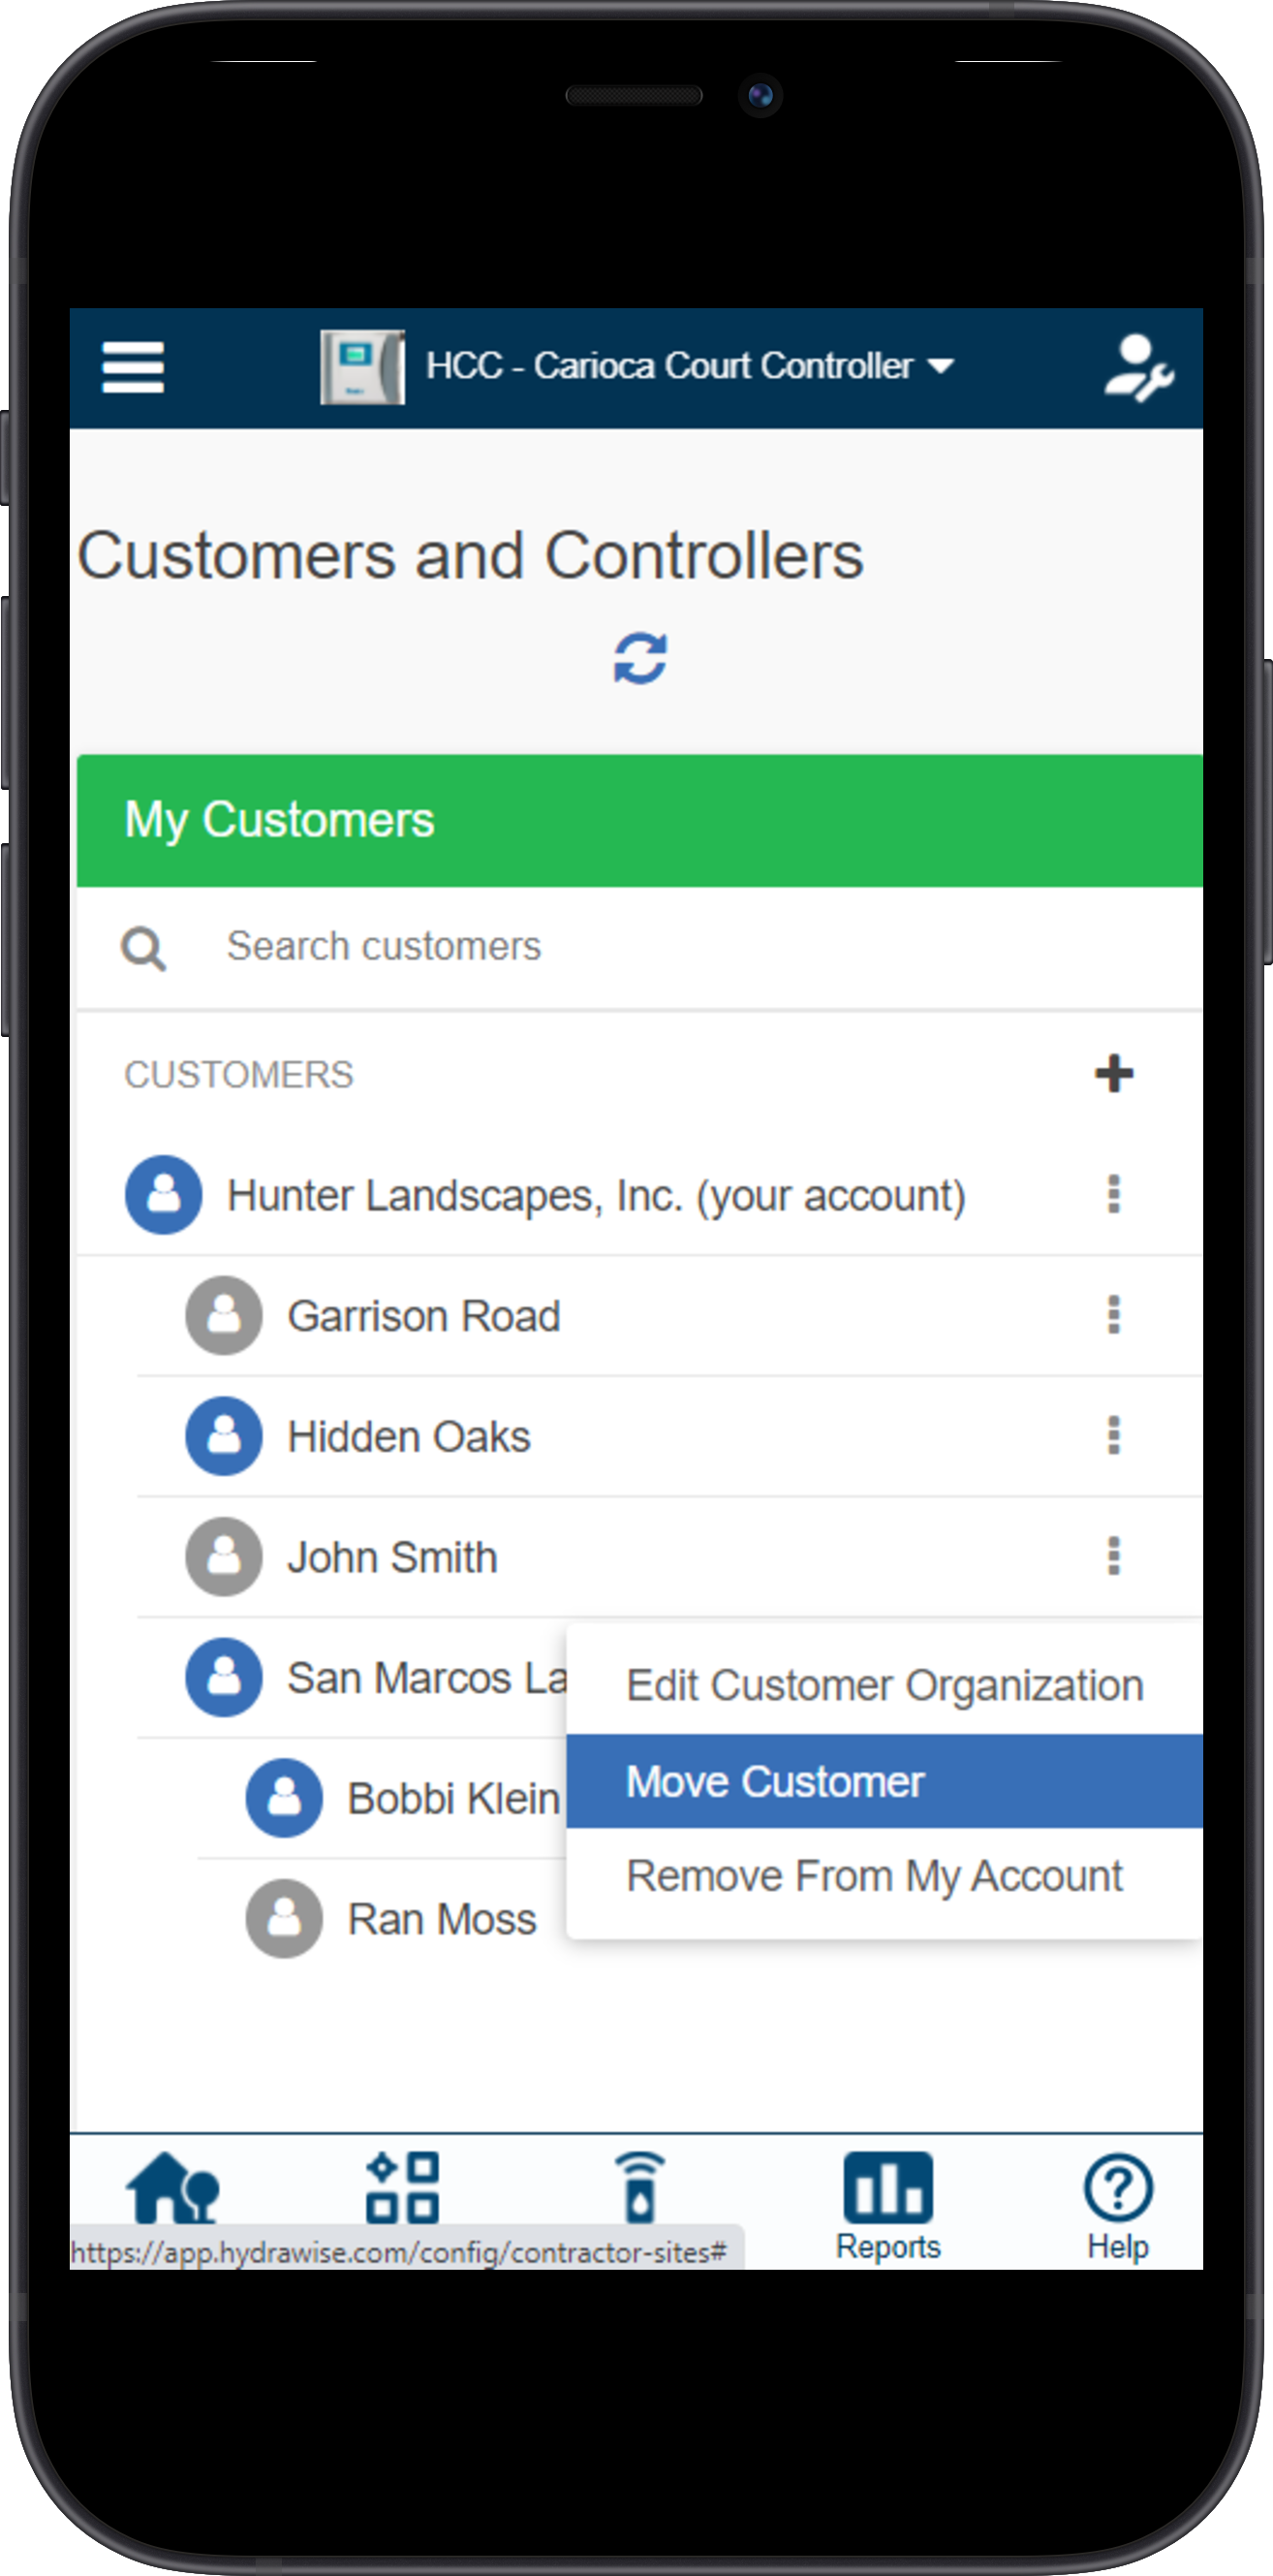
- Click the three-dot icon next to the customer. Click MOVE CUSTOMER.
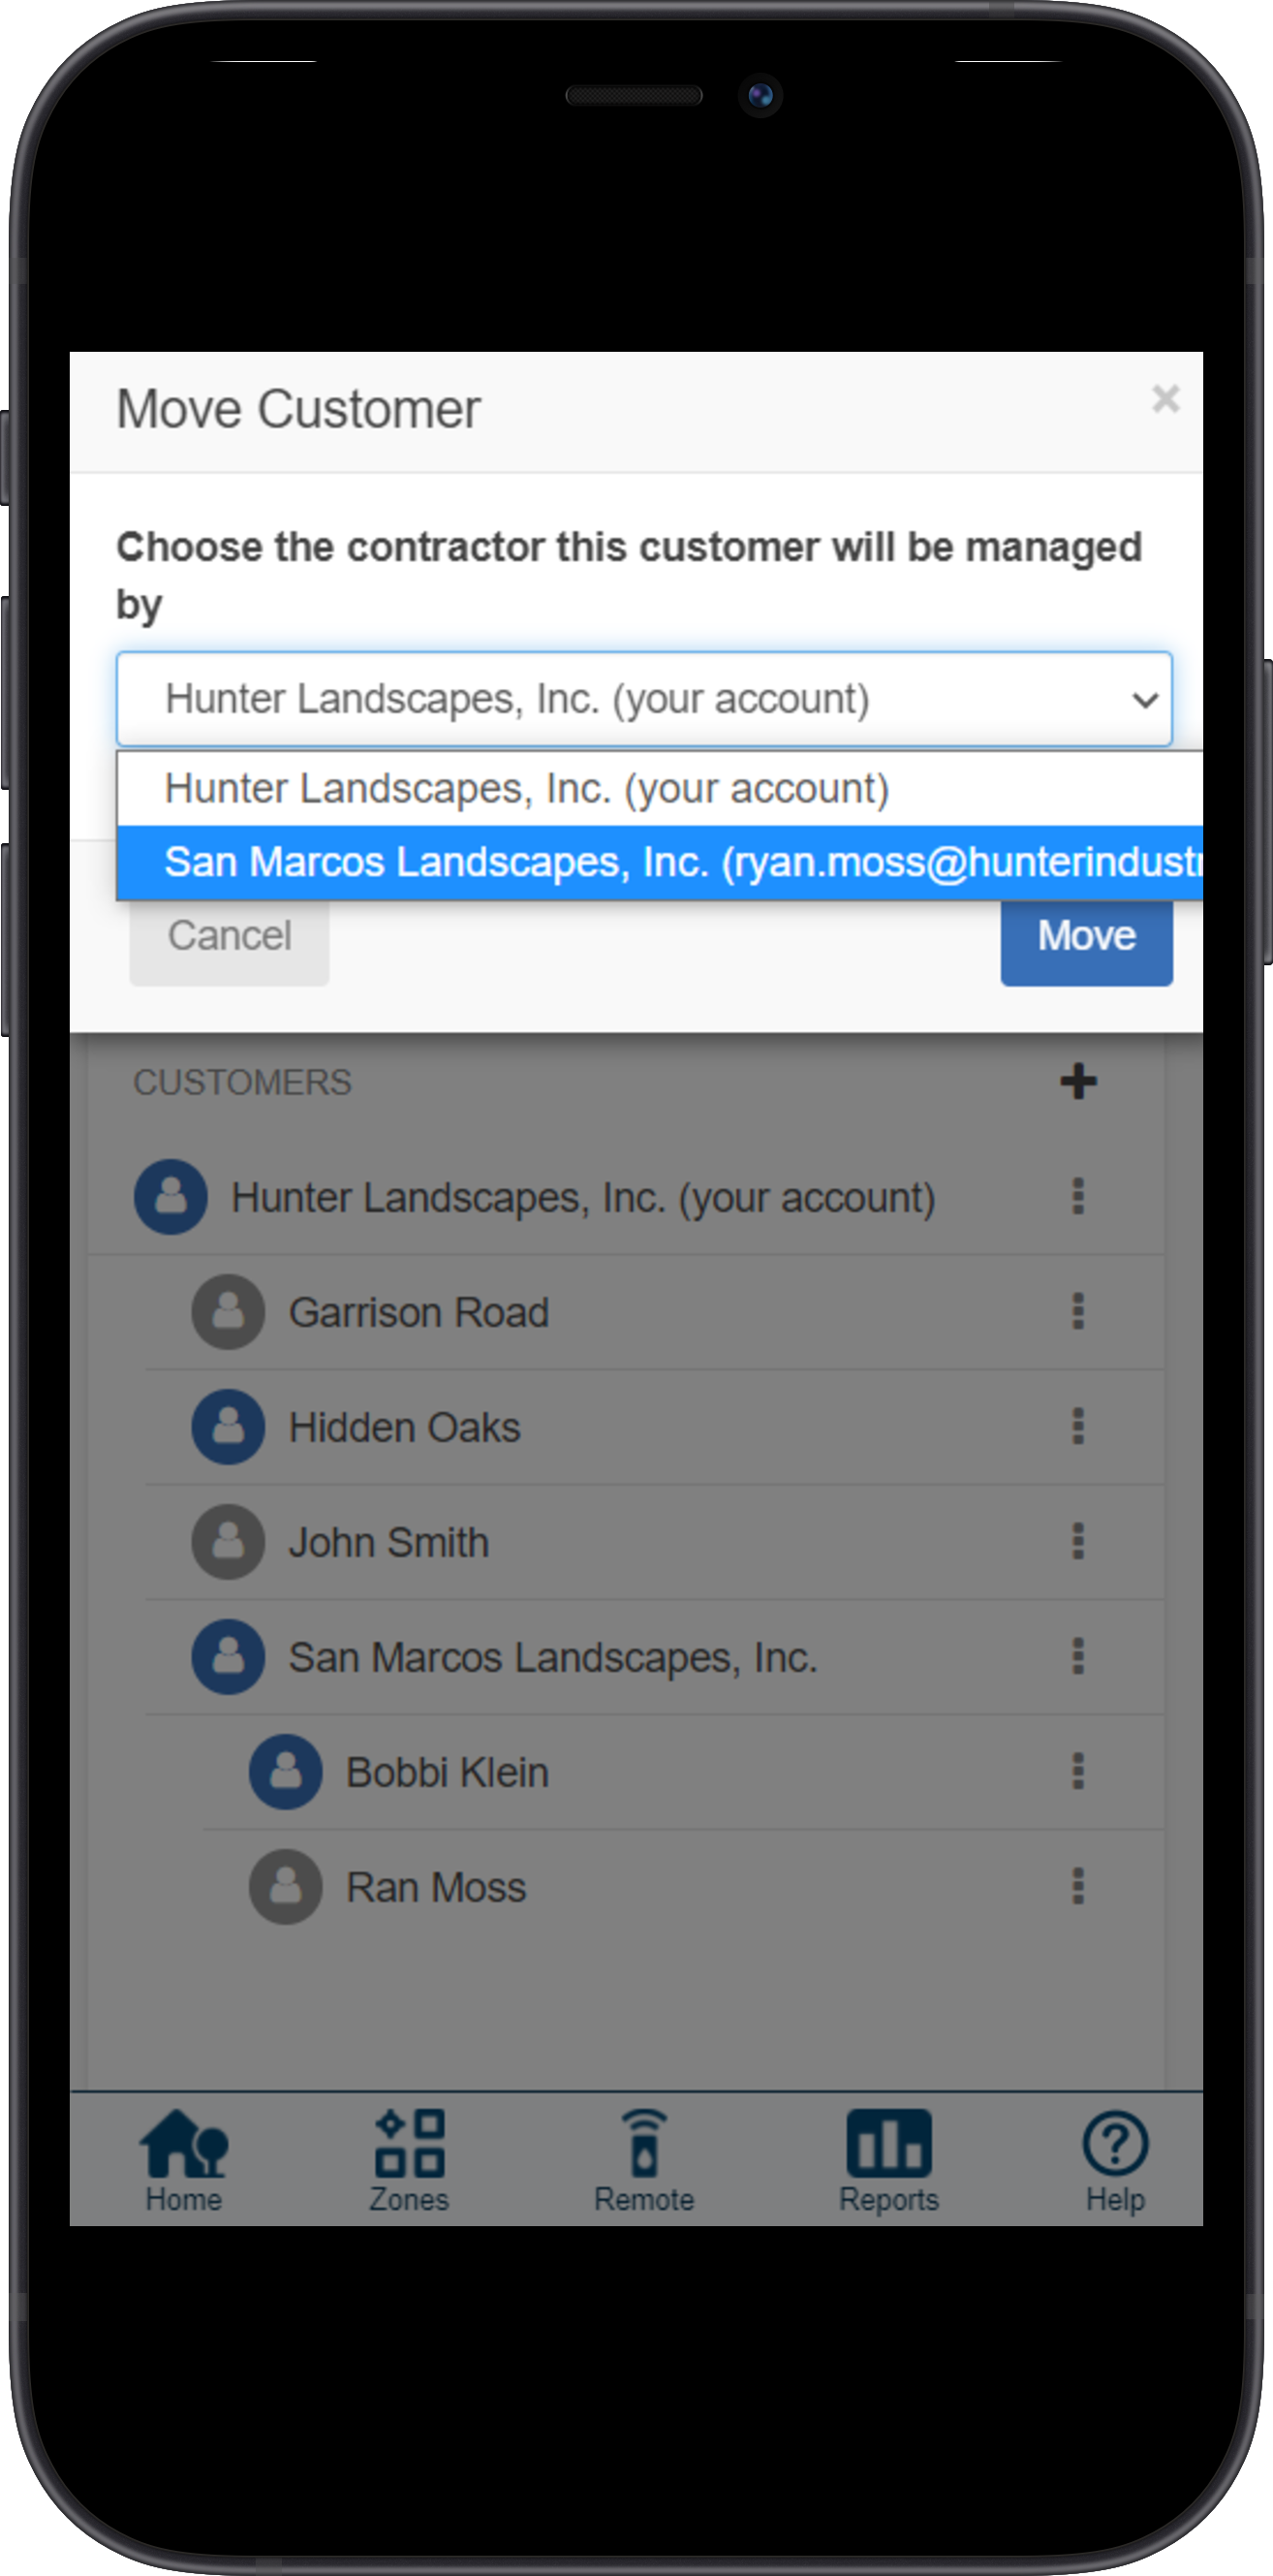
- Select the contractor who will manage this customer. Click MOVE.
| Figure 5A |
 |
| Figure 5B |
 |
Moving a Customer Under Sub-Contractor Account
As a contractor, you might have a sub-contractor or more set up in your account (e.g; property manager). In some cases, you may need to move a specific customer under their account so you both can manage. Using your MULTI-SITE MANAGER feature, you can MOVE a customer to a sub-contractor account with just a few short steps.
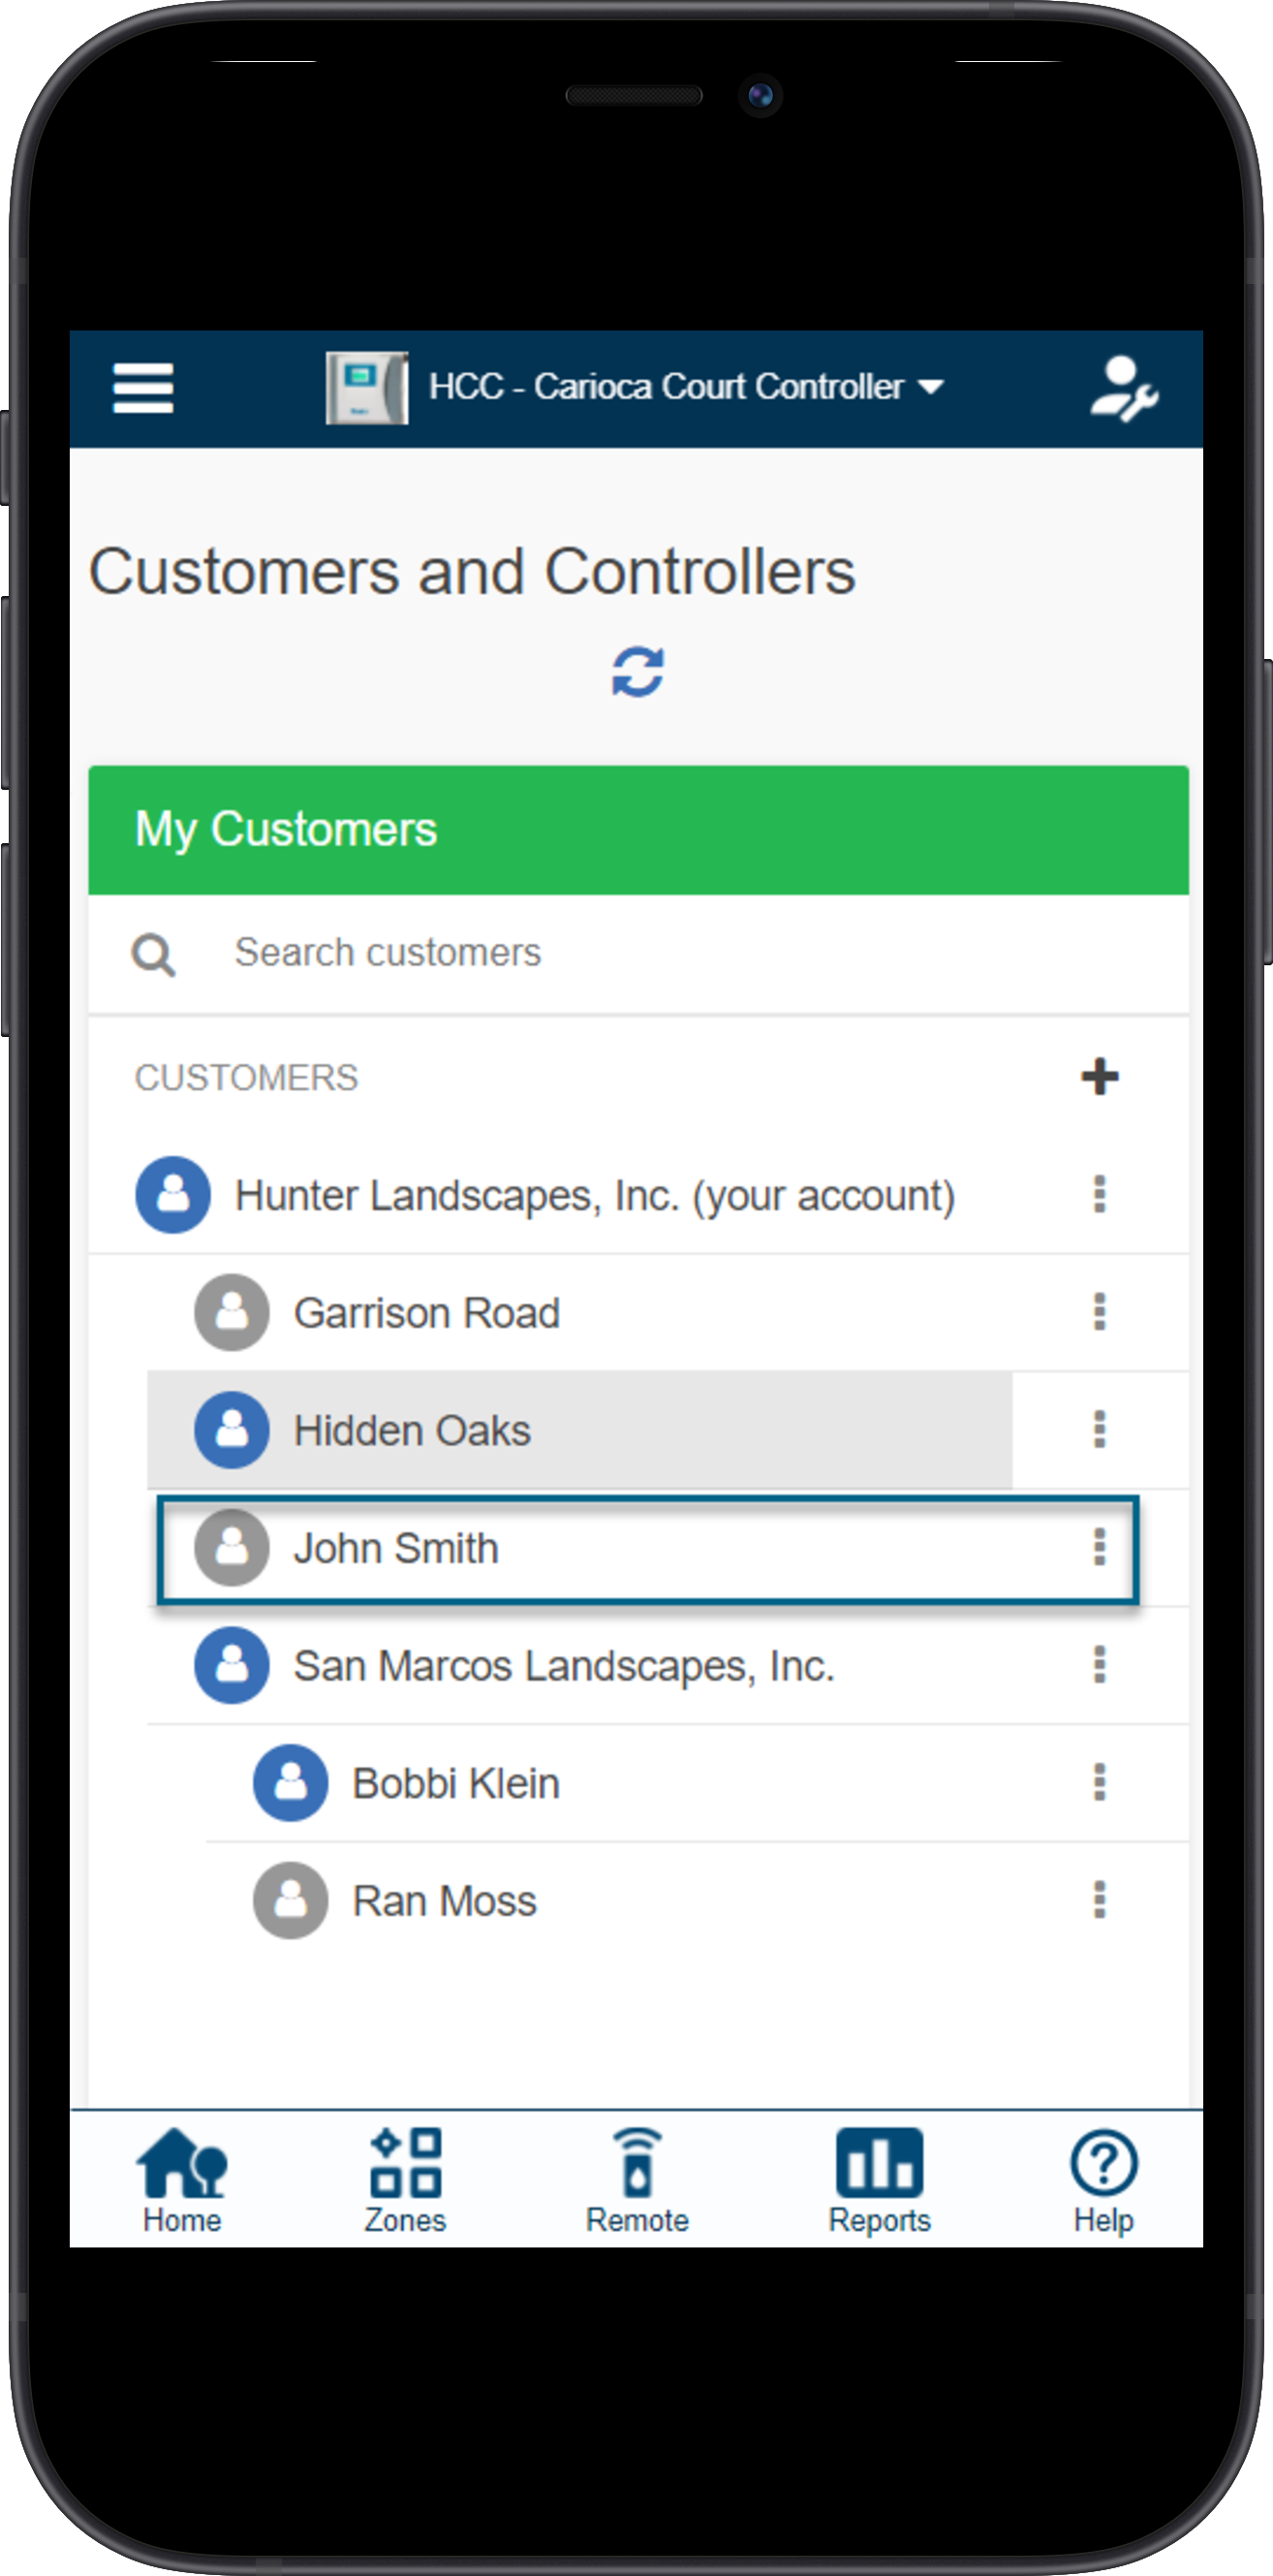
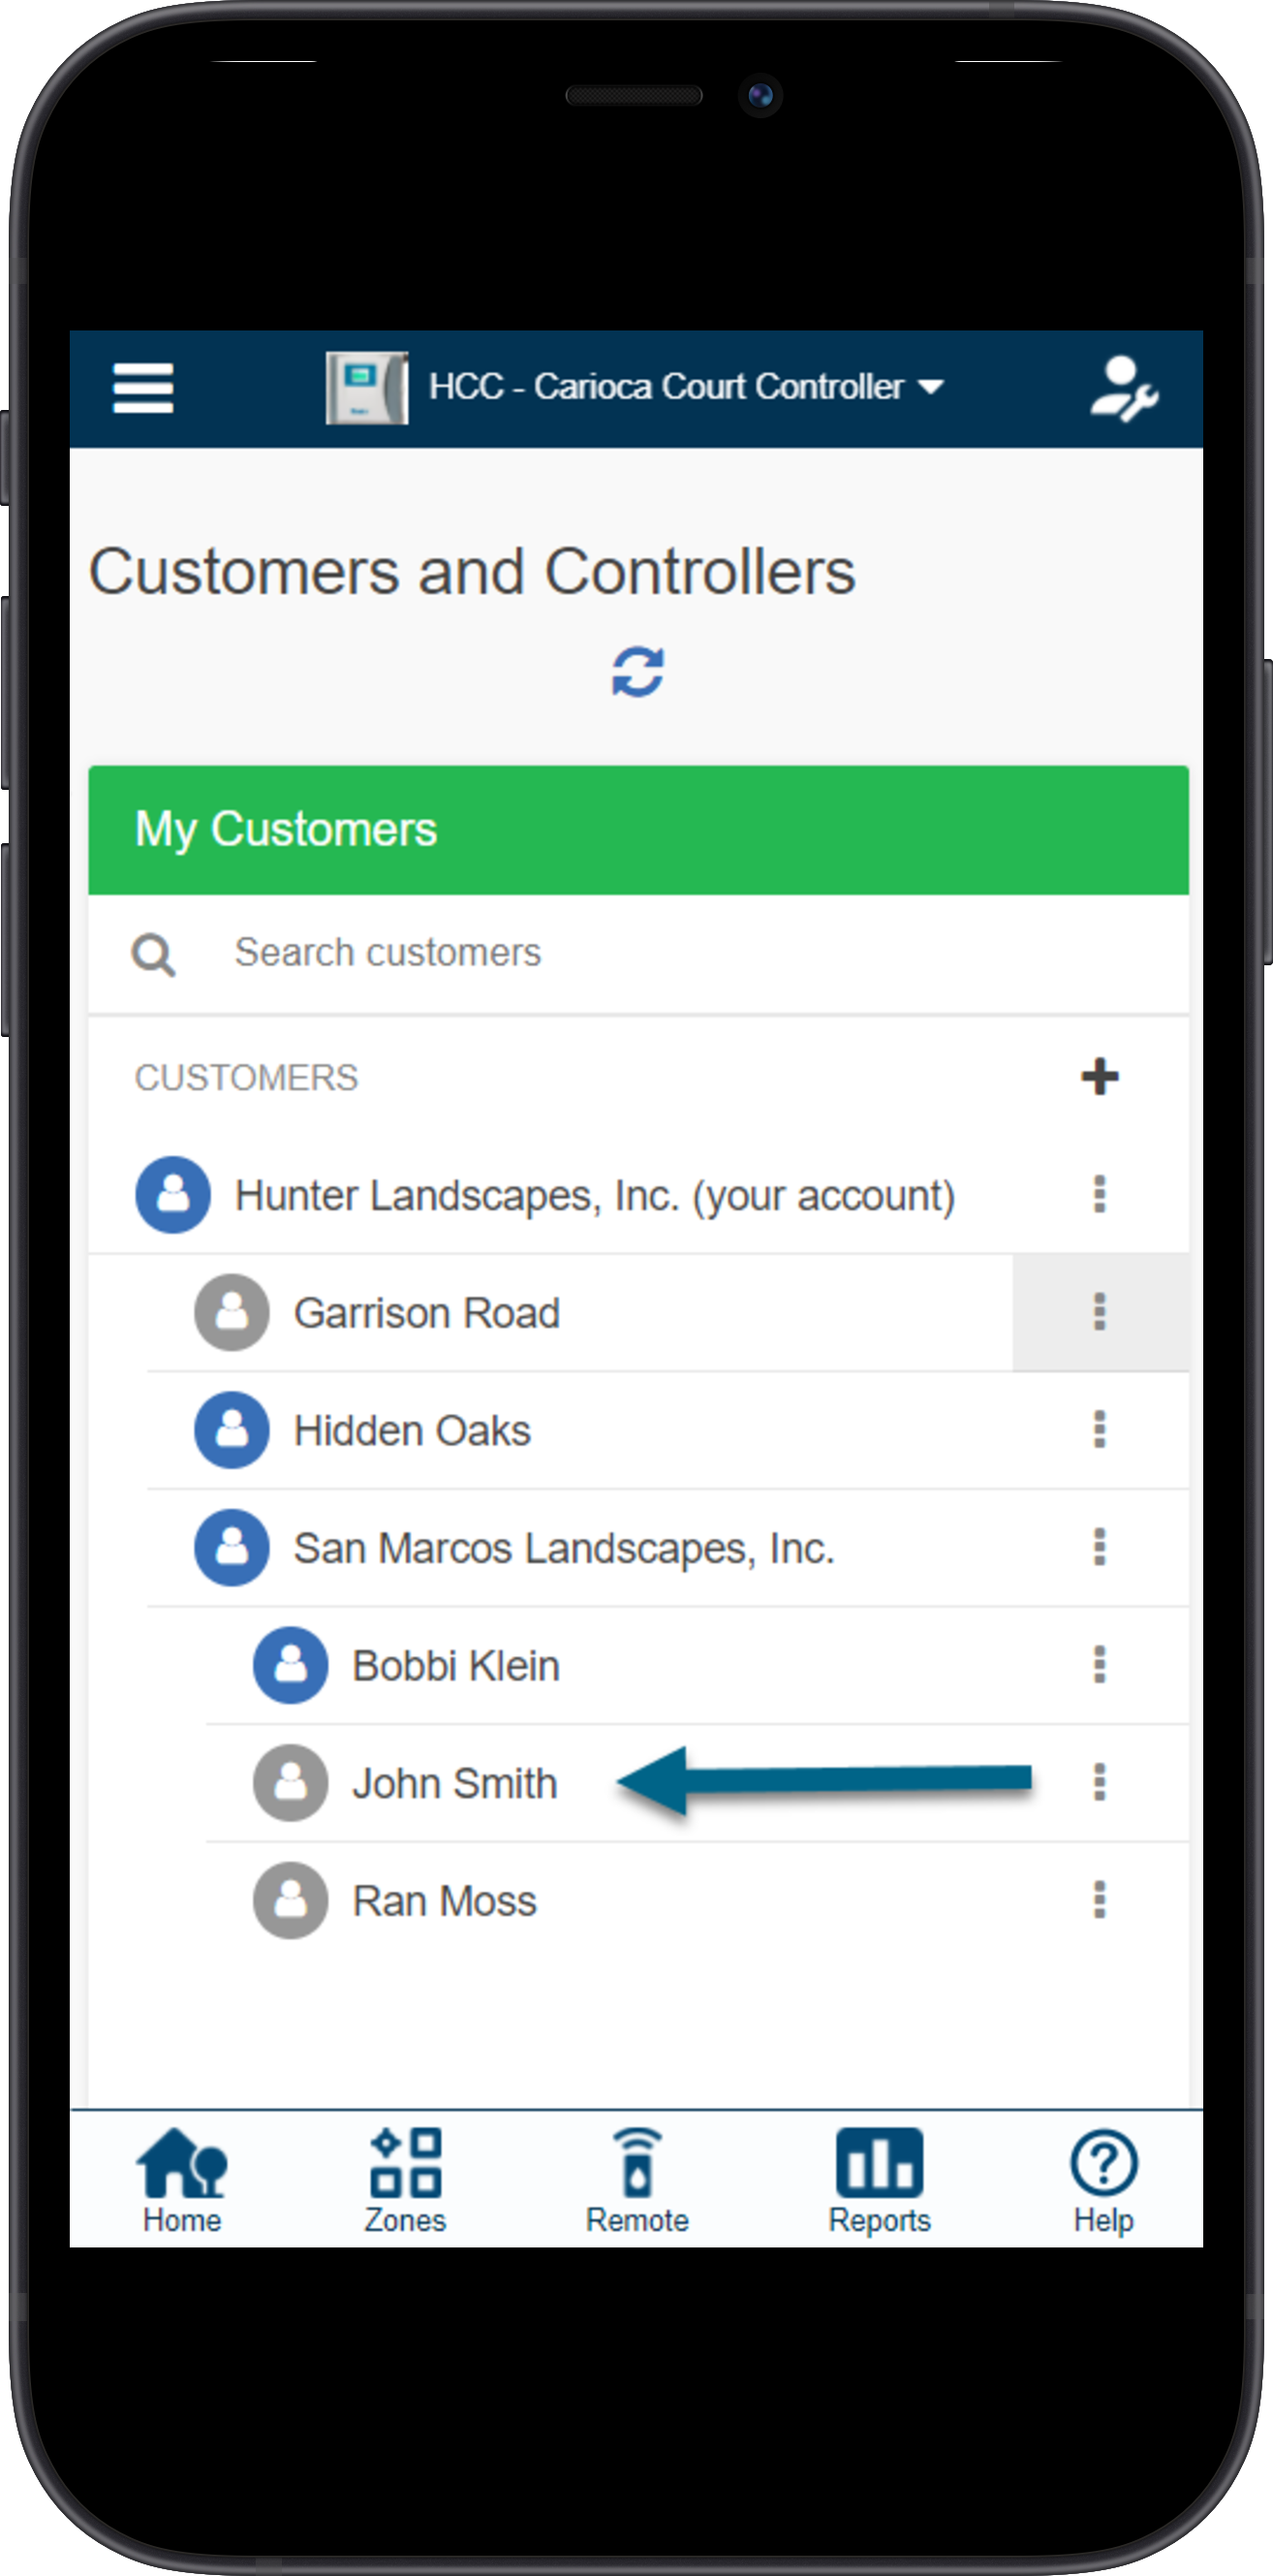
Please view the steps below to make these changes (e.g: John Smith).
| Step 1 | Step 2 |
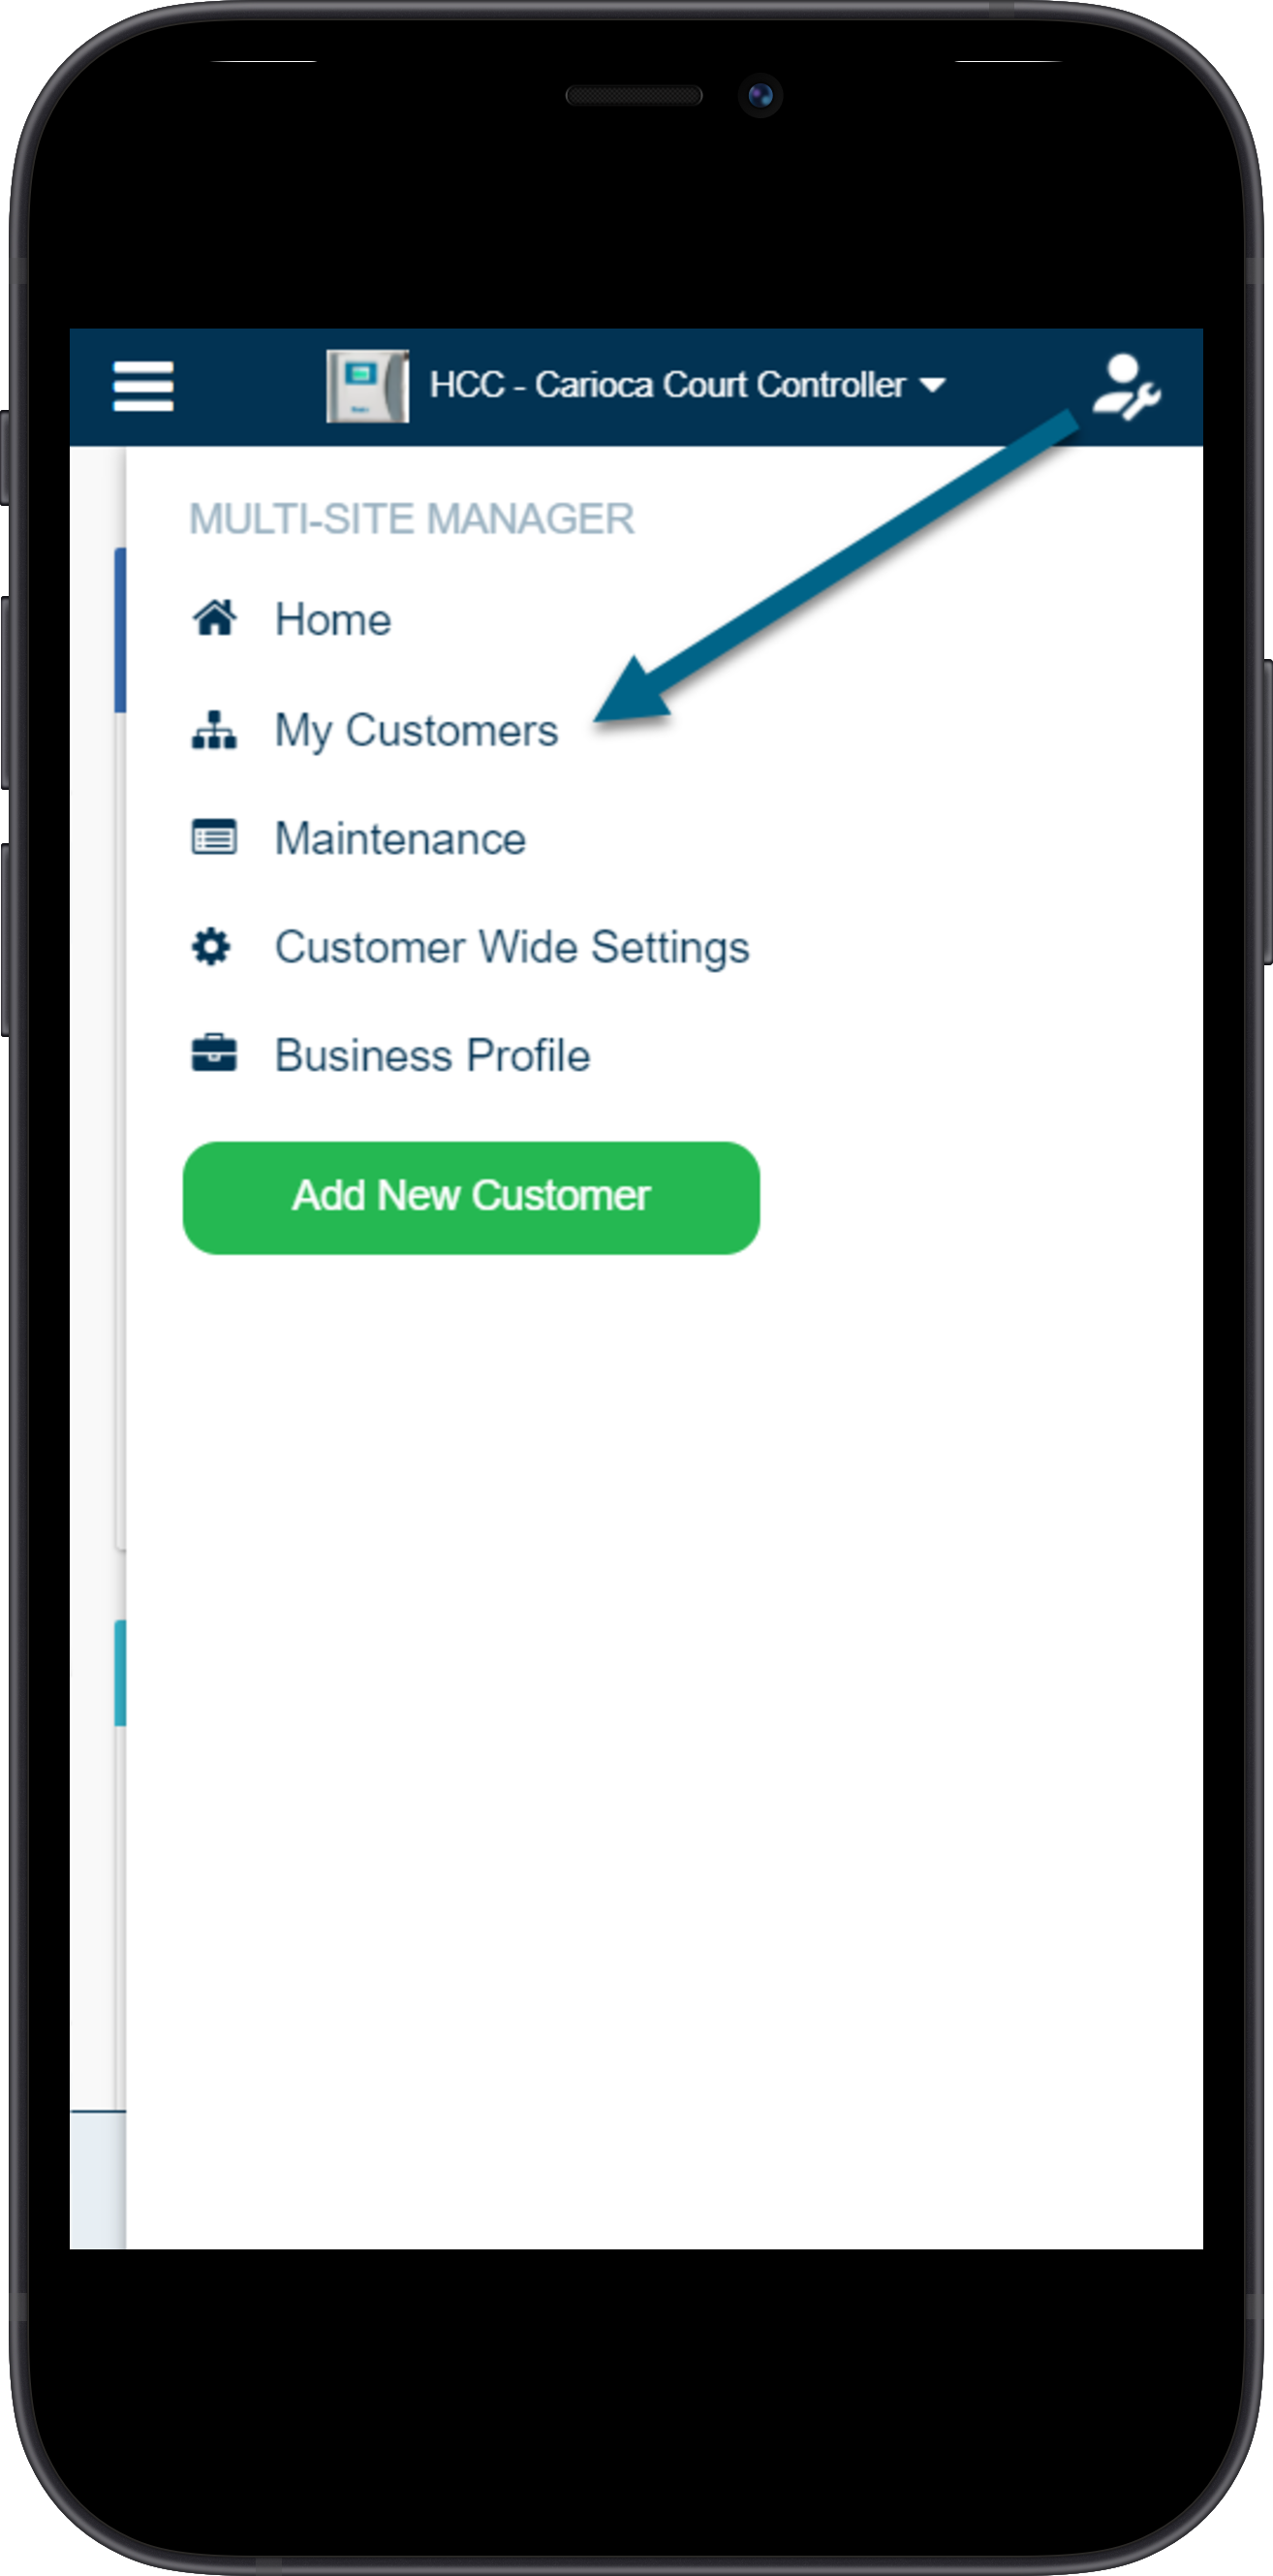
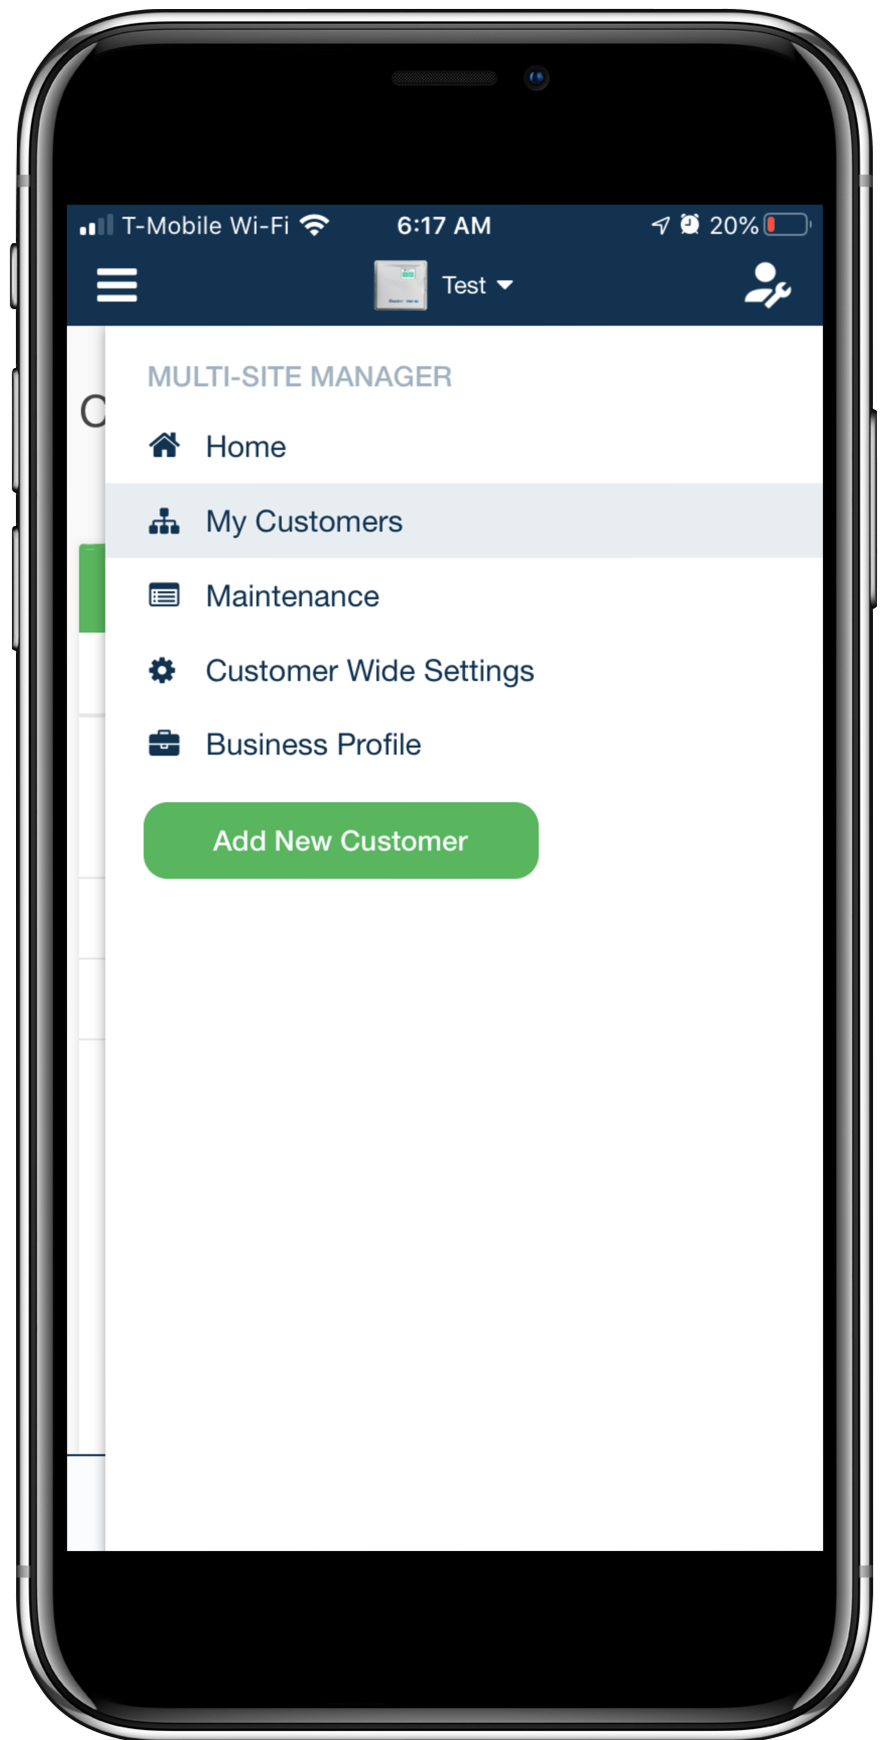
Click on the MULTI-SITE MANAGER  icon on the upper right-hand side, then MY CUSTOMERS. If using a PC, click on the MULTI-SITE MANAGER icon on the upper right-hand side, then MY CUSTOMERS. If using a PC, click on the MULTI-SITE MANAGER  icon on the upper right-hand side, then MY CUSTOMERS. icon on the upper right-hand side, then MY CUSTOMERS.
|
Scroll down to my customer's section and select the CUSTOMER name that will be moved. |
|
|
|
| Step 3 | Step 4 |
| Click on the THREE-DOT icon next to the controller name. Select MOVE CUSTOMER (e.g. John Smith) | Select the sub-contractor account to which you’re moving the controller and click MOVE. |
|
|
|
|
The customer is now under a sub-contractor (San Marco Landscapes, Inc.) and both companies can now manage.
|
|
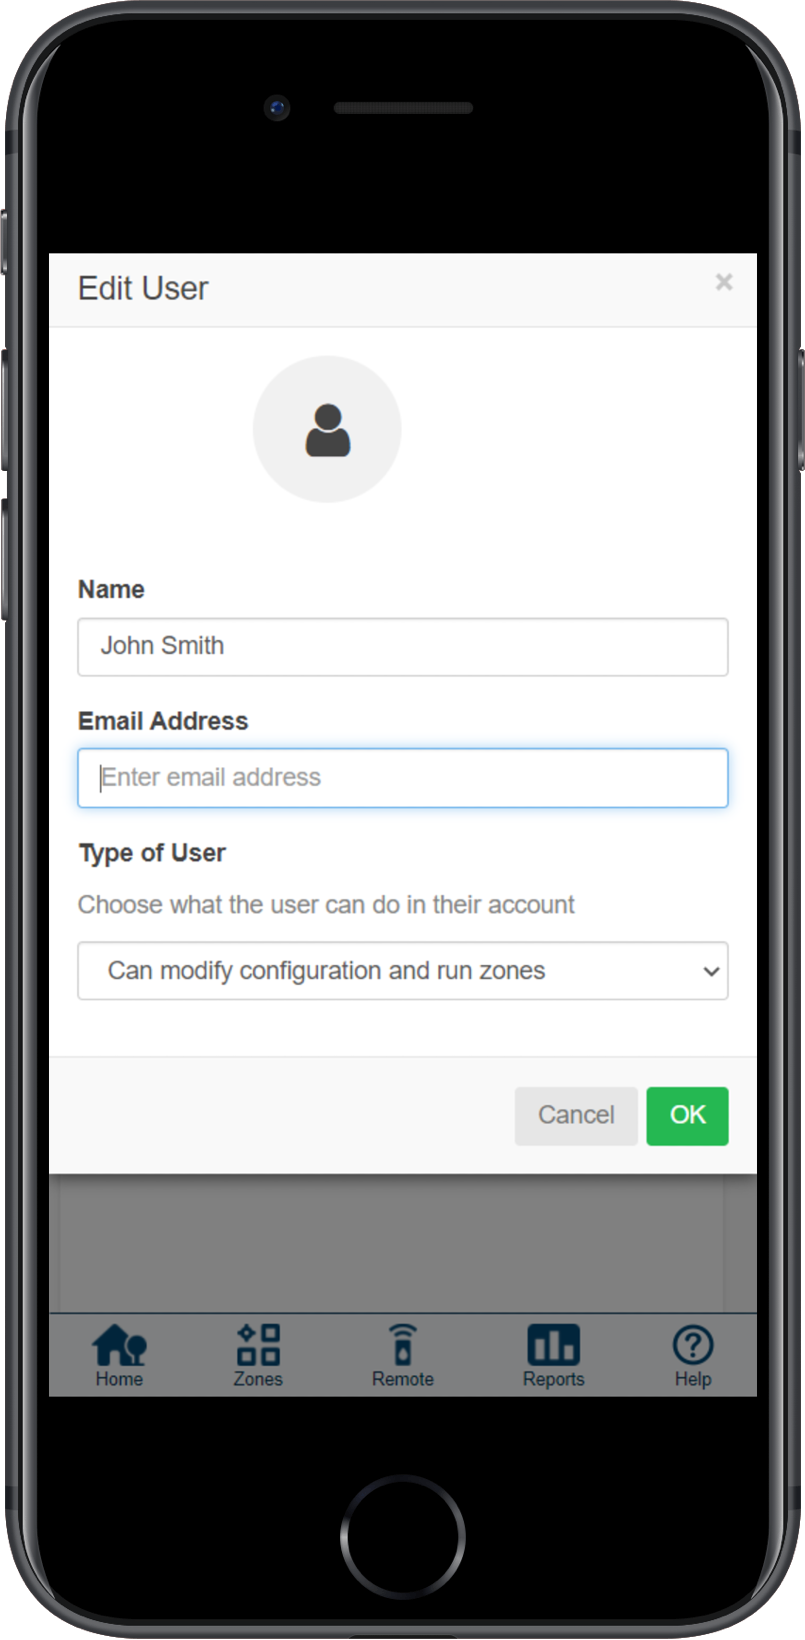
How to Add an Email Address to a Customer's Account
In some cases, you may not have a customer's email address during the controller setup process. If you used the SKIP feature when setting up the controller, you can add the email address at a later time. To complete this process, follow these steps.
- Sign in to your Hydrawise account.
- Click on the MULTI-SITE MANAGER (
 ) icon on the upper right-hand side of the app.
 - Click on MY CUSTOMERS (
 ).
). - Locate the customer's name and click it to open CUSTOMER DETAILS.
- In the USER category, click the (
 ) icon.
 - Click EDIT.
- Enter the customer's email address and click OK.
How Do I Give a Customer Access to the Controller in My Account?
In some cases, you may not have a customer's email address available to set up the account under MY CUSTOMERS. In such cases, you may have to add the controller to your personal business account first. Follow these steps to make sure you and the customer can both access the controller:
- Add the customer to your business account.
- Move the controller into their account.
- Delete the auto-generated controller.
If using your computer (PC), the MULTI-SITE MANAGER is located on the upper right-hand side as well.
- Log in to the Hydrawise app.
- Click on the MULTI-SITE MANAGER
icon on the upper right-hand side. Then select MY CUSTOMERS.
- Scroll down and select ADD NEW CUSTOMER.
If additional information is required to add the customer, click here.
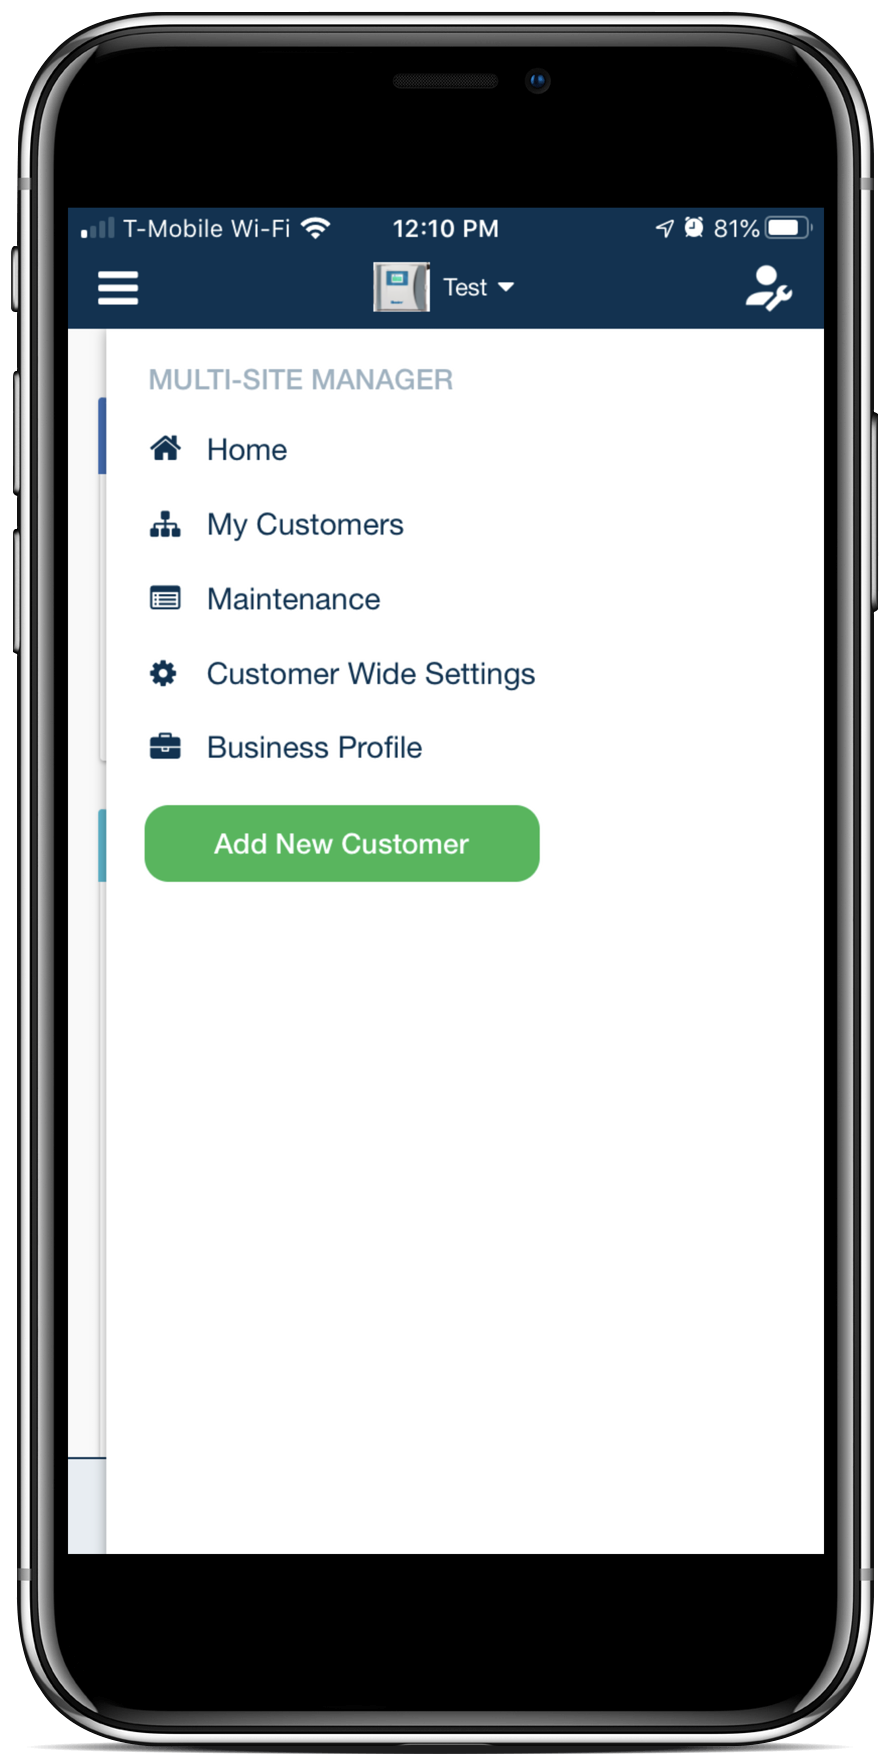
With the customer now added to your contractor account, you can MOVE the controller so you both have access.
- Click on the MULTI-SITE MANAGER
icon on the upper right-hand side. Then select MY CUSTOMERS.
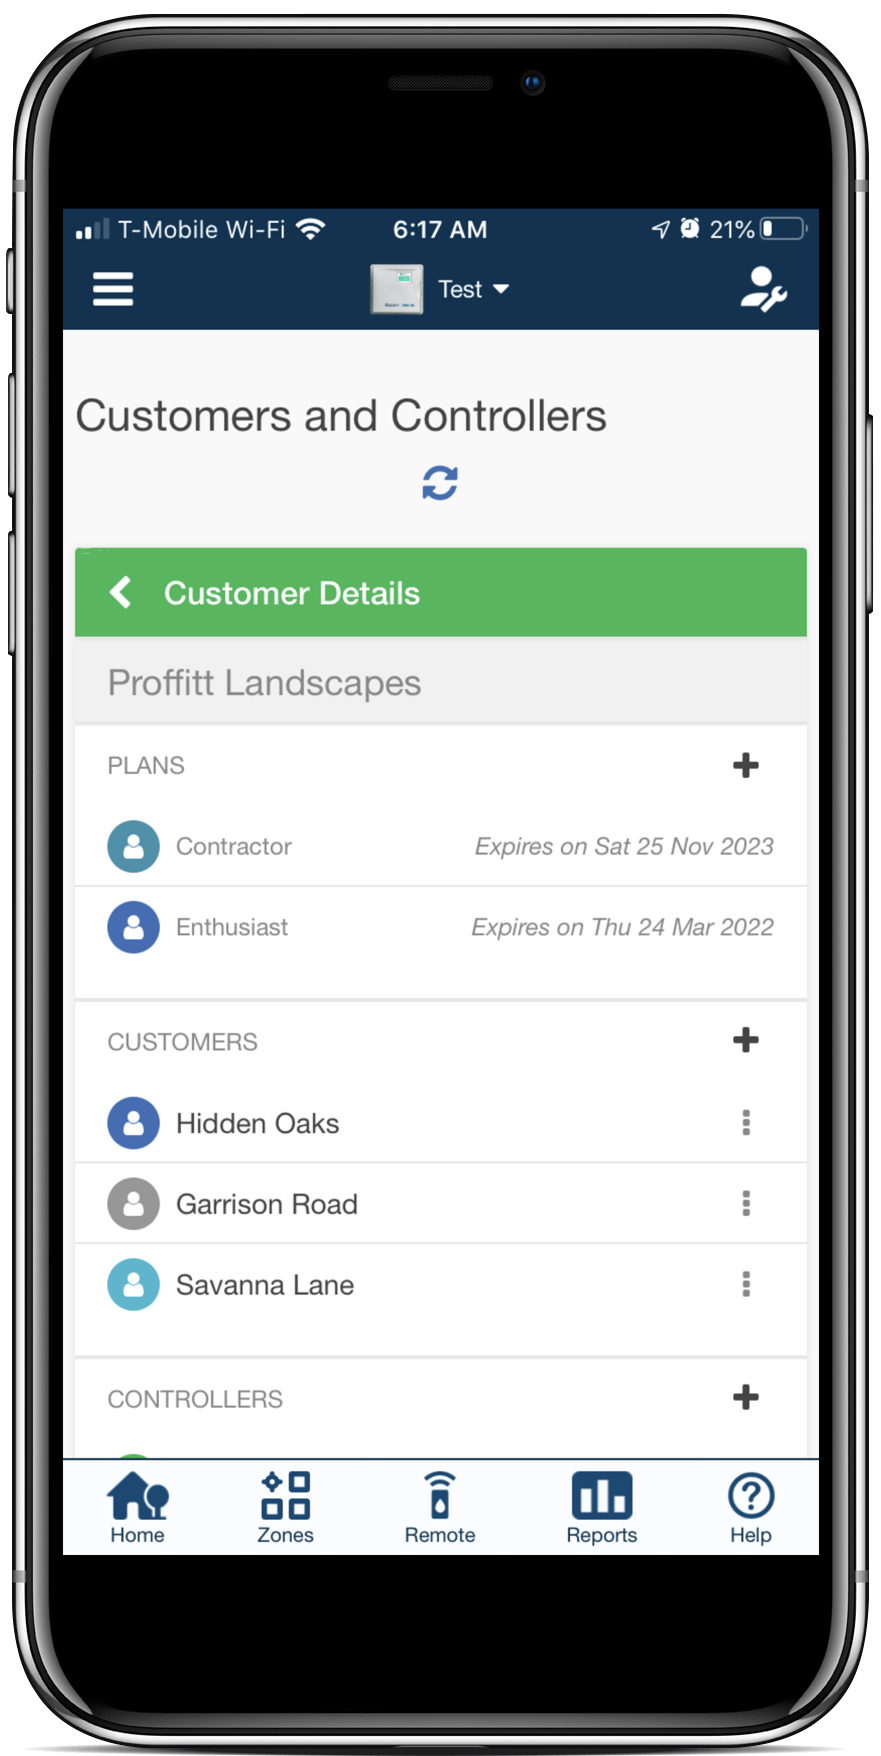
- Scroll down and select your ACCOUNT NAME (e.g., Proffitt Landscapes (your account)).
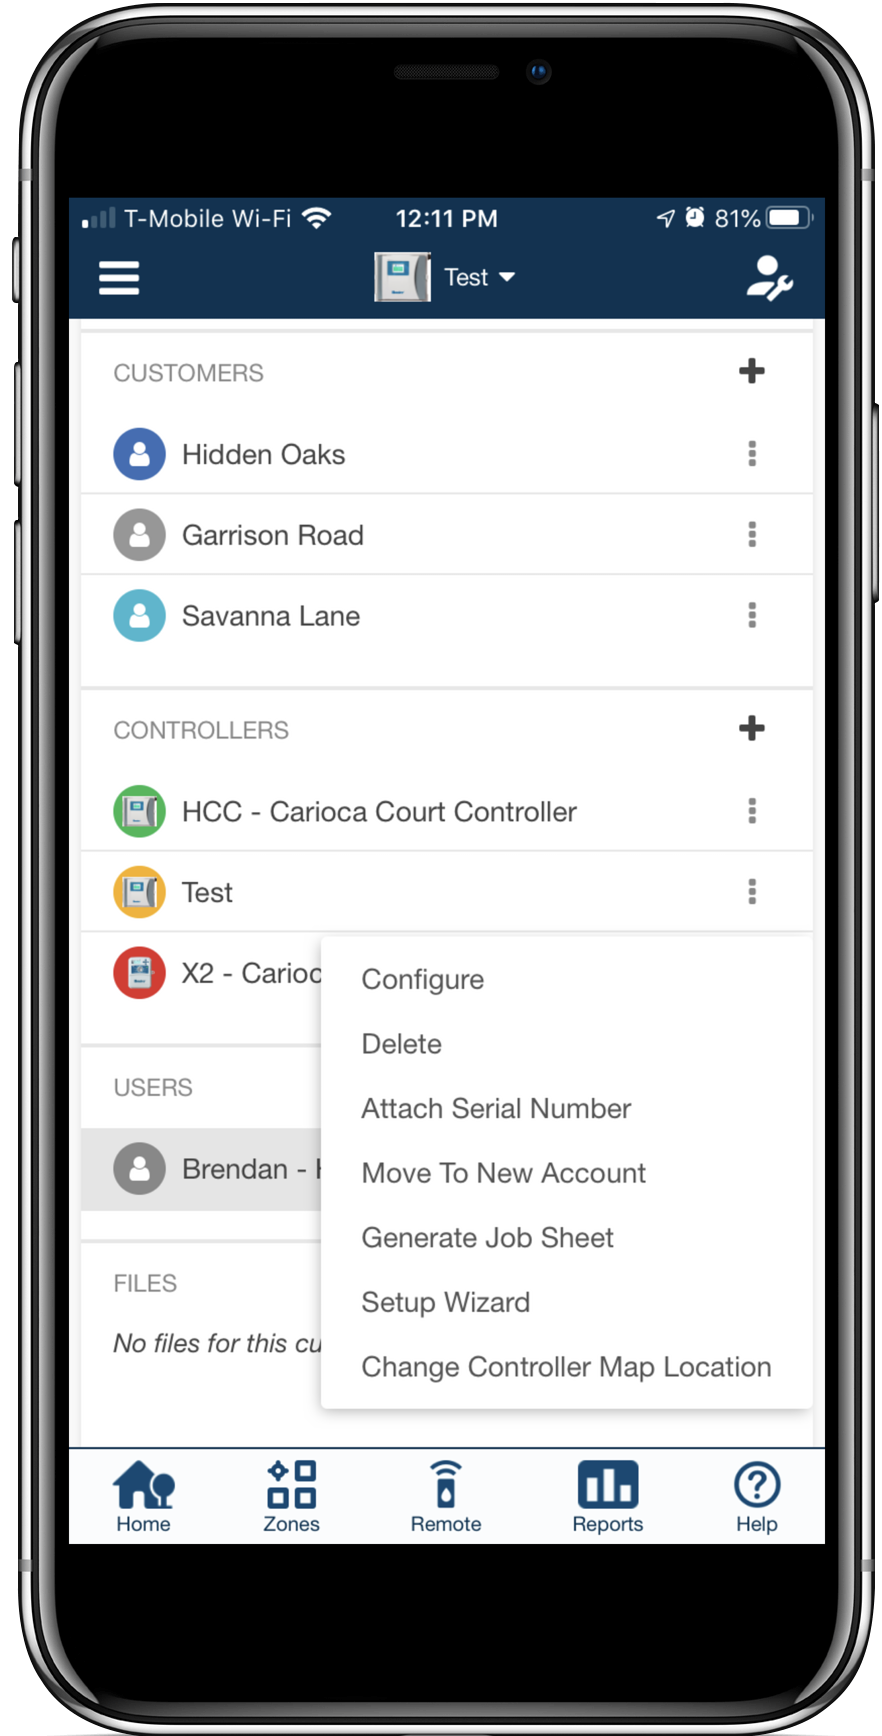
- Scroll down to the controller you would like to move. Then click the (
) ICON.
- Select MOVE TO NEW ACCOUNT.
- Select the new customer you just added and click MOVE.
- Click on the MULTI-SITE MANAGER
icon on the upper right-hand side. Then select MY CUSTOMERS.
- Click on the desired customer's NAME.
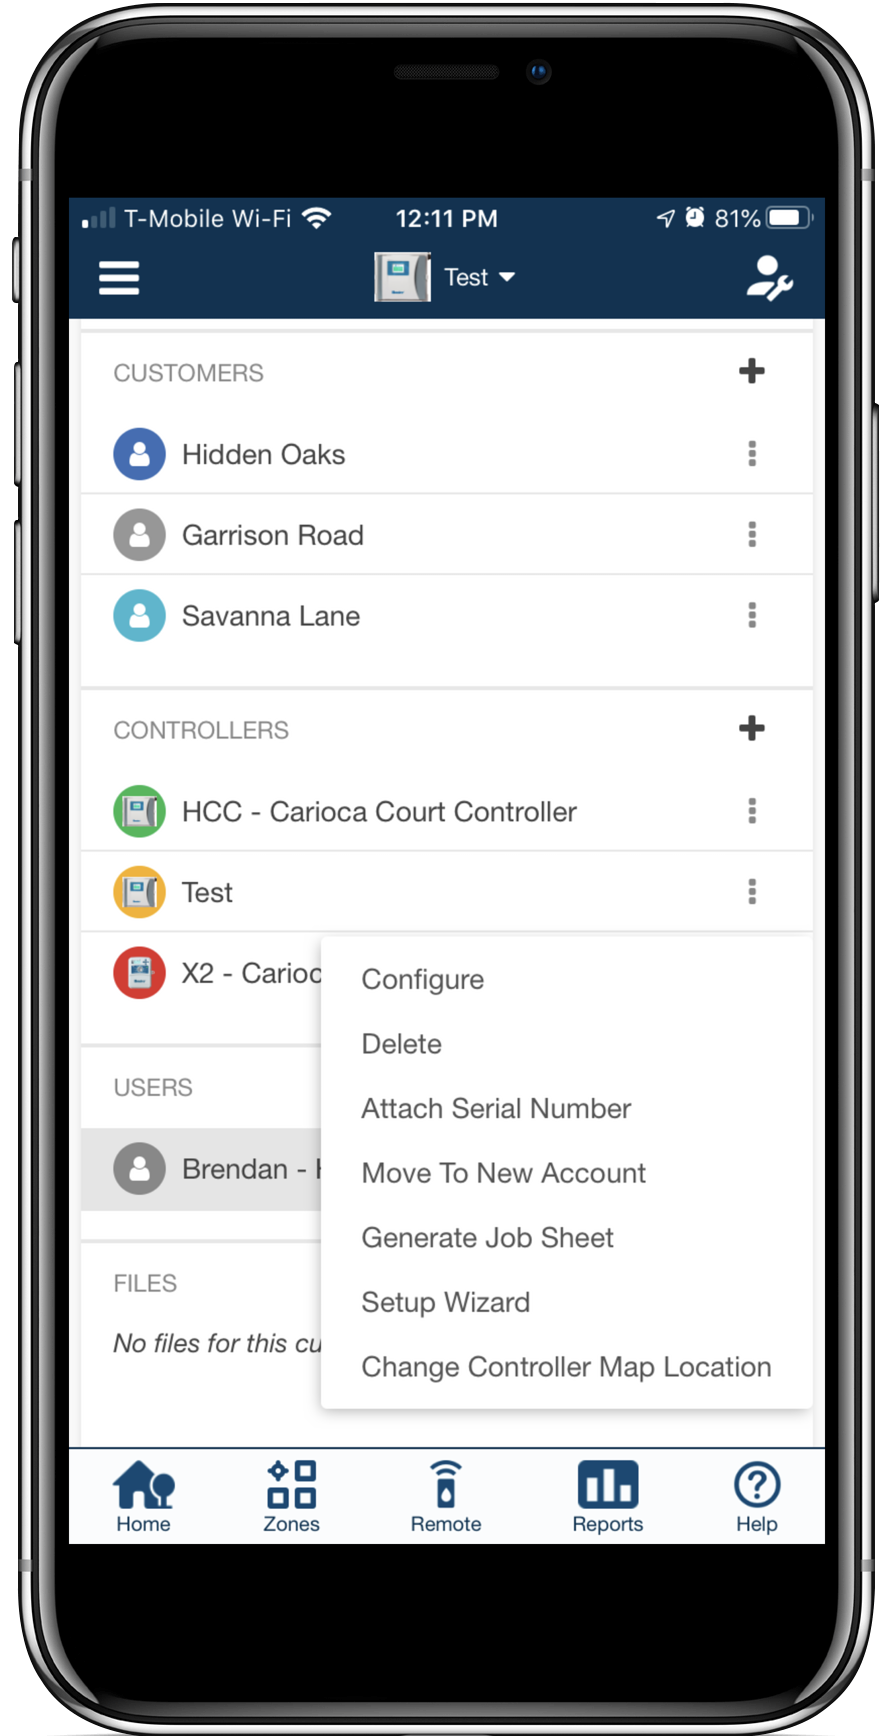
- Scroll down to the controller you wish to DELETE. Then click the (
) ICON. The controller that needs to be deleted will appear in yellow (
).
- Select DELETE.
This action removes the duplicate controller that has no serial number or information attached to the customer's account.
How can I change the email of my customer?
You may set up the customer with an incorrect email in some cases, or they requested that their email needs to be changed. Please review the steps for each of the scenarios.
| Incorrect Email (For Contractor) |
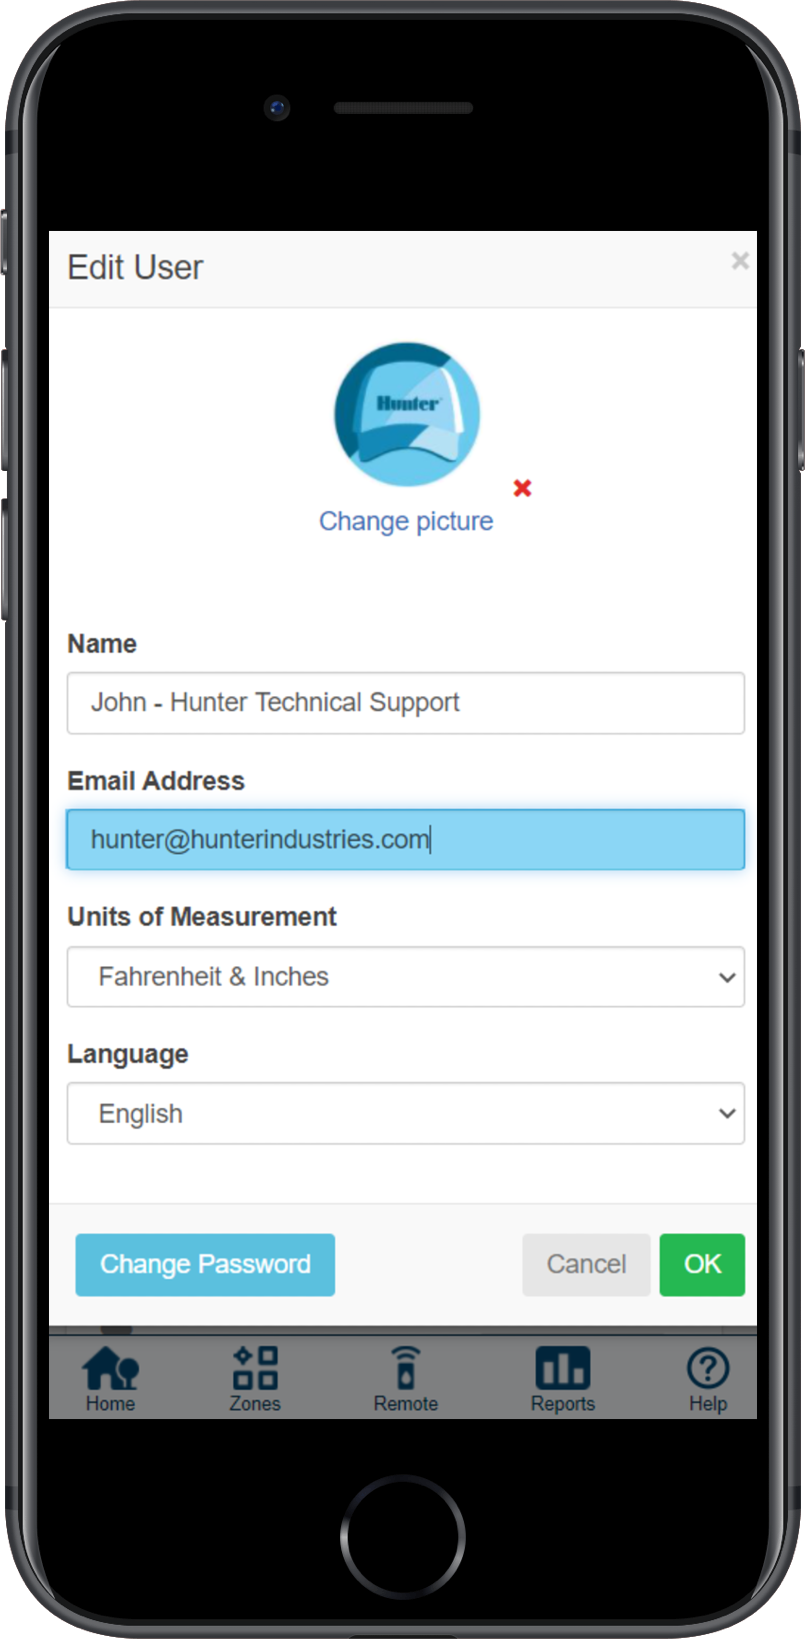
If the email was set up incorrectly by you as the contractor (e.g., missing letter, non-working email, etc.), the email could be edited in the customer's USER settings.
- Sign-in to your Hydrawise account.
- Click on the MULTI-SITE MANAGER
 icon on the upper right-hand side of the app. If accessing from a web browser, click on the (
 ) on the upper right-hand side.
 - Click on MY CUSTOMERS.
- Click on the customer NAME that has incorrect email.
- Under USERS, click on the three-dot icon (
 ) and click EDIT.
- Change EMAIL ADDRESS and click OK.
In the event you see the message below, another Hydrawise user already registers the email.
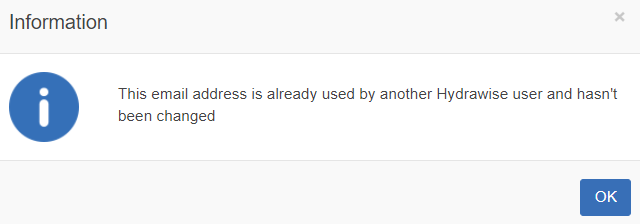 |
Please follow the steps below:
IMPORTANT: The controller will have to be reprogrammed after these steps are completed.
- Sign-in to your Hydrawise account.
- Click on the MULTI-SITE MANAGER
 icon on the upper right-hand side of the app. If accessing from a web browser, click on the (
 ) on the upper right-hand side.
 - Click on MY CUSTOMERS.
- Click on the customer NAME that has incorrect email.
- Under controller, click on the three-dot icon (
 ) and DELETE the controller.
 - Click the back arrow (<) to view your customer list.
- Under the same customer name, click on the three-dot icon (
 ) and select REMOVE FROM MY ACCOUNT. The customer with incorrect email will now be removed from your account.
 -
Add the customer back to your account with the verified email and set up the controller. Learn more
| Incorrect Email (For Homeowner) |
If the homeowner decides they would like to change their email to a new or different address, only they can change the email in the account details section. Please have them use the steps below.
- Sign-in to your Hydrawise account using the original email.
- Click on the MENU icon (
 ) on the upper left-hand side of the app. If accessing from a web browser, click on the (
 ) on the upper right-hand side.
 - Click on ACCOUNT.
- Click the ACCOUNT DETAILS.
- Under USER SETTINGS, click the (
 ) icon.
 - Change the EMAIL and select OK.
The email is now changed, and the existing password will still apply to the account.
How do I move the controller back to customer's account?
In some cases as the contractor, you may have to add the controller into your personal business account without knowing the customer's email address. The customer may not have access to this controller until you ADD them to your account, then MOVE the controller so both of you can access it.
NOTE: If your customer is not in your account under MY CUSTOMERS, then you will need to first add them using the steps in the article found here.
Please view the steps below to make these changes:
| Step 1 | Step 2 |
Click on the MULTI-SITE MANAGER  icon on the upper right-hand side, then MY CUSTOMERS. If using a PC, click on the MULTI-SITE MANAGER icon on the upper right-hand side, then MY CUSTOMERS. If using a PC, click on the MULTI-SITE MANAGER  icon on the upper right-hand side, then MY CUSTOMERS. icon on the upper right-hand side, then MY CUSTOMERS.
|
Scroll down to my customer's section and select YOUR ACCOUNT NAME. |
|
|
|
| Step 3 | Step 4 |
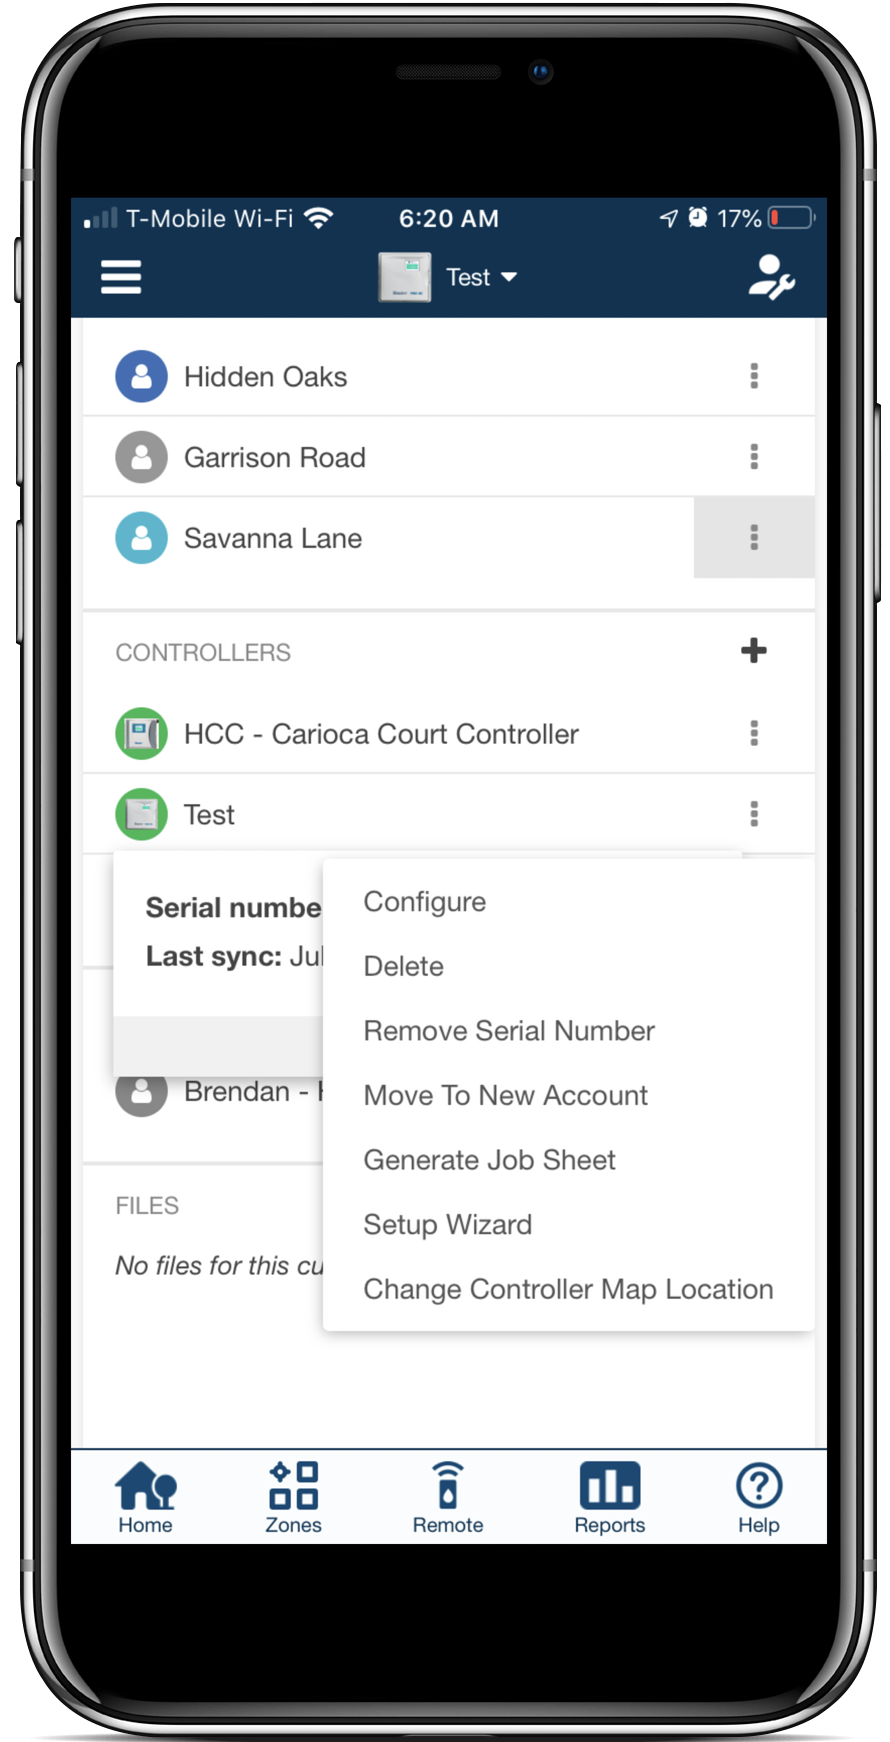
| Click on the controller name you would like to move and click the DOT ICON. Select MOVE TO NEW ACCOUNT. | Select the account to which you’re moving the controller and click MOVE. |
 |
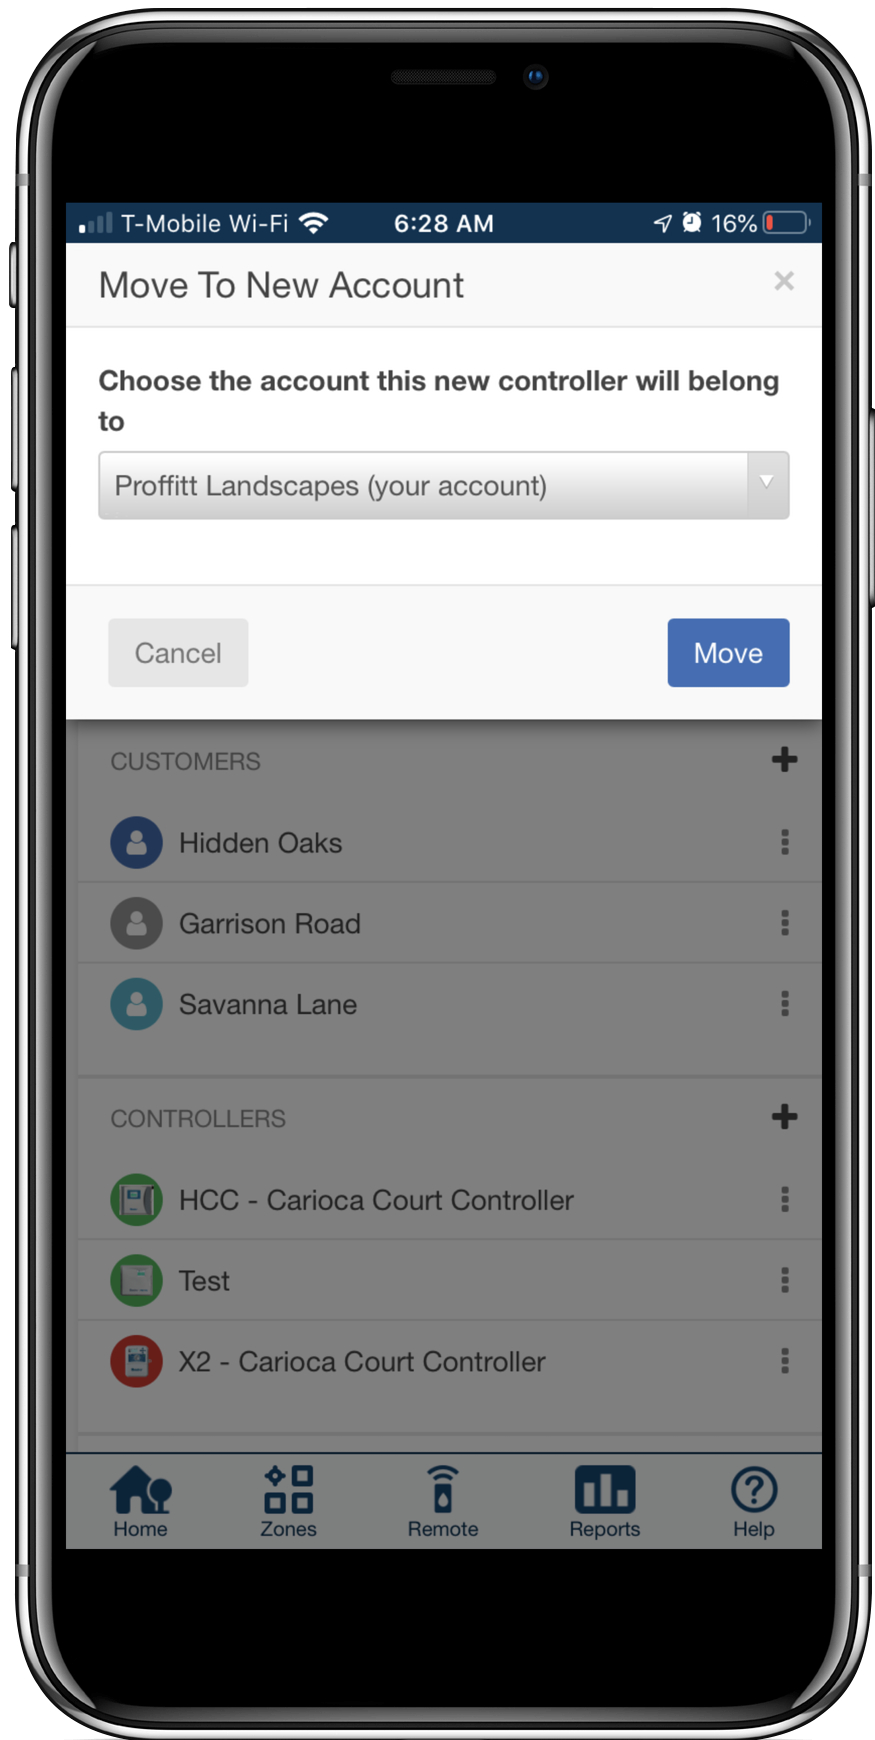 |
The controller is now assigned to a new account and you both have access.
How can I register as a contractor?
To register as a contractor, you’ll first need to sign up for an account. You can do this without purchasing a controller.
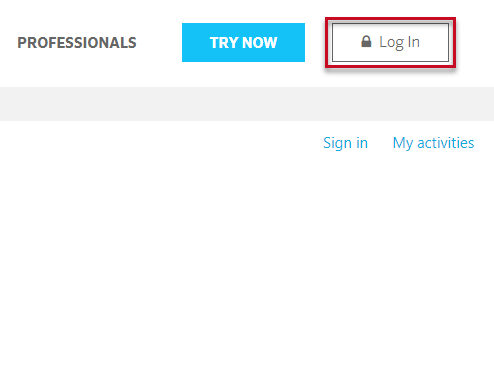
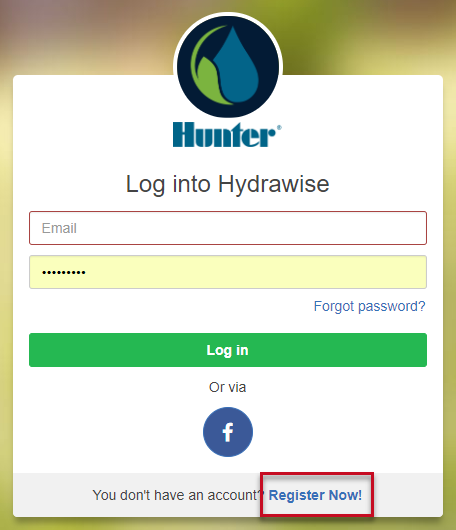
- From the Hydrawise home page, click on LOG IN at the top right of the page.
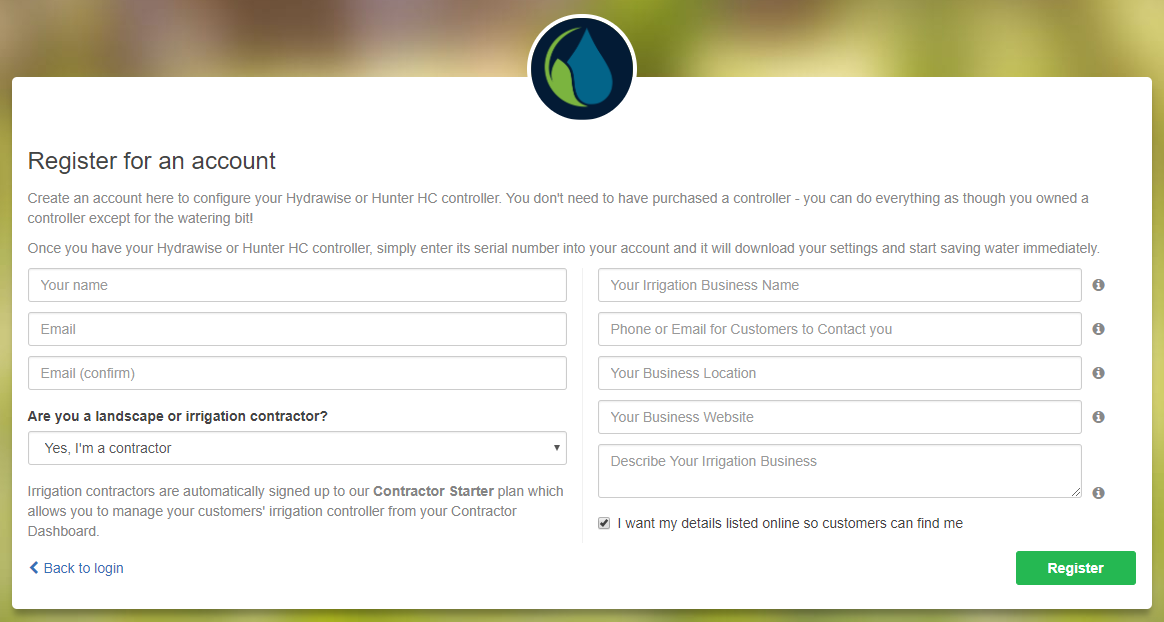
- Select REGISTER at the bottom right corner to fill out the online form.
- You will be asked to fill out the following:
- Name
- Irrigation Business name
- Phone for customers to contact you
- Business location
- Business Website
- Business Description
- Lastly, check the box if you would like your details visible online.
| STEP 1 |
 |
| STEP 2 |
 |
| STEPS 3-4 |
 |
How do I remove a customer?
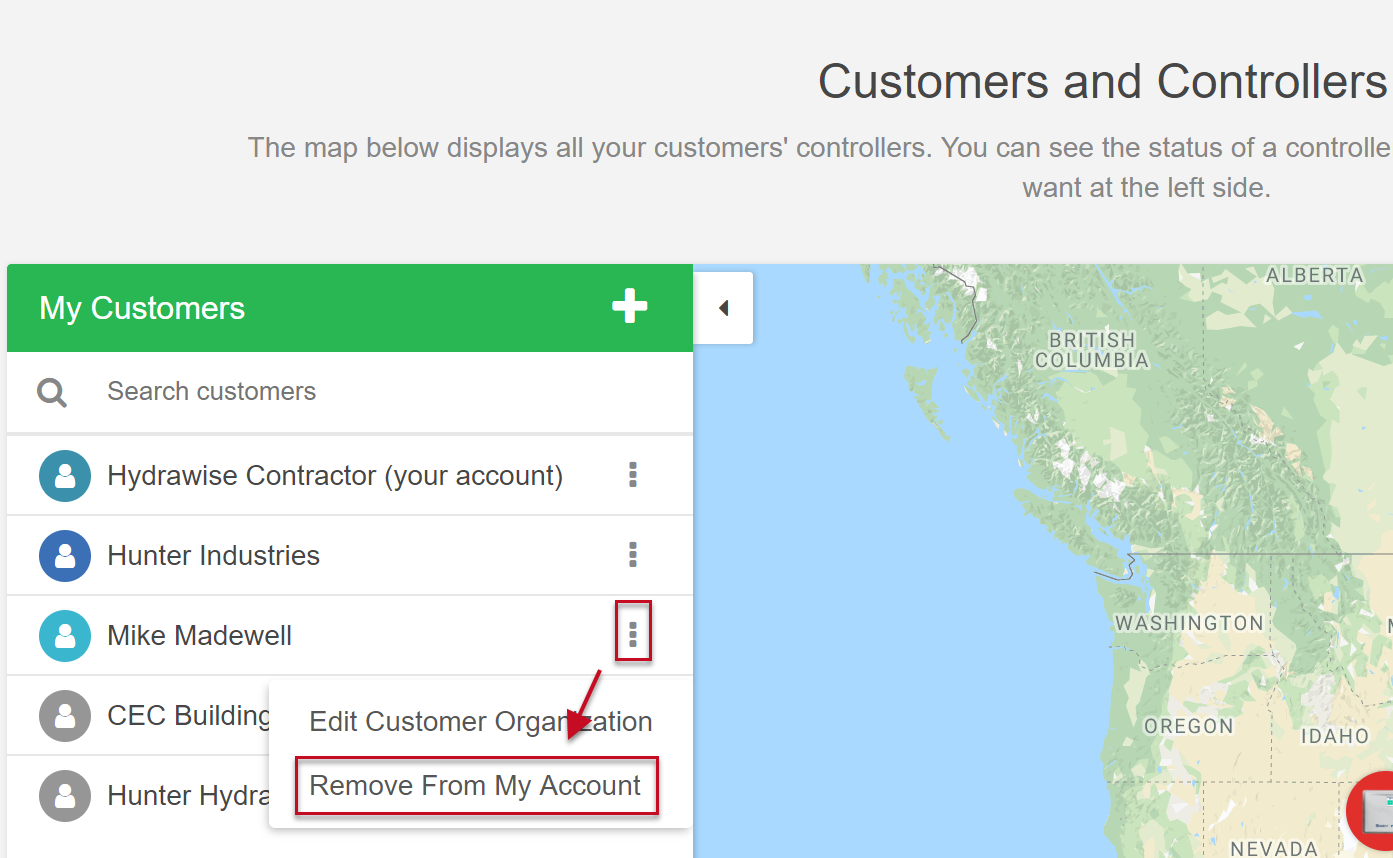
From your Multi-Site Manager on the upper right ( ), follow the instructions below:
- Click on the customer you want to remove in your MY CUSTOMERS list.
- Click the EDIT ICON.
- Click on REMOVE FROM MY ACCOUNT.
| Steps 1-3 |
 |
Configuring a Customers Controller
From the Contractor Portal, you can locate your customer and configure their details if necessary. Use the steps listed below to access any of the following features:
- CONFIGURE - This will allow you to make any program changes to this specific controller.
- DELETE - If the controller is no longer being used, you can delete it using this feature.
- REMOVE/LINK SERIAL - You can remove or link a serial number for a new or existing customer.
- MOVE TO NEW ACCOUNT - The controller can be moved to another customer within your account.
- SETUP WIZARD - If necessary, you can run through the basic setup wizard to reprogram the controller for the customer from the beginning.
| Steps |
- Sign in to your Hydrawise account.
- Select the MSM (Multisite Manager) icon (
) on the upper right-hand side of the app.
- Select MY CUSTOMERS.
- Scroll to the CUSTOMER and click on the NAME.
- Next to the CONTROLLER NAME, select the THREE DOT icon. Select an option.
How do I add a controller as a contractor?
There are two ways to add a controller for a customer.
The first method is to create the controller on your own account. Then, configure it as you would if you or the customer created it straight on their account. This option can be used when a customer does not give account information (email) to the contractor.
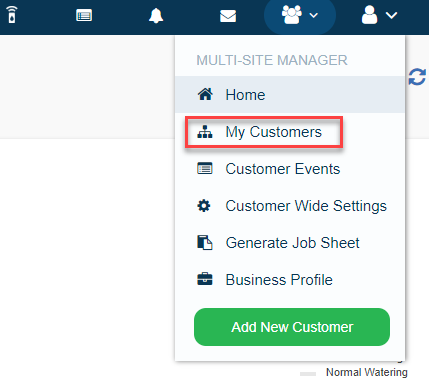
- Click on the MULTI-SITE MANAGER
 icon on the upper right hand side, then MY CUSTOMERS.
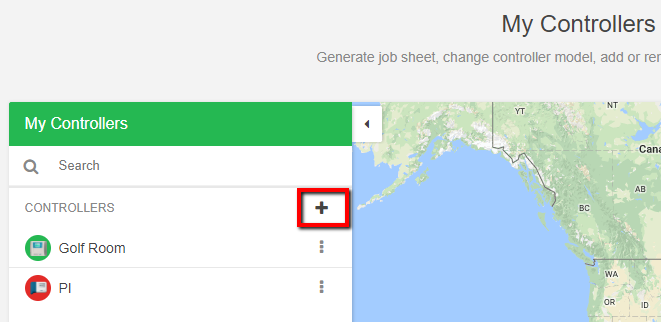
- Next, go to MY CONTROLLERS and click ADD CONTROLLER.
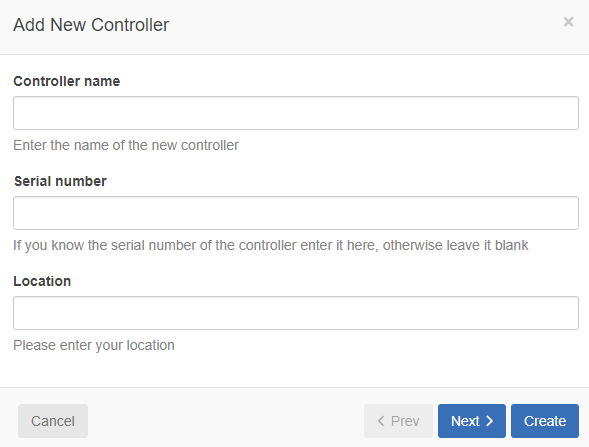
- Create the controller by adding a NAME, SERIAL NUMBER (if you have it), and the LOCATION. NOTE: This can wait for when you get the customer's serial number.
| Step 1 |
 |
| Step 2 |
 |
| Step 3 |
 |
If you end up gaining access to the customer's account, you can create it straight in their account. This will save you from having to move the controller from your account to theirs at a later time.
To learn more about moving controllers from your account into your customer's account, click here.
The second way to add a controller to a customer's account would be to create it directly by selecting the account under My Customers.
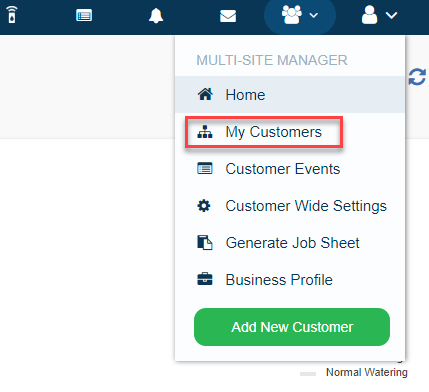
- Click on the "Manager" icon on the upper right hand side, then "My Customers."
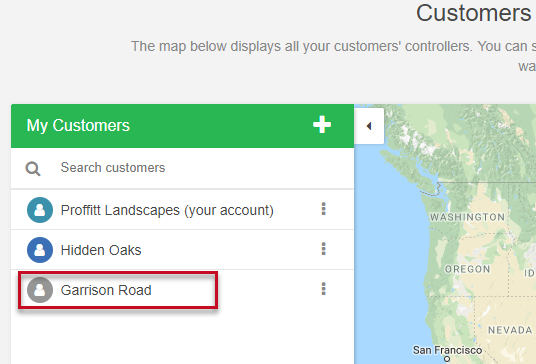
- Click on the "controller" for editing.
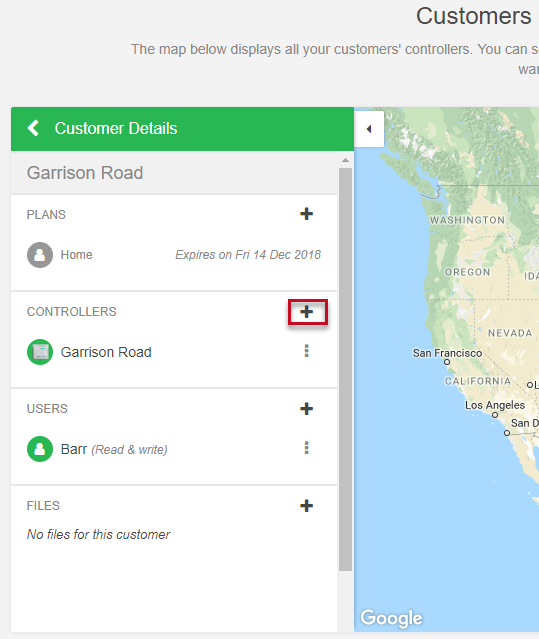
- Click on the plus tab to add controller in this customers account.
- Create the controller by adding a controller Name, serial number (if you have it) and the location. Otherwise, this can wait for when you get the customer's serial number.
| Step 1 |
 |
| Step 2 |
 |
| Step 3 |
 |
| Step 4 |
 |
Managing Customer Plans
As a Hydrawise contractor, you have a few options for assisting customers with their plans. The three options include Assigning a Plan, Assigning Available Plans you have in your contractor account, and Purchasing a Plan for the customer. These options include adding a plan to your own contractor account.
| Steps |
- Click on the MULTI-SITE MANAGER
 on the upper right-hand side of the app. Click on the
  icon if navigating on the web browser.
 - Click MY CUSTOMERS.
- Under your customer list, select a CUSTOMER NAME. NOTE: The top customer name in your customer list will be YOUR ACCOUNT NAME. You can assign one of your Enthusiast plans to your personal account if desired.
- Under the PLANS menu, you have three options when clicking the
 button.
- Assign Plan Using Code
- Assign Available Plan
- Purchase Customer Plan
| Add Plan Using Code |
If you’ve purchased a plan card from a retailer with a code on the back, or if they’ve given you the plan code, you can use this to assign the plan for your customer. The plan code is four characters followed by a dash and another four characters (for example, 45F2-644E).
- Select ADD PLAN USING CODE.
- Enter UPGRADE KEY.
- Click UPGRADE.
| Assign Available Plan |
If you’ve purchased plans online or you want to use the included plans with your Contractor Plan, they are available for you to assign to new or existing customers.
- Select ASSIGN AVAILABLE PLAN.
- Available plans will be listed. Choose the plan and click ADD PLAN to assign it to a customer.
For the contractor on a Contractor, Bronze, Silver, or Gold plan, Enthusiast (Advanced Homeowner Plan) plans are included.
| Contractor Plan | Included Enthusiast Plans |
| Contractor | 2 Plans |
| Bronze | 12 Plans |
| Silver | 20 Plans |
| Gold | 35 Plans |
| Purchase Customer Plan |
- Select PURCHASE PLAN.
- Choose the plan you want to purchase and select whether you’d like it to be automatically renewed.
- Click UPGRADE WITH PAYPAL to pay for a plan. Learn more
How can I add or delete a user on my account?
You may want to have several people in your organization to manage your customers, controllers, or your customers may have more than one person in their household or business who wants to manage their controller. This can easily be done by adding extra users for a customer.
In the contractor portal, find your customer and click on their account name to configure user details.
The following information can be found in this section:
- Add new user
- Edit user
- Delete user
- Resend Activation Emails
- Sending a Lost Password Email
ADD A USER |
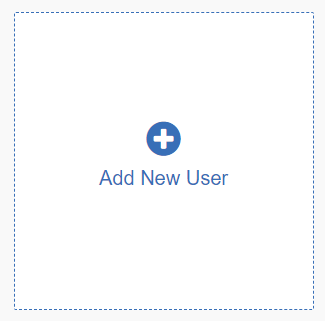
- Click on the ACCOUNT icon on the upper right hand side, then USERS.
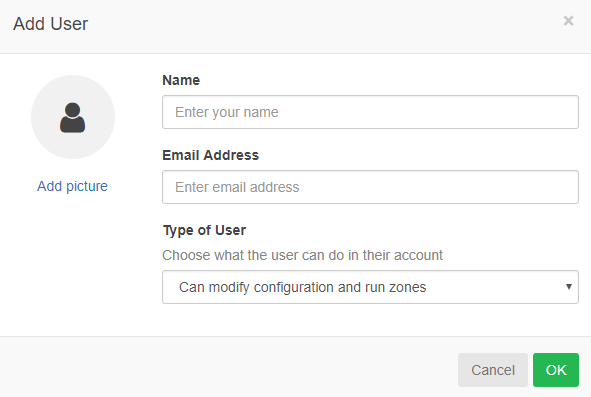
- Click the plus button and this will show the NEW USER screen to add the following information:
- User Name - The name of the new user
- Email Address - The email address that the new user will use to log into their account
- Type of User - If you want your customer to have full control over their system, select “Can modify configuration and run zones." If you don’t want your customer to be able to change their configuration, select “Can view configuration, manually run zones”
- Click OK – the user will get an activation email and will be prompted to select a password.
| Step 1 |
 |
| Steps 2-3 |
 |
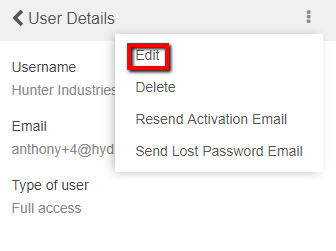
If you need to edit, delete, resend activation or send lost password, please use the instructions below. Click on the MULTI-SITE MANAGER  icon on the upper right hand side, then MY CUSTOMERS.
- Click on the customer you want to manager or search by the username/email.
- Click on the user you would like to edit
- Select
 icon, then view details
 - From the menu, select
 icon, then EDIT, DELETE, RESEND ACTIVATION or SEND PASSWORD..
 |
How do I send activation or lost password email?
You may need to send a customer another activation email if the email was changed or they had issues receiving it after the setup wizard was completed. Below are some quick instructions on sending another activation and/or lost password email from your MULTI-SITE MANAGER.
| Resend Activation Email |
- Sign-in to your Hydrawise account using the original email.
- Click on the MULTI-SITE MANAGER (
 ) icon on the upper right-hand side of the app, then MY CUSTOMERS. If accessing from a web browser, click on the (
 ) icon on the upper right-hand side.
 - Click on the CUSTOMER NAME to manage or search by the username/email.
- Select the three-dot icon (
 ) to the right of the USERS name.
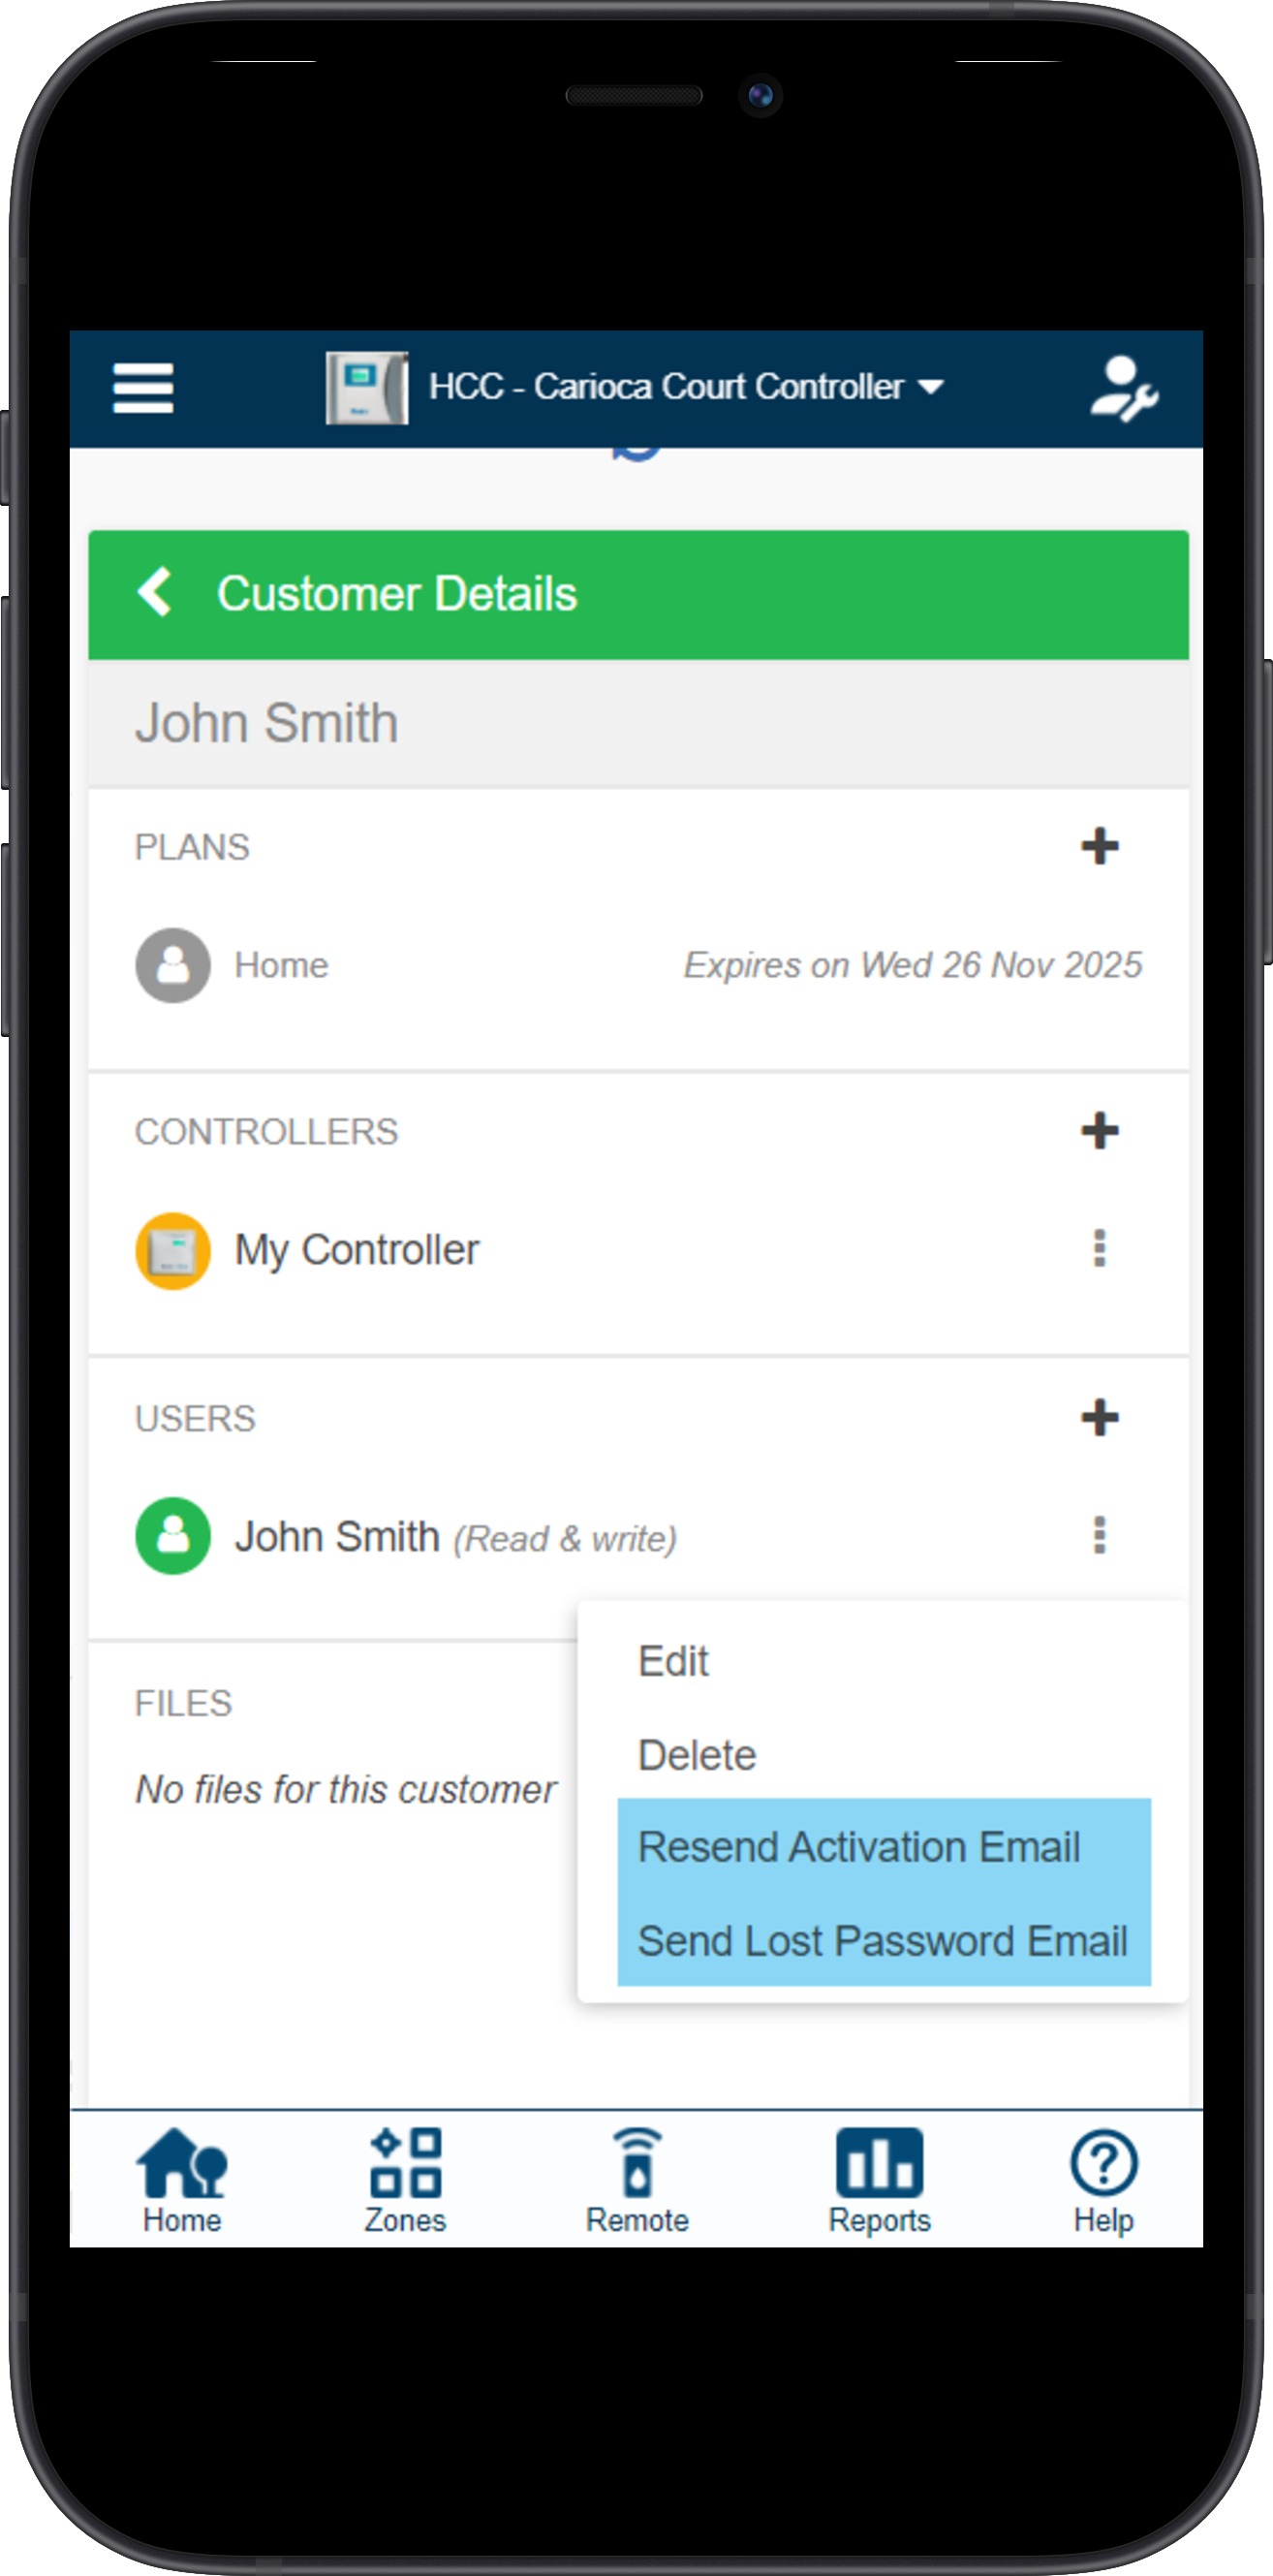
 - Select RESEND ACTIVATION EMAIL or SEND LOST PASSWORD EMAIL to the customer.
| App Screenshot |
 |
Can I manage my customers files?
In the contractor portal, find your customer and click on their name to configure their details. The files are visible at the bottom. You can use the customer file functionality to store information about your customer. For example, you may wish to store irrigation drawings so that you can refer to them at a later date.
Adding a File
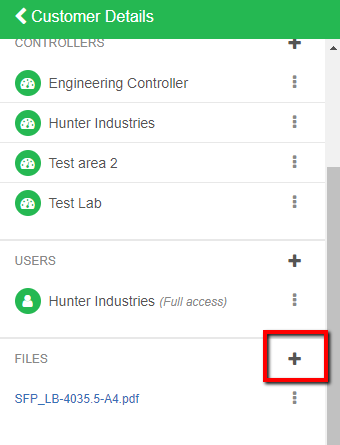
To add a file, click on the plus button in the file section at bottom of details and select the file you want to upload.
 |
Renaming a File
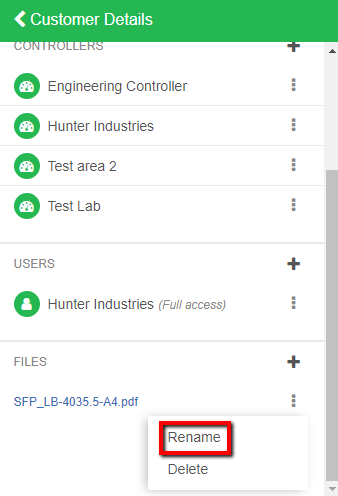
To rename a file, click on the menu next to the file name and choose Rename.
 |
Deleting a File
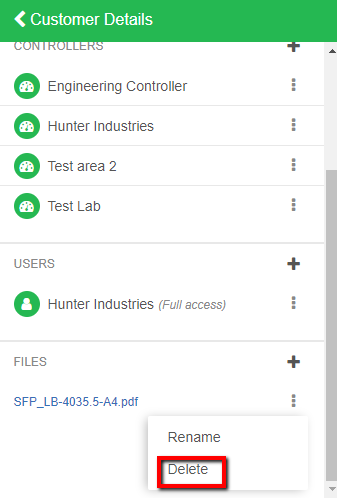
To delete a file, click on the menu next to the file name and choose Delete.
 |
How can I manage my customers controllers?
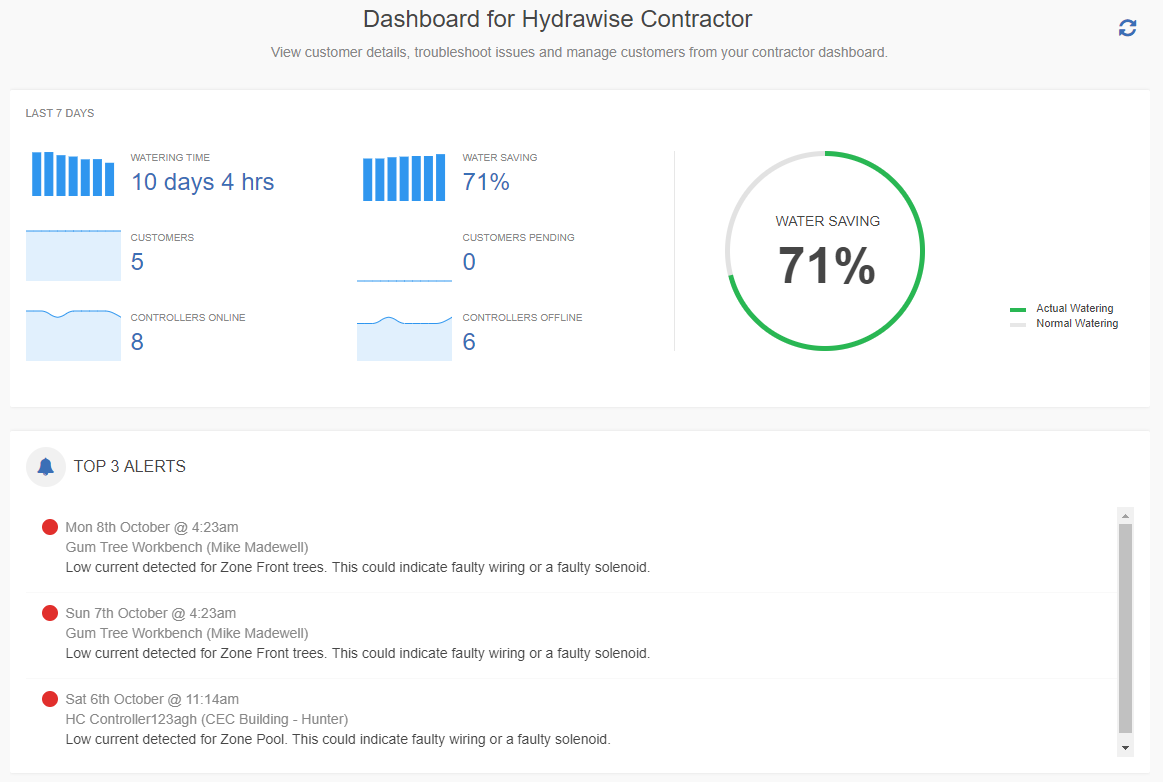
Information about the status of your customer's controllers will show up in the contractor portal like the screen capture below:
- Sign in to your Hydrawise account.
- Click on the MSM (Multi-Site Manager) icon (
 ) on the upper right-hand side of the app. If accessing from a web browser, click on the (
 ) on the upper right-hand side.
 - Select HOME.
- In the CONTRACTOR DASHBOARD section, you can monitor customers controllers using the following information:
- Top 3 alerts (see possible alerts for more info)
- Total watering time for customers
- Water Savings
- Total Customers
- Customers pending - waiting for the customer to accept contractor as manager.
- Controllers Online - Connected to the internet
- Controllers Offline - Not connected to the internet
 |
Limit Customer Access
In the event you need to change customers access from full modify the schedule to view only, we offer the following instructions:
Changing an existing customer’s permissions
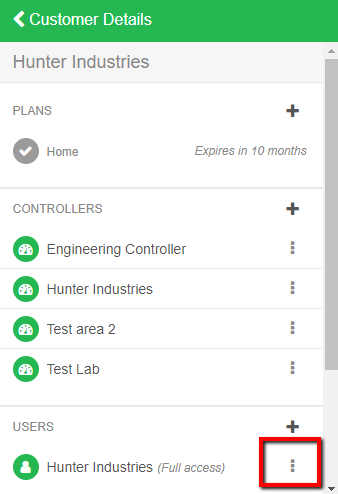
- Click on the MULTI-STE MANAGER icon
 on the upper right-hand side.
 - Click on MY CUSTOMERS.
- Click on the CUSTOMER NAME you want to change or search by the username/email.
- Click on the USERNAME you want to change.
- Select
 icon.
icon. - Click VIEW DETAILS.
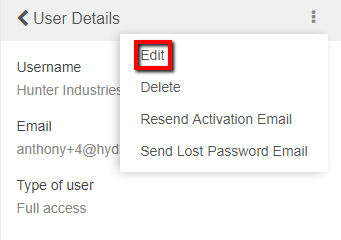
- From the menu, select
 icon, then EDIT.
 -
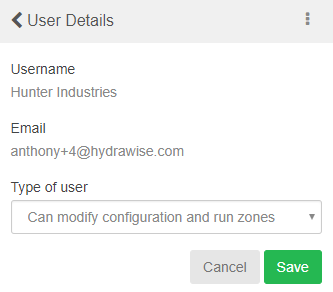
Choose the level of access you want for the user:
- If you want the user to have full control over the controllers, select “Can modify configuration and run zones”
- If you don’t want the user to be able to change the configuration, select “Can view configuration, manually run zones”
- Click SAVE to change the permissions.
| STEP 1-4 |
 |
| STEP 5 |
 |
| STEP 6-7 |
 |
Viewing Changes to Customer
This article will show you the steps needed to view any changes made by your customer.
- Looking at customer alerts
- Looking at events for that controller
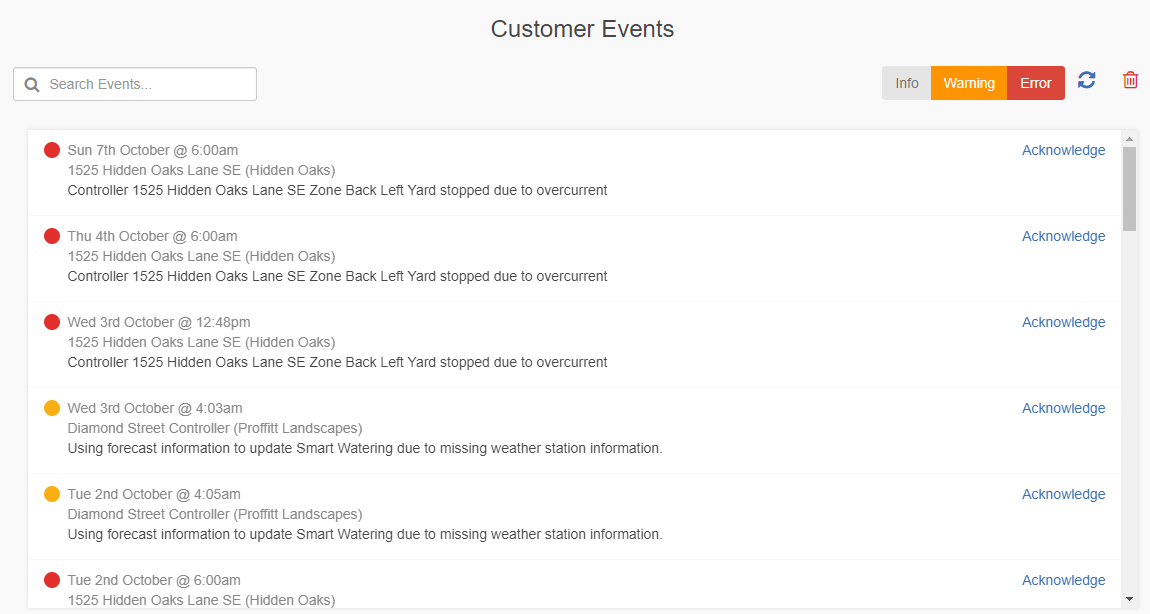
Customer Events:
- Click on Settings, then My Customers.
- In the Customer Events section, you can see different types of alerts. Use the Info, Warning, and Error buttons to show or hide different types of alerts.
 |
Types of Alerts
| Types of Alerts | |
| Errors | Problems with the controller, such as over current or excess water usage |
| Warnings | Possible problems with the controller, such as low current |
| Info | Information about the controller, such as new zones added or zone run times |
Controller Reports:
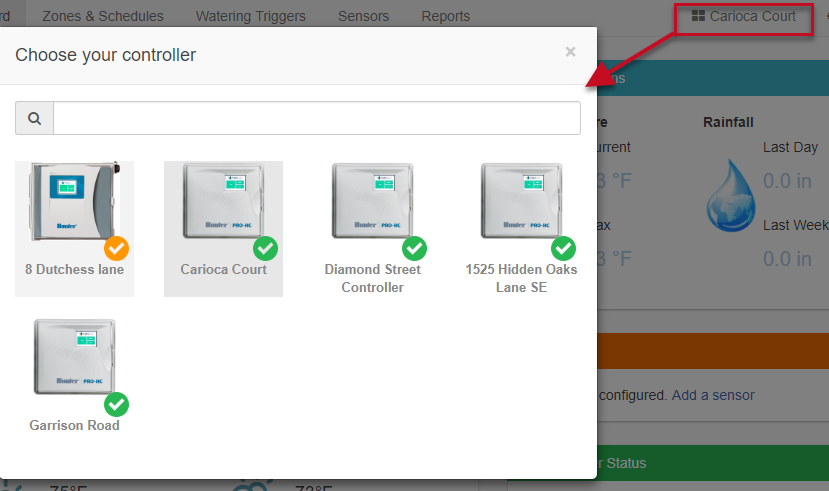
- From the menu, choose the Controller link in the upper right.
- Choose customers controller name to view report.
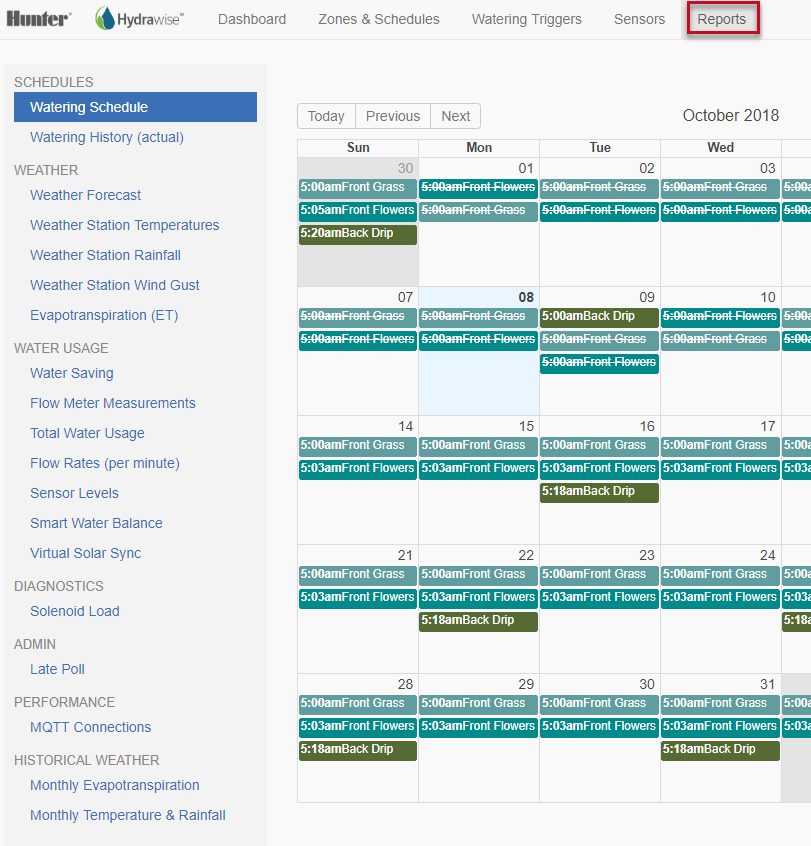
- Next, select Reports at the top of the dashboard. This will show every report available for this specific controller.
| STEPS 1-2 |
 |
| STEP 3 |
 |
Customer Messaging
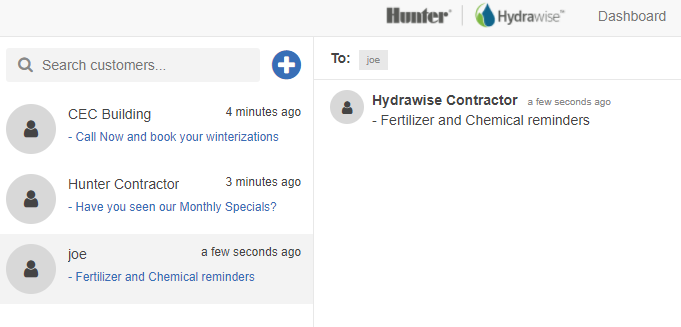
Hydrawise allows in-app communication for contractors and their customers in a format similar to instant messaging. Messages between contractors and customers appear as push notifications on the customers’ phones (just like alerts). For added convenience, we store the conversations.
You can use this feature by following the simple steps below in the app or the web browser.
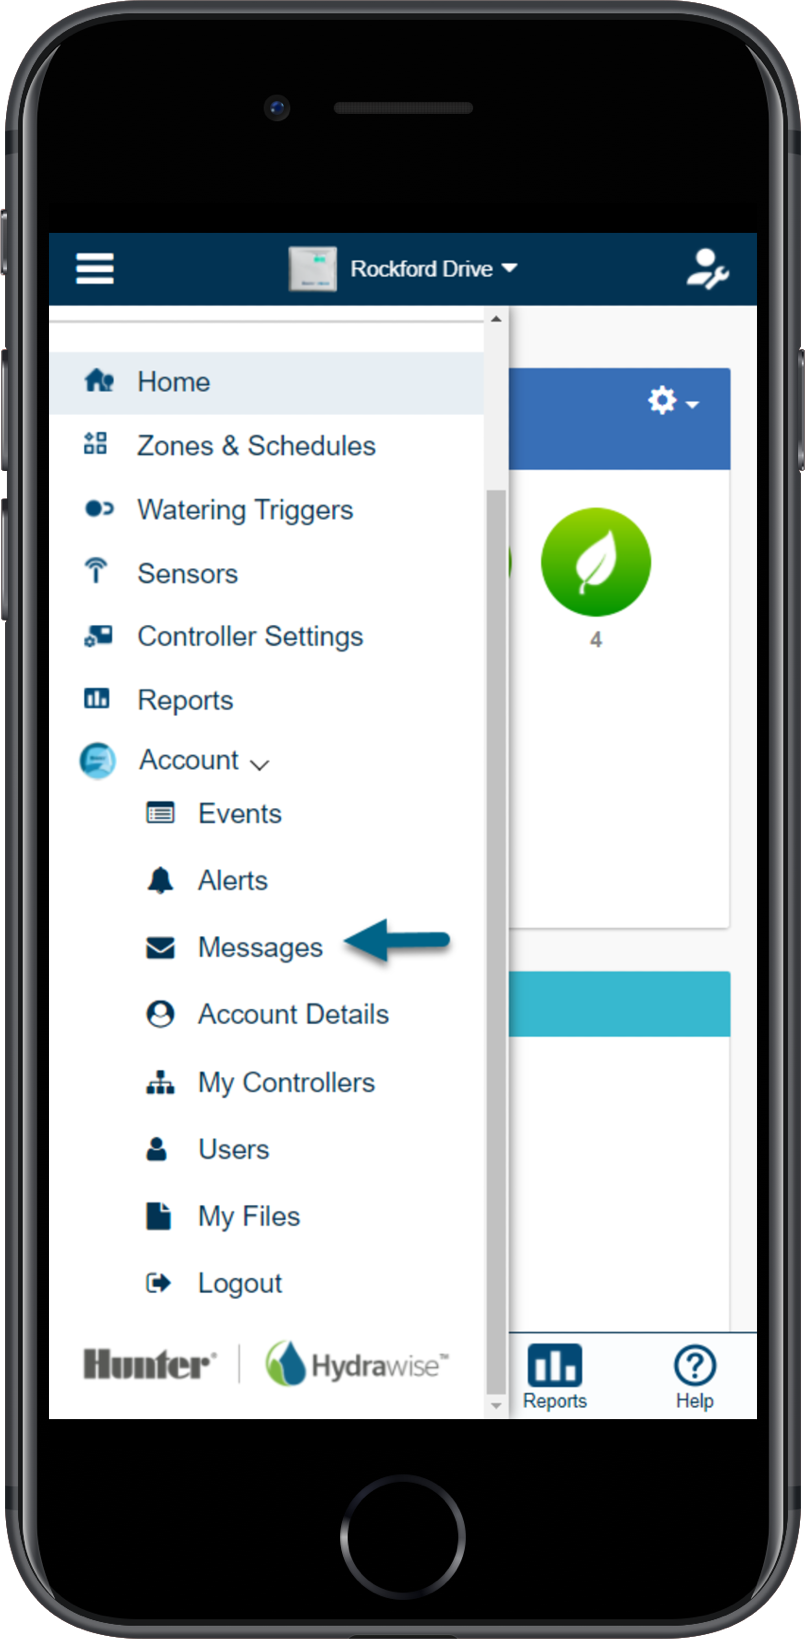
- Sign in to your Hydrawise account.
- Click on the MENU icon (
 ) in the app or simply go straight to the MESSAGES icon (
 ) on the web browser.
 - Click on the MESSAGES icon (
 ).
). - Click on the plus icon (
 ).
). - Choose SEND TO ALL CUSTOMERS or SEND TO SPECIFIC CUSTOMERS.
- Enter your message at the bottom of the screen, then click the SEND icon (
 ) on the lower righthand side.
NOTE: End-users can only send and receive messages to and from their contractor.
 |
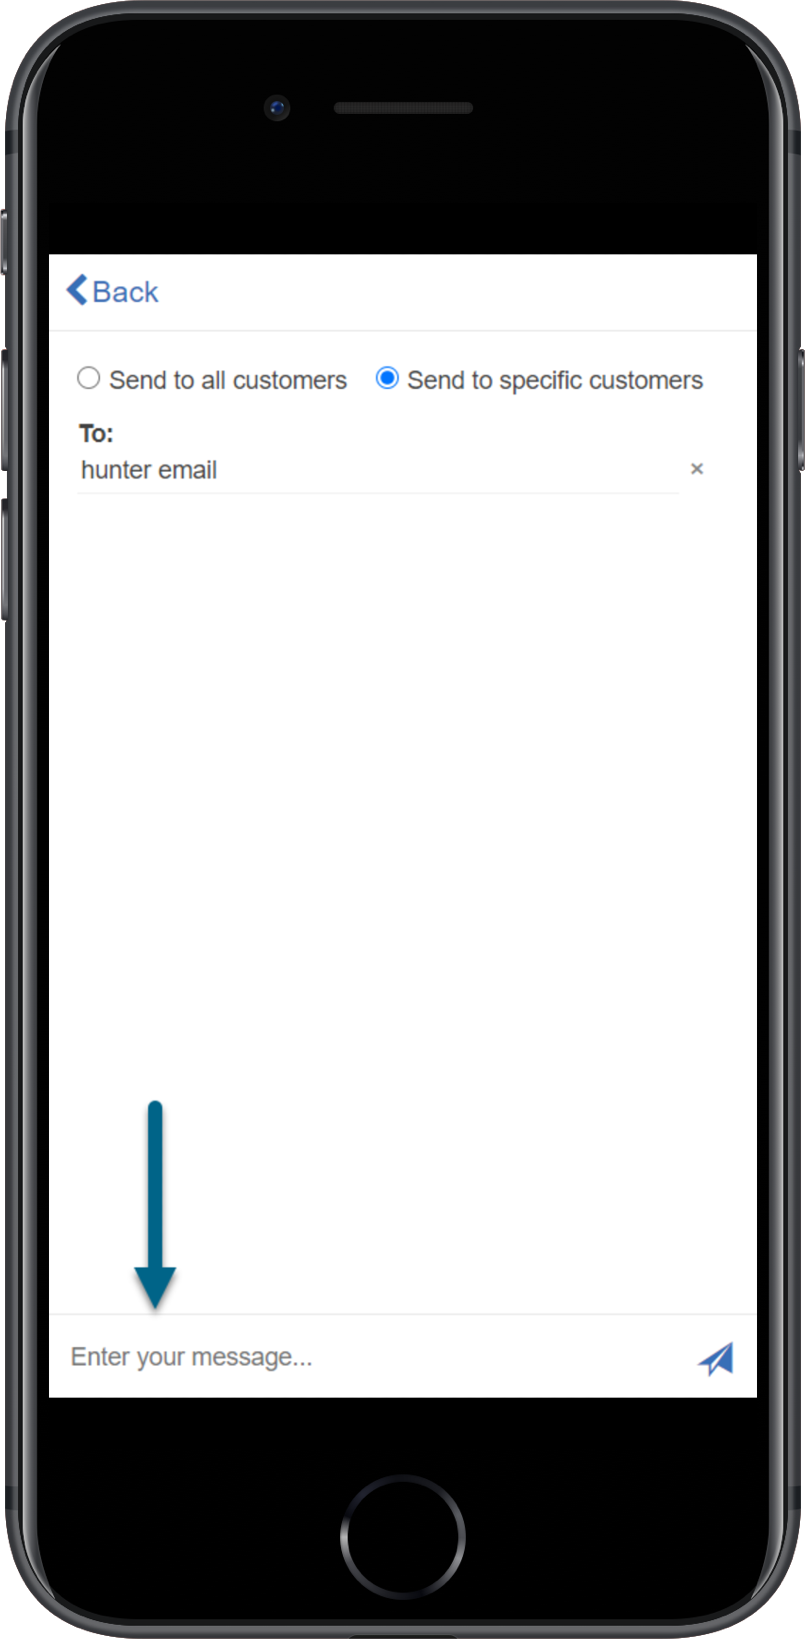 |
This tool provides contractors the ability to message customers directly. You can send messages to individual customers or all customers. Below are a few ideas:
- Call now to book your winterizations.
- Have you seen our monthly specials?
- Urgent weather notices
- Fertilizer and chemical reminders
- We noticed your irrigation system had a High-Flow Alert last night. I’ll have my team visit later today to look at it for you.
With Hydrawise Contractor Messaging, you can add value to your business.
After MESSAGES is selected, press the plus symbol to enter the first letter of the user's name, and they will appear in the dropdown.
 |
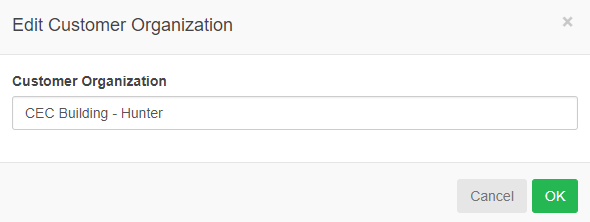
Edit Customer Organization
This feature will allow the contractor to change the organization name of the customer as it would appear in the contractor portal section (e.g. business name, street name, etc.)
Please view the steps and screenshots to access this feature:
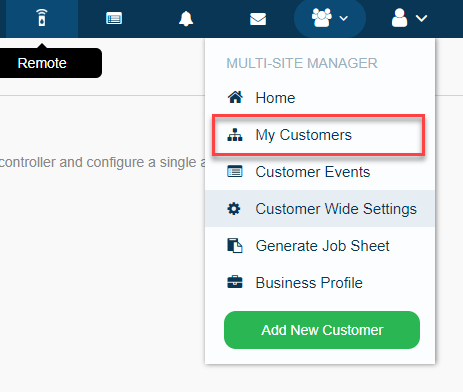
- Click on the "Manager" icon on the upper right hand side, then "My Customers."
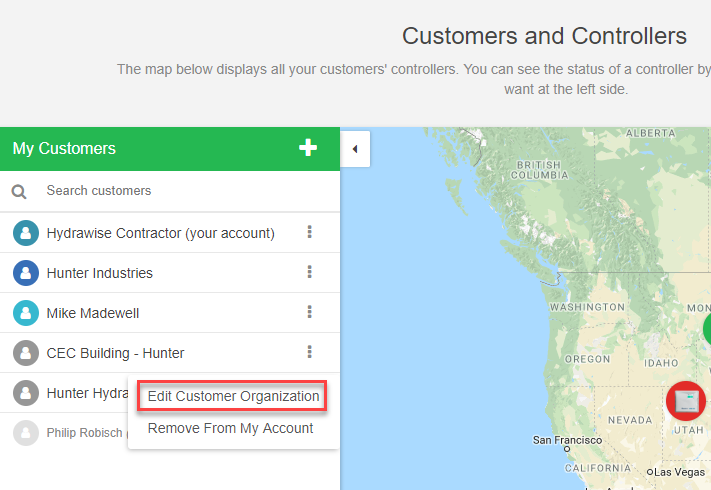
- Click on the first set of three selection dots (
 ) next to customer name.
 - Select "Edit Customer Organization"
- Change customer name and select "ok"
| Step 1 |
 |
| Step 2-3 |
 |
| Step 4 |
 |
