No Internet Connection Message
This message indicates the controller is not fully connected to the network. We detect this within about 7 minutes for all Hydrawise controllers except the HC models with firmware version 1.89 or 2.05. These HC controllers take up to 7 hours to indicate their No Internet Connection message. If you have the X2 controller with WAND WiFi Module, please use the troubleshooting section here.
When the controller is Offline, it will continue to water the default watering schedule as it's stored on the controller's memory. Any changes you make to your settings and schedules through the app will only update to the controller when it reconnects to the internet. In addition, no reporting and weather adjustments/predictive watering triggers will apply while offline.
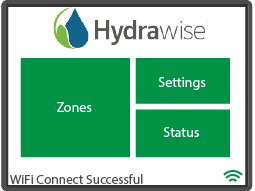
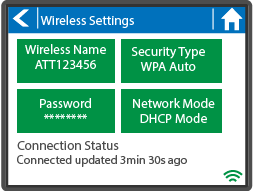
IMPORTANT: If you see the message in the Wireless setting “Connected”, "WiFI connect successfully" or the solid icon , this does not always indicate you are completely connected to the server. Please check the Connection (Server) Status to view if you are fully connected. The following article will cover the topics listed below:
- Connection Status/Description
- Troubleshooting Steps
- WiFi Checklist
| Status | Description |
|
No Internet Connection |
Software Status - The controller is NOT CONNECTED to Hydrawise. We detect this within about 7 minutes so this would be a connectivity problem. |
| Controller Connection Status (Connected) - From the Home screen at the controller, select Status > Connection Status. A SUCCESSFUL connection to the Hydrawise servers is indicated by the Last Sync under 1 minute or Connected: updated "X:XX" Ago as the Server Status. The controller is connected to Hydrawise and received a configuration update "X:XX" seconds ago. This is the normal state. | |
|
|
Controller Connection Status (Disconnected) - A UNSUCCESSFUL connection to the router is indicated by Can't Find WiFi Access Point, Wireless Down, No Internet, or Last Sync 1 minute or greater as the Server Status. The controller is NOT connected to the router. |
| Troubleshooting Steps |
- Check that your wireless router and controller are powered on.
- Verify serial numbers in the software match the number in the controller status screen.
- Serial number location in controller Click here
- Serial number location in software Click here
- Signal Strength check - A medium signal of 75> is needed in order to connect and maintain the connection. Settings > Wireless > Wireless Name > Select Network > Read strength (High recommended for best functionality).
- Reboot Controller - Settings > Config > Reboot Controller > Connection (server) Status
- Factory Default - Settings > Config > Factory Default > Erase Config > Connection Wizard >Connection (server) Status
- Reset Modem/Router - Unplug for 15-20 seconds. Next, plug back in and wait 2-3 minutes. Repeat these steps two more times. Check Connection (server) Status. This will refresh the connection to an extender if you have one installed.
- Reset Extender (if have one) - Reset extender as well to refresh the IP settings.
-
Testing with Hot-spot - For testing with a hotspot, Click here.
- Check Server Status. This test will tell you if the controller is working fine and may need to install an extender for a better connection.
- Check Network Settings - The following Wi-Fi requirements apply to your Hunter Hydrawise-ready controller.
| Wi-Fi Checklist: | |
| Network Types |
|
| Bandwidth |
2.4 GHz only. |
| Router Channel | Set between 1-11 |
| Security Type | WPA or WPA2 |
| Guest Networks/Networks with portal page login | Not compatible |
| Mac Address (If Needed) |
Visit the support page here |
|
Outbound Ports |
Secure MQTT (TCP Port 8883) HTTPS (TCP Port 443) NTP (UDP Port 123) DNS (TCP and DNS Port 53) |
|
Inbound Ports |
None |
Wifi Extender Note: You can try and connect to the extender via hotspot. If you have connection issues here, then your not getting an internet connection from the source.
Router and Internet Service Provider Challenges
Hydrawise Service Outages
SERVICE OUTAGES are rare but can happen and we like to keep our customers informed as soon as possible. You will likely see a notification within the Home dashboard of the app to let you know that we are working with our providers to restore service for all affected users. See chart below for recent outages:
| Outage Date | Description |
| December 17, 2021, between 7:14 AM PST and 7:59, AM PST |
Amazon Web Services experienced an internet outage that impacted connectivity for all Hydrawise controllers. During this time controllers could not communicate with Hydrawise infrastructure to accept changes to their configuration. From 7:59 AM PST, controllers with serial numbers starting with ‘c0’ progressively reconnected to Hydrawise with all ‘c0’ controllers fully connected by 1:59 PM PST. |
| December 17, 2021, between 7:59 AM PST and 9:44 PM PST | The controller's serial numbers starting with ‘05’ or ‘0F’ were impacted by a second outage with the Amazon Web Services IoT service. Controllers had an intermittent connection to Hydrawise until 9:44 PM when the issue was fully resolved by Amazon. |
Hydrawise controllers keep a local copy of their program so irrigation during this time would not have been impacted.
Password Incorrect Message
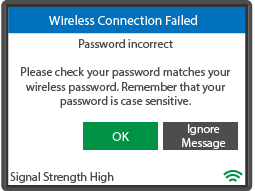
In some instances, you may see the message PASSWORD INCORRECT when adding the correct password.
| Issue | Resolution |
| Incorrect bandwidth (5G) | Make sure you are connecting to a 2.4 network. |
| Channel Congestion | Login to your router settings and verify you are using a channel between 1-11. In some cases, try changing the channel as well. |
If still an issue, we would recommend the following steps listed below to clear and reenter the password.
IMPORTANT: We use the standard US Typing (alphanumeric) keys. These keys include the same letter upper and lower case, number, punctuation, and symbol keys positioned the same way as the typewriter.
- Go to SETTINGS, WIRELESS, PASSWORD.
- Clear the password by pressing back until the password is cleared, then press OK.
- Select SECURITY TYPE and change to AUTO-DETECT.
- Select CONFIRM.
- Select PASSWORD and enter the same PASSWORD.
- Check the status of the connection by selecting STATUS > CONNECTION STATUS.
- The SERVER STATUS will have a message that is displayed "OK-UPDATED xx SECONDS AGO."This indicates the controller is fully connected.
Watering with No Internet
If your controller loses internet connectivity for more than one day, Hydrawise can send you an email notification or In-app alert. During this time, your controller will run the last synced schedule in offline mode. Learn more
Hydrawise Software has 2 stages of OFFLINE.
Stage 1 - The controller has been disconnected for less than 6 hours, it can report watering if it reconnects before Hydrawise does a full reboot. This will show in REPORTS: Schedules > Watering History (Actual) as OFFLINE RUN.
Stage 2 - The controller has been disconnected for more than 6 hours and has rebooted and cannot reconnect. This will show as blank in REPORTS but will still run the last synced schedule.
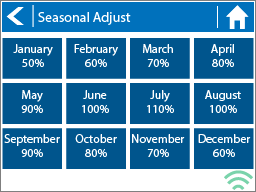
The feature OFFLINE ADJUSTMENTS allows the controller to automatically adjust the amount of watering on a month-by-month basis if the controller is in an Offline mode (ie. not connected to the internet). The steps below will cover both online and offline instructions on changing the seasonal adjust for when the controller enters offline mode.
Online: Offline Water Adjustment
- Sign in to your Hydrawise account using the original email.
- Click on the MENU icon (
 ) on the upper left-hand side of the app. If accessing from a web browser, click on the (
 ) on the upper right-hand side.
 - Select CONTROLLER SETTINGS on the left-hand side.
- Select OFFLINE ADJUSTMENTS.
- Sliders can be adjusted from 0%-300%.
Offline: Offline Water Adjustment
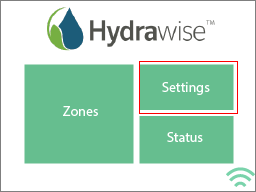
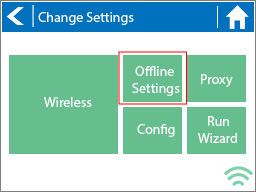
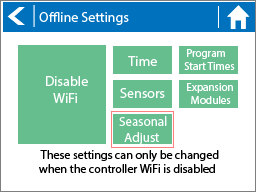
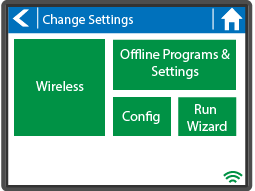
- Select SETTINGS.
- Select OFFLINE PROGRAMS & SETTINGS.
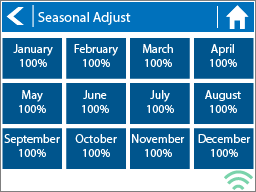
- Select SEASONAL ADJUST.
- Select a MONTH to adjust.
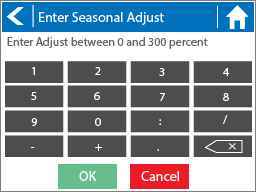
- Adjust each month by a percentage then select OK.
| CONTROLLER SCREENSHOTS: |
|
|
Changing Wireless Settings
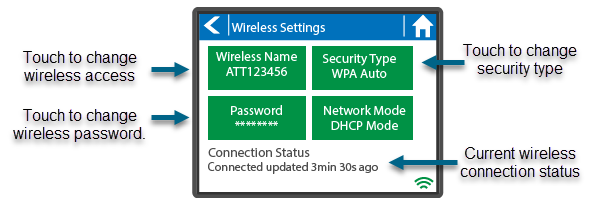
- From your Hydrawise controller, click on SETTINGS.
- Click on WIRELESS to change any of the following settings.
- NAME: From the Wireless settings screen, click on WIRELESS NAME to change or manually enter the name of your wireless access point.
- PASSWORD: Click on PASSWORD if you want to change the password for your wireless connection.
- SECURITY TYPE: Click SECURITY TYPE to change the security type to WPA2/WPA2 personal.
Dealing with Low Wi-Fi Signal Strength
First, check your Wi-Fi signal strength by reading the tips in our article here. In an average home, you usually have to deal with three major sources of Wi-Fi signal interference:
- Wall and floor interference: Homes built with brick, concrete, or metal have the most impact on Wi-Fi signal interference because the construction material can block off the signals. Wood and glass can also interfere, but not as much.
- Competing Wi-Fi network interference: If you live in a highly populated urban area, you may experience a weak Wi-Fi signal due to a large number of competing signals in your area.
-
Electronic interference: TVs, computers, mobile phones, microwaves, and other electronic devices are present in most homes. Any type of electronic device can interfere with your Wi-Fi signal.
These types of interference can disrupt your Hydrawise device. Here are some troubleshooting tips to help solve the problem:
- First, determine the Wi-Fi signal strength in the area where you want to mount the controller. Test the signal using your smartphone or another Wi-Fi device to make sure the signal is showing at least medium to high strength.
- Make sure there are no metal or concrete objects that are in the direct line of sight between the controller and your router/Wi-Fi device:
- Do not place your controller inside a metal shed.
- Do not place your controller in a basement.
- Remove electronic devices located between the controller and the line of sight of your router.
- If you can put a network access point or Wi-Fi extender near your controller, you can establish a direct line of sight to the Wi-Fi source without interference.
For more information on Wi-Fi troubleshooting, click here.
Clearing Browsing Data
In the event you are having issues logging in to your Hydrawise account, please try clearing your browsing history, cookies and cache. Use instructions below based on your selected browser.
Safari
To learn more about clearing your cache in Safari, visit Apple Support.
- In the Safari menu bar, click the Safari option.
- Click the Clear History link.
- In the Clear drop-down menu, select the time range where you want to clear browsing data.
- Click the Clear History button.
Chrome
To learn more about clearing your cache in Chrome, visit Google Support.
- On the browser toolbar, click the Chrome menu icon.
- Select the More Tools link.
- Select the Clear browsing data link.
- In the data drop-down menu, select the time range where you want to clear browsing data.
- Select the Cookies and other site and plug-in data and Cached images and files check boxes.
- Click the Clear Browsing Data button.
Firefox
To learn more about clearing your cache in Firefox, visit Firefox Support.
- In the Firefox menu bar, click the Firefox option.
- Select the Preferences link.
- Click the Privacy tab.
- Under the History heading, click the clear your recent history link.
- Select the Cache checkbox.
- Click the Clear Now button
Microsoft Edge
- Open the Settings Menu. In the top right hand corner you'll see three dots in a horizontal line. ...
- Locate Clearing Browsing Data. ...
- Choosing What to Clear. ...
- Restart the Browser.
Internet Explorer
Version 11 and 10
- In Internet Explorer, select the Tools gear button, point to Safety, and then select Delete browsing history.
- Choose the types of data or files you want to remove from your PC, and then select Delete
Version 9
- In Internet Explorer, select the Tools gear button, and then select Internet options.
- Under Browsing history, select Delete.
Setting Up a Static IP Address
STATIC IP addresses are useful if you want to consistently have the same IP address. In this guide, you will learn how to set up a static IP address instead of using DHCP.
IMPORTANT (X2 WAND Controllers Only): Configuring a static IP for WAND is only achievable through the user's Router Settings network webpage after the WAND has connected to the Wi-Fi network. With WAND, there is no option to manipulate DHCP like in our touchscreen controllers.
| STEP 1 | STEP 2 |
| From the controller's home screen, tap on SETTINGS. | Select WIRELESS. |
|
|
|
| STEP 3 | STEP 4 |
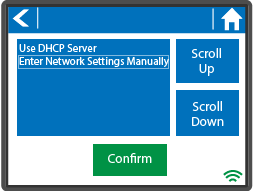
| Select NETWORK MODE - DHCP MODE. | Select ENTER NETWORK SETTINGS MANUALLY then tap on CONFIRM. Finally, select the IP address and ENTER DNS address. |
|
|
|
Once you have completed entering all the IP settings manually, click on Test Network. This ensures the controller has successfully connected to your router using the Static IP Settings that have just been set.
