Performing a Reboot or Factory Default at Controller
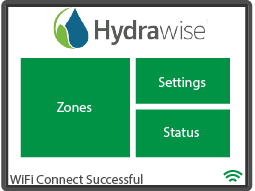
If you are having issues connecting to your Wi-Fi network, it is a good idea to reboot and/or perform a factory default at the controller. You can follow the steps below to perform a reboot on your controller. This can help reestablish WiFi if you are having communication issues. The reboot will not erase any settings in your controller.
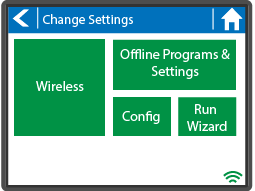
- Select Settings.
- Select Configure.
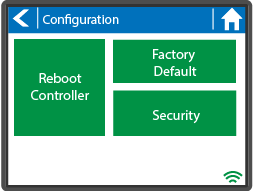
- Select Reboot Controller.
If the reboot procedure did not help with the connection, please follow the steps below to perform a Factory Default reset on your controller. When the controller goes back online, the settings in the software will sync back into the controller within a few seconds.
- From the home screen, select Settings.
- Select Config.
- Select Factory Default.
- Select Erase config.
- Select Ok to start.
- Select Ok to scan for networks.
- You can choose your 2.4g Network from the list provided on the screen.
- Select Confirm.
- Enter Wireless Network and select OK.
- Select Continue to perform a network test.
The controller is now ready for new configuration settings manually or automatically through synchronization with your Hydrawise account.
Manual Operation from the Controller
You can run an irrigation zone on demand from the Hydrawise controller before having the system connected to your home Wi-Fi network.
IMPORTANT: If the controller is connected to WiFi, the app events will not show the user who performed the manual command.
The command sent from the controller shown in events:
Wed. 19th August @ 7:15 am Zone 1 has run for 37 seconds.
The command sent from the app shown in events:
Wed. 19th August @ 7:15 am - by John Smith Scheduling Zone 1 to run for 20 minutes at 07:15 AM (Los Angelos Time).
Running a SINGLE zone manually from the controller.
From the Home screen, navigate to the Zone Summary screen by pressing Zones.
| Top BLUE Bar - Range of Zones you are viewing. | |
| GREEN - This indicates a zone with a scheduled run time. | |
| BLUE - This indicates a zone is currently running. | |
| LIGHT BLUE - This indicates the zone that will run next. | |
| GREY - This indicates a zone without a scheduled run time. | |
| GOLD - This indicates a zone is assigned to a master valve (HC Models Only). | |
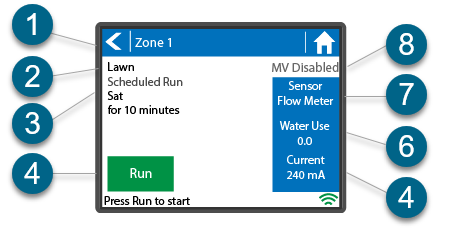
The Zone Status screen will allow you to view specific information about the individual zone. To view this screen, select ZONES, then select one of six ZONES displayed.
- Zone Number: The number of the zone.
- Zone Name: This is the name of the Zone that you configured in the Hydrawise app.
- Schedule Run: This will display the next scheduled cycle.
- Run: Press to Start or Stop To Manually Modify a Zone
- Water Use: Water usage for this zone run. This is only shown if you have a flow meter installed and the zone is currently running.
- Sensor: The current sensor state that is configured in the Hydrawise app.
- Current: Indicates the current that all solenoids are using (including a master solenoid if configured). Generally speaking, this value ranges from 200mA to 600mA depending on the number of solenoids attached to a single zone output. The controller has a built-in fail-safe to automatically stop your zone if more than approximately 800mA is detected as this may indicate a faulty solenoid or wiring.
- MV Enabled/Disabled: If you have a pump or master valve or pump configured in the software, this will display Enabled.
When a zone is running, the Run Now button will change to Stop. This allows you to stop a running zone. From the Zone Status screen, you can manually start a zone using the RUN NOW button. When started, the zone will run for the zone’s default configured run length. This can be overridden by clicking on Run Time before manually starting the zone.
Running ALL ZONES manually from the controller.
From the Home screen, navigate to the Zone Summary screen by pressing Zones.
You have the ability to stack zone runs when there’s already a zone running. As you turn on zones individually at the controller, they will be put in a queue waiting to run when the last one is finished.
From the Zone Status screen, you can manually start a zone using the RUN NOW button. When started, the zone will run for the zone’s default configured run length. This can be overridden by clicking on RUN TIME before manually starting the zone.
In addition to setting a single zone to run, you can stack additional zones to run in sequential order. After you started your first zone, repeat the steps for any other zone you would like to run. The zones that will run NEXT will be changed to a LIGHT BLUE color on the controller screen.
| Top BLUE Bar - Range of Zones you are viewing. | |
| GREEN - This indicates a zone with a scheduled run time. | |
| BLUE - This indicates a zone is currently running. | |
| LIGHT BLUE - This indicates the zone that is queued up to run. | |
| GREY - This indicates a zone without scheduled run time. |
Controller has a Blank Display
First, make sure there is power to the controller's outlet. Use a test lamp or any other 110VAC device to determine if there is voltage at the outlet. If there isn’t power, or if you have a controller that is hard wired, check the circuit breaker at the main breaker box.
Caution: High voltage testing on the transformers primary power side should only be done by a professional electrician or irrigation contractor.
| Checking Transformer Voltage |
| If you have power at the outlet, the next thing to check is the transformer output. Use a voltmeter to check the voltage either on the two transformer wires or at the two AC screw terminals on the controller. The transformer should have an output in the range of 24VAC to 28VAC.
If the wall outlet has 110VAC and the transformer has no voltage output, you need to replace the transformer. |
| Cycle Controller Power |
|
If you have voltage at both the wall outlet and the transformer output and you still have a blank display, try cycling the power on the controller. To cycle the power on the controller:.
Note: If this doesn't restore the display, the controller will need to be replaced. |
Viewing the Time and Date
Time and date settings are synchronized with the settings that you configure in the Hydrawise app. The timezone is set based on the location you entered during the app wizard.
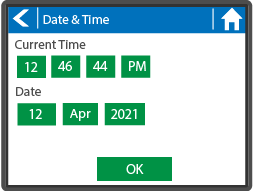
If your controller is running as a stand-alone controller (WiFi is disabled) then the date, time, and time zone will be shown on a GREEN background and can be updated.
IMPORTANT: If a Hydrawise controller never had an internet connection, the default time is set in a 24-hour format when running in offline mode.
Viewing the Connection Status
The connection status screen shows your controller’s connection to Hydrawise servers for synchronizing schedule and weather information. The features on this screen include Updated Connection, Connection Quality, Wi-Fi Signal Strength, Software Version, and the controller Serial Number. To view this screen, select STATUS, then CONNECTION STATUS.
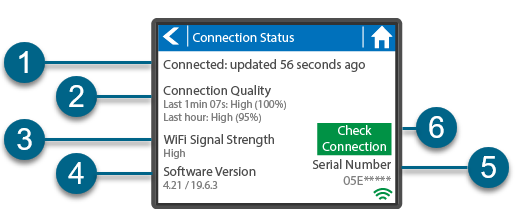
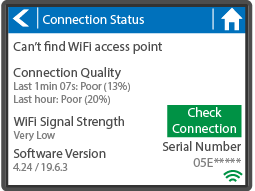
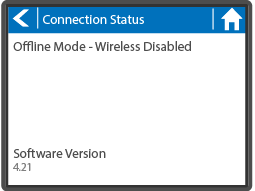
- CONNECTED: Status of Connection to Hydrawise Servers. This is the number of seconds, minutes, or hours since the controller checked in to the Hydrawise Cloud. The Can't find Wi-Fi access point message means the controller is unable to find a Wi-Fi signal (Fig.1). The Offline Mode message indicates the Wi-Fi is disabled (Fig.2).
-
CONNECTION QUALITY: A detailed summary of the internet connection. Measures the internet connection from Controller to Hydrawise Cloud. Wi-Fi, Router, ISP & Internet etc.
- Total Time Connection Quality - This is based on the last time the controller powered up.
- Last Hour Connection Quality – This is the percentage of connection in the last hour, 100% indicates no drop in connection for any reason.
- WiFi SIGNAL STRENGTH: This is a measurement of just the signal strength between the controller and the router/booster. The scale is represented by High, Medium, Low, or Poor. Hydrawise controllers require a signal of medium or above for a stable connection.
- SOFTWARE VERSION: Controller / Wi-Fi Firmware.
- SERIAL NUMBER: The serial number is used to link your actual controller with your Hydrawise account. Learn more
- CHECK CONNECTION: A series of tests done that will offer suggestions on issues and ways to fix them.
| Fig 1. | Fig 2. |
 |
 |
| Connected Message's | Description |
| OK - updated xxx seconds ago |
The controller is connected to Hydrawise and last got a configuration update xxx seconds ago. This is the normal state. |
| Wireless Down | Wireless is not connected |
| OK - Updating certificates | The controller is doing an initial upgrade from version 2.x to 3.x software. You should only see this once, if the controller is continually showing this then there is a problem - please contact Anthony with a video of the problem. |
| OK - Downloading Software |
The controller is doing a firmware upgrade. During this period no configuration changes will be processed by the controller. |
| Connecting in xxx seconds |
The controller is not connected and is waiting xxx seconds before attempting to reconnect to the internet. When a connection fails we do not try to reconnect immediately - there is an escalating delay between 5 seconds the 60 minutes (worst case after 33 unsuccessful connections). There is a “Reconnect Now” button on the Controller Status screen to force a reconnection immediately if you’re in front of the controller. |
| Connecting to the Internet |
The controller is attempting to connect to the internet |
| Connecting to Hydrawise |
The controller has connected to the internet and is now connecting to the Hydrawise servers |
| OK - subscribing to updates |
The controller has connected to Hydrawise and is getting its configuration |
| OK - processing cloud update | The controller is connected to Hydrawise and is processing a configuration change |
| Updating Wi-Fi firmware |
The controller is updating the Wi-Fi firmware to 19.5.4. During this period no configuration changes will be processed by the controller. |
| Updating Pro-C adapter |
The controller is updating the Pro-C adapter software. During this period no configuration changes will be processed by the controller. |
Viewing the Serial Number
The serial number is needed when you add your controller to the cloud. This number is found on the controller or using the controller’s touch screen.
To link your controller to your account, please refer to this article How To Remove or Link Your Serial Number
IMPORTANT: The serial number A8000000 is a generic serial number assigned when the controller has not been registered (never connected to the internet to activate). This serial number will show on the touchscreen temporarily until the controller is connected to the internet. To see the real serial number, either refer to the sticker or add the controller online so it updates to the correct online serial number
To access the serial number on the touch screen, follow these steps:
- From the HOME screen, click STATUS.
- Click CONNECTION STATUS (fig.1).
The serial number is shown on this screen and will contain only letters a through f and numbers 0 through 9 (fig.1).
| Serial Number Sticker | |
|
X2 WAND Controller - Located on the WAND cartridge device. |
|
|
HC Controller - Sticker located on the back of the controller PROHC - Controller - Located inside wiring compartment above the 24 VAC terminals HPC - Controller - Sticker located on the back of the front panel HCC - Controller - Sticker located on the back of the front panel
|
|
To link your controller to your account, please refer to this article Linking a Controller to My Account.
Viewing the Zone Information
The Zone Status screen will allow you to view specific information about the individual zone. To view this screen, select ZONES, then select one of six ZONES displayed.
- Zone Number: The number of the zone.
- Zone Name: This is the name of the Zone that you configured in the Hydrawise app.
- Schedule Run: This will display the next scheduled cycle.
- Run: Press to Start or Stop To Manually Modify a Zone
- Water Use: Water usage for this zone run. This is only shown if you have a flow meter installed and the zone is currently running.
- Sensor: The current sensor state that is configured in the Hydrawise app.
- Current: Indicates the current that all solenoids are using (including a master solenoid if configured). Generally speaking, this value ranges from 200mA to 600mA depending on the number of solenoids attached to a single zone output. The controller has a built-in fail-safe to automatically stop your zone if more than approximately 800mA is detected as this may indicate a faulty solenoid or wiring.
- MV Enabled/Disabled: If you have a pump or master valve or pump configured in the software, this will display Enabled.

