Controller - Offline Mode Setup
OFFLINE PROGRAMMING will allow the controller to run like our traditional controllers, the X-core and the Pro-C models. Each of the six programs (a-f) allows you to start each program up to six times a day, set run lengths, and set specific days to water.
To set up your controller for manual configuration, please follow the steps below:
- From the main menu, click on SETTING.
- Select CONFIG.
- Select FACTORY DEFAULT.
- Select ERASE CONFIG. This will reset the controller back to factory settings. You will be presented with a warning dialogue.
- Select CONFIGURE OFFLINE and begin the wizard steps. Click OK.
- Enter DATE and TIME. Click OK.
- The next step is to enable a MASTER VALVE. Click OK. Learn More
- Make a section for MASTER VALVE, then click CONFIRM.
- Click OK to start setting up a PROGRAM.
- Edit WATER DAYS. Check all that apply. Click the back arrow.
- Edit START TIMES (default 5:00 AM). Click ADD and enter TIME (Hours and minutes) (six maximum). Click OK.
- Edit ZONES. Highlight a ZONE, then check the ZONE ENABLED box. Click on the green box and enter a RUN TIME. Click OK when each applicable zone is complete. Repeat as needed.
- Click the HOME button.
Your Hydrawise controller is now set up to run as a standalone controller.
Basic Screen Navigation & Offline Functions
The controller features a full color touchscreen making navigation easy.
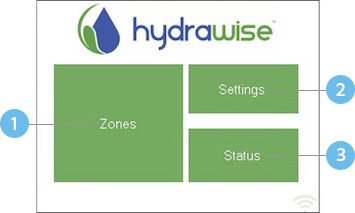
The Home screen, shown below, has 3 buttons allowing you to view and run your irrigation zones, change controller settings or view status information.
 |
![]() Touch to view all zones
Touch to view all zones
![]() Touch to change controller settings
Touch to change controller settings
![]() Touch to view controller status information
Touch to view controller status information
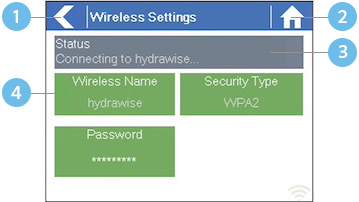
Each screen (except for the home screen) has two buttons at the top of the page allow you to quickly navigate to the Home screen or the previous screen.
 |
![]() Go to previous screen (changes not saved)
Go to previous screen (changes not saved)
![]() Go to Home screen (changes not saved)
Go to Home screen (changes not saved)
![]() GREEN items indicate settings which can be changed
GREEN items indicate settings which can be changed
![]() GREY items indicate status information
GREY items indicate status information
All items on each screen are color coded to indicate which screen elements are buttons and which screen elements indicate status information.
GREEN screen items indicate settings that can be changed. If you touch on the GREEN color item then you'll be able to change that setting.
GREY colored items indicate status information. Touching on these has no effect.
If you're entering information into the controller and use the Home or Back buttons then your changes on that screen will not be changed.
The charts below will walk you through the different function paths when programming at the controller with and without internet.
| OFFLINE STANDARD MODE | |
| Adjust Time: | Home > Settings > Offline Programs and Settings >Time |
| Enable Wi-Fi: | Home > Settings > Offline Programs and Settings > Enable Wi-Fi |
| Program Sensor/Check Status: | Home > Settings > Offline Programs and Settings > Sensors > Configure to level type for normally closed style. |
| Start Times: | Home > Settings > Offline Programs and Settings > Offline Programs > Edit Start Times |
| Water Days: | Home > Settings > Offline Programs and Settings > Offline Programs > Edit Water Days |
| Zones: | Home > Settings > Offline Programs and Settings > Offline Programs > Edit Zones |
| Master Valve: | Home > Zones > Zone > Click blue bar > Select Master Valve > Confirm |
| Set Seasonal Adjust: | Home > Settings > Offline Programs and Settings > Seasonal Adjust |
| OFFLINE ADVANCED MODE | |
| Adjust Time: | Home > Settings > Offline Programs and Settings >Time |
| Enable Wi-Fi: | Home > Settings > Offline Programs and Settings > Enable Wi-Fi |
| Program Sensor/Check Status: | Home > Settings > Offline Programs and Settings > Sensors |
| Start Times: | Home > Settings > Offline Programs and Settings > Offline Programs > Edit Start Times |
| Water Days: | Home > Settings > Offline Programs and Settings > Offline Programs > Add or Modify |
| Zones: | Home > Zones > Choose Zone > Run Time > OK |
| Master Valve: | Home > Zones > Zone > Click blue bar > Select Master Valve > Confirm |
| Set Seasonal Adjust: | Home > Settings > Offline Programs and Settings > Seasonal Adjust |
| ONLINE MODE |
|
Change Wi-Fi/Check Status: Home>Settings>Wireless>Select a Setting to Modify Controller Status: Home>Status>Controller Status Program Expander: Home>Status>Expansion Modules Manually Run Zone(s): Home>Zones>Select Zone> Run>Enter Time>OK Model: Home>Status>Controller Status Network Status: Home>Status>Network Reboot Controller: Home>Settings>Config>Reboot Controller Reset Controller: Home>Settings>Config>Factory Default Run Wizard: Home>Settings>Run Wizard Sensor Status: Home>Status>Sensor Serial Number: Home>Status>Controller Status Server Status: Home>Status>Controller Status Test Network: Home>Status>Network>Test Network Test Zone: Home>Status>Zone Tester Time and Date: Home>Status>Time Version Number: Home>Status>Controller Status Zone Status: Home>Zones>Select Zone |
Configuring Sensors in Offline Mode
Please follow the steps below to add and configure your sensor or flow meter in Offline Mode. Please use the following link for Installation Instructions.
- Select SETTINGS.
- Select OFFLINE SETTINGS.
- Select SENSORS.
- From this screen, you can now navigate between Sensor 1 and Sensor 2 by using the Next and Previous options. Just as you configure your sensors online, you can select the different options to make changes accordingly.
| Sensor Status Options | |
| Type Options | Not Used, Level (Rain Sensor) or Flow Meter |
| Mode | Stop when open, Stop when closed, Start when open, or Start when closed. |
| Status | Open or Closed |
| Zones | Applies to all zones |
| Active Delay | Seconds |
| Inactive Delay | Seconds |